• Ciao Guest - You’ve landed at the ultimate Guzzi site. NEW FORUM REGISTRATIONS REQUIRE EMAIL ACTIVATION - CHECK YOUR SPAM FOLDER - Use the CONTACT above if you need help. New to the forum? For all new members, we require ONE post in the Introductions section at the bottom, in order to post in most of the other sections. ALWAYS TRY A SEARCH BEFORE STARTING A NEW TOPIC - Most questions you may have, have likely been already answered. DON'T BE A DRIVE-BY POSTER: As a common courtesy, check back in and reply within 24 hours, or your post will be deleted. Note there's decades of heavily experienced Guzzi professionals on this site, all whom happily give endless amounts of their VALUABLE time for free; BE COURTEOUS AND RESPECTFUL!
  • There is ZERO tolerance on personal attacks and ANY HYPERLINKS to PRODUCT(S) or other competing website(s), including personal pages, social media or other Forums. This ALSO INCLUDES ECU DIAGnostic software, questions and mapping. We work very hard to offer commercially supported products and to keep info relevant here. First offense is a note, second is a warning, third time will get you banned from the site. We don't have the time to chase repeat (and ignorant) offenders. This is NOT a social media platform; It's an ad-free, privately funded website, in small help with user donations. Be sure to see the GTM STORE link above; ALL product purchases help support the site, or you can upgrade your Forum profile or DONATE via the link above.
  • Be sure to see the GTM STORE link also above for our 700+ product inventory, including OEM parts and many of our 100% Made-in-SoCal-USA GTM products and engine kits. In SoCal? Click the SERVICE tab above for the best in service, tires, tuning and installation of our products or custom work, and don't miss our GT MotoCycles® (not) art on the BUILDS tab above. WE'RE HERE ONLINE ONLY - NO PHONE CALLS MADE OR RECEIVED - DO NOT EMAIL AND ASK QUESTIONS OR ASK TO CALL YOU.
  • Like the new V100, GuzziTech is full throttle into the future! We're now running on an all-new server and we've updated our Forum software. The visual differences are obvious, but hopefully you'll notice the super-fast speed. If you notice any glitches or have any issues, please post on the Site Support section at the bottom. If you haven't yet, please upgrade your account which is covered in the Site Support section or via the DONATE tab above, which gives you full site access including the DOWNLOADS section. We really appreciate every $ and your support to keep this site ad-free. Create an account, sign in, upgrade your account, and enjoy. See you on the road in 2024.

New Stelvio arrived

The number(s) I see are 0716 SH089. I have the originals and could try them again. The schematics on the cover seem the same, formatted a bit differently.

What is the Bosch, or an Echlin number for the lighting relay? I could get a replacement for that too but at this point, although it makes no sense I don't think it is the relays.

I should get a chance to fiddle with it this weekend.
 
No idea what those numbers are but they are not an Echlin part numbers that I can find and no idea what the proper Echlin part number should be.

I already gave you the Bosch equivalent for the relay. The HB and Lighting relay are the same relay. They are both 5 pin, no diode.

I thought you said you changed out both the HB and Lighting relay??
 
Yes you had given the Bosh number for the 5 pin. I think I got them at NAPA, and assumed they were Echlin, before I got that number from you. 0 332 209 151 I'll take them back and have them cross reference but I do think they are right.

I had meant to ask yesterday for the number for the Mainenence relay, the 4 pin. Do you have a Bosch number for that. I have not yet tried to replace it.
 
I don't have a Bosch equivalent but it is the same relay as one of the two injector relays on the other side of the bike. You can swap them and see what happens.
 
OK we can finally put bad relays to bed. The 5 pins I got from NAPA were a direct replacement of Bosch 0 332 209 151. I swapped the 4 pin Maintenance relay with an injector relay from the other side. No change.

I want to stress again that everything else seems to work perfectly. To review what does not work. No headlights, hi or low. No driving lights. No charging.

I have checked every connection visible without taking the tank cover or tank off. All are connected, dry and clean. The whole bike is show room looking really. 2013, 580 miles, bought at auction from a Harley dealer, Virginia title, by the yahoos I got it from in Miami.


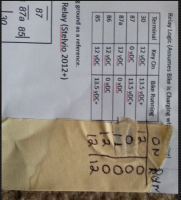
Now back to the first two oddities. There is a voltage drop at the hot side of the 30A fuse. It reads 8.8V and my battery is reading 12.3 on my meter. That drop shows at Lighting logic relay pin 30, of course, with key on. With bike running there is no voltage at that pin. This is two issues and there is no such thing as coincidence but..... I suppose I am going to have to get into that harness and probably the only way to do that is to take it out.

However I had this idea of simply jumping the 30A fuse block to the battery and see if it charges and the lights work as a test. Is there any reason you can think of not to do this? If that doesn't work making a direct jumper to the #30 pin in the lighting relay just to see if I can get the lights and charging to work. To say I hate the thought of getting into that harness is an undertement. Taking it out is one thing but checking every wire would be another. Replacement seems almost impossible unless someone has a wrecked one behind their garage.
 
Last edited:
Good news about the relays.

Go back and read some of my last posts. I wrote about running a jumper from the battery to the green/white wire at the 30 amp fuse.

No real danger in doing that as that is pretty much the route of the wire in the harness. You can leave the 30 amp fuse in place in case that break in the harness ever becomes live again. Make sure you put an inline 30 amp fuse on the new jumper and use at least a 12 gauge wire. For a test it will be fine without a fuse, but if the test works, I would make this a permanent connection with an inline fuse vs trying to fix the harness. The splice is somewhat easy to get to but you may end up doing more damage. I would just leave it alone if it were my bike. Even if the broken splice were to become live again it will not make a difference. You basically have two parallel circuits now and the 40 amp and 30 amp fuse will protect it depending on which way the current is running.

Make sure you check that you have power at the 40 amp fuse holder, both sides. 8vdc is not a valid voltage. That is most likely indicating a poor connect at the splice or voltage back feeding from the relays. If you do not have power at both sides of the 30 amp fuse holder, then do the jumper. If you don't have power at the 40 amp it will get a bit more complicated as I believe that splice will have the splice for the alternator charge circuit that runs back to the battery. The jumper to the 30 amp will work for your lights, but you may not get any charging. Lets hope it does not come down to that.

All that being said, follow the harness from the battery to the 30 amp fuse. Perhaps you will see a rub mark or something.
 
Last edited:
That did it. It's charging and the lights work. I'm only about 80% happy with my wiring job but it will do for sure for now and I did include a fuse. I actually get a chance to ride it for the first time now, since it's April here in Michigan for some reason.

Thanks for the help. I am sure to have many other questions which I will start new threads for.
 
Great news. That is a new one for the Stelvio books. Have never heard of a connection in the wiring harness letting go pretty much right from the factory but congratulations, you are the first.

I would pick up some split plastic loom to put the wire in. That will protect it and make it look good. Just make sure your crimps are tight on all your connectors and taps , tie wrap the wire in place and you are good as new.
 
Congratulations Canuck1969! :clap: What can I say Joe but WOW. That is the finest example of patience and logical working out of an electrical gremlin I have ever seen. :whew: Truly a fine piece of work. I'm hope Rapier realizes how you went above and beyond to help him. Great Job Sir! :nod:
 
Bringing this thread back from the dead.....

Rapier, I think you need to look at this thread.....

https://www.guzzitech.com/forums/th...le-alternator-wiring-short.17351/#post-131097

I helped someone fix a problem with no lights and charging and was able to travel to their home to work on it. After some testing, it was determined that the splice between the 40amp and 30 amp fuse was suspect. The only difference was when we jumped the 30amp fuse to battery there was still no charging which we then probed further.

The screen shot below is from your findings of the lighting relay. This bike had the exact same readings that made no sense at that time given that the 30 amp fuse was not blown. If you remember, you had off and on voltage on that fuse. It too was a 2013 Stelvio


Upload 2017 6 15 8 13 31


What we found was that the splice between the 30 and 40 amp fuse is made at the alternator itself and not in the harness. The crimp had come apart and started building up heat to the point of a bit of a melt down. It was not a clean break until the end when the wire turned to dust.

I suspect your bike has the exact same issue, but the break in the wire was clean and never caused another issue and you kept charging and lights with the jumper...not yet.

Give the thread a read and I would pull the tank and inspect that connector on the alternator. I think you may find the same thing, but to a lesser degree. There is a way to check the resistance between the 30 and 40 amp fuses that I detail at the end. Just make sure if you decide to do that you need to remove your jumper to the 30 amp fuse.

Personally, I would just remove the tank and inspect the wire. You will know for sure that way.
 
I am in Colorado now 1 week into a month long trip. No abnormalities after 3500 miles.
 
I am in Colorado now 1 week into a month long trip. No abnormalities after 3500 miles.

Your issues sounded very similar to mine. I actually used this thread to troubleshoot the issues I was having. When things became even stranger I reached out to canuck1969 and together we went through the troubleshooting. Luckily we live realtively close to each other.
Both wires (40 Amp to battery and 30 Amp to Lighting) are crimped on the same ring connector right at the alternator output. Those two wires come together at the crimp onto the terminal. Mine lasted almost 10,000 miles before I started seeing trouble and strange things regarding charging. Never got stranded because I began to troubleshoot and keep an eye on it.

When you get home, remove your gas tank and take a look at the alternator. Pull back the boot and take a look at the wires. If you see any green powder (like we did) it's the source of your trouble. It will be very obvious.

After a new ring terminal and good crimp on both wires my charging was instantly back and better than before (Full 14.1 v - 14.2 v)

Simple fix. And Peace of Mind.

The whole setup of that circuit, battery charging and lighting onto the relays, is very simple. Now I have the whole thing committed to memory.
 
Back
Top