MotoZA
Tuned and Synch'ed
So I changed my plugs and caps on my Stelvio NTX last night, it took me about 30 minutes (I work slowly). I thought I'd post this as there are a few long forum threads about the different plug cap options and it can become a bit confusing. Here are some notes and pics of what I used and what I did. I rode to work in pouring rain this morning (36 km) -- no problems -- so the below works.
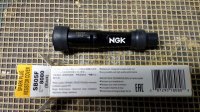
I could only get hold of SB05F caps (ideally I would've opted for SD05F caps, since their rubber boots fit better over the small diameter plug). The 'F' means it's for threaded plug ends, so you have to unscrew the little aluminium nipple on the plug. The cap itself screws into the plug cord. I tugged lightly on the plug caps after screwing them in to make sure they're gripping and won't come loose. BTW, my cords were long enough, no mods were needed.

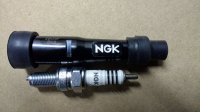
The plug (CR8EIX) next to the cap (SB05F):

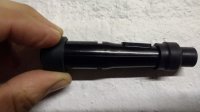
Notice the two slots in the body of the cap: if the caps are installed correctly (by simply rotating the caps correctly when screwing them onto the cords), you can pry them out from the front of the cylinder head with a long enough flat point screwdriver by engaging one of the slots.

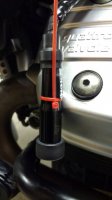
Since I don't like to bank on being able to successfully access those slots with a long, thin screwdriver, I also use the old cable tie trick, as shown below. Notice that the NGK logo boss provides a nice shoulder for the cable tie to not slip when pulling on the other cable tie.

And that really is it, now push the caps back onto the plugs (you should feel and hear the caps slip onto the plug as the cap's contact wire slips over the tread on the plug).
I could only get hold of SB05F caps (ideally I would've opted for SD05F caps, since their rubber boots fit better over the small diameter plug). The 'F' means it's for threaded plug ends, so you have to unscrew the little aluminium nipple on the plug. The cap itself screws into the plug cord. I tugged lightly on the plug caps after screwing them in to make sure they're gripping and won't come loose. BTW, my cords were long enough, no mods were needed.

The plug (CR8EIX) next to the cap (SB05F):

Notice the two slots in the body of the cap: if the caps are installed correctly (by simply rotating the caps correctly when screwing them onto the cords), you can pry them out from the front of the cylinder head with a long enough flat point screwdriver by engaging one of the slots.

Since I don't like to bank on being able to successfully access those slots with a long, thin screwdriver, I also use the old cable tie trick, as shown below. Notice that the NGK logo boss provides a nice shoulder for the cable tie to not slip when pulling on the other cable tie.

And that really is it, now push the caps back onto the plugs (you should feel and hear the caps slip onto the plug as the cap's contact wire slips over the tread on the plug).
