• Ciao Guest - You’ve landed at the ultimate Guzzi site. NEW FORUM REGISTRATIONS REQUIRE EMAIL ACTIVATION - CHECK YOUR SPAM FOLDER - Use the CONTACT above if you need help. New to the forum? For all new members, we require ONE post in the Introductions section at the bottom, in order to post in most of the other sections. ALWAYS TRY A SEARCH BEFORE STARTING A NEW TOPIC - Most questions you may have, have likely been already answered. DON'T BE A DRIVE-BY POSTER: As a common courtesy, check back in and reply within 24 hours, or your post will be deleted. Note there's decades of heavily experienced Guzzi professionals on this site, all whom happily give endless amounts of their VALUABLE time for free; BE COURTEOUS AND RESPECTFUL!
  • There is ZERO tolerance on personal attacks and ANY HYPERLINKS to PRODUCT(S) or other competing website(s), including personal pages, social media or other Forums. This ALSO INCLUDES ECU DIAGnostic software, questions and mapping. We work very hard to offer commercially supported products and to keep info relevant here. First offense is a note, second is a warning, third time will get you banned from the site. We don't have the time to chase repeat (and ignorant) offenders. This is NOT a social media platform; It's an ad-free, privately funded website, in small help with user donations. Be sure to see the GTM STORE link above; ALL product purchases help support the site, or you can upgrade your Forum profile or DONATE via the link above.
  • Be sure to see the GTM STORE link also above for our 700+ product inventory, including OEM parts and many of our 100% Made-in-SoCal-USA GTM products and engine kits. In SoCal? Click the SERVICE tab above for the best in service, tires, tuning and installation of our products or custom work, and don't miss our GT MotoCycles® (not) art on the BUILDS tab above. WE'RE HERE ONLINE ONLY - NO PHONE CALLS MADE OR RECEIVED - DO NOT EMAIL AND ASK QUESTIONS OR ASK TO CALL YOU.
  • Like the new V100, GuzziTech is full throttle into the future! We're now running on an all-new server and we've updated our Forum software. The visual differences are obvious, but hopefully you'll notice the super-fast speed. If you notice any glitches or have any issues, please post on the Site Support section at the bottom. If you haven't yet, please upgrade your account which is covered in the Site Support section or via the DONATE tab above, which gives you full site access including the DOWNLOADS section. We really appreciate every $ and your support to keep this site ad-free. Create an account, sign in, upgrade your account, and enjoy. See you on the road in 2024.

Norge Windscreen and Peg Options

I have used my credit card quite a few times with Chinese companies. No problems so far. :wait: If possible I do it through PayPal using my credit card for double protection since I don't really trust PayPal to stand behind a problem.
However, if that is really a turn off price the entire assembly from Honda online. I checked Ron Ayers online and with the springs and shipping they were $72 of which $6 was the springs so not a lot more than China and you get OEM Honda. Currently my friend in the Gold Wing club thinks he has a line on some so I'll wait a few days before I order.

The Honda dealer price is about $100 (PER SIDE). I might be wrong, but the Ron Ayers price of $72 is most likely for one side. If it's for both, good deal for sure.
 
The Honda dealer price is about $100 (PER SIDE). I might be wrong, but the Ron Ayers price of $72 is most likely for one side. If it's for both, good deal for sure.
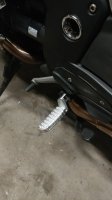
I purchased the pair for $72 ($72.21 with shipping). I priced them at several other online sites and they were lowest cost with shipping. Having worked at a Honda dealer and having owned and still own several Honda's I am used to their pricing.
I might have wanted just one side if I was going to race flat track with it!
 
Another plus to the GW pegs is the stock shifter and brake toe pieces work. I had added an offset toe piece to my rear brake lever so I could reach it. With the peg install I put the OEM back on. I thought I might need it for the shifter since I lowered the pegs enough that I didn't need it for the brake but I was able to adjust the stock toe piece to work. Coupled with the Corbin seat my bike is much more comfortable to ride.
 
Here are the Ulysses pegs I just installed on my Norge. Quite a bit lower but they also transmit a bit more vibration. They are also a lot wider, such that I find myself occasionally hitting them with the back of my leg when lifting my feet from a stop. Had to grind some material off the right side to clear the brake pedal. I was hoping to reuse the stock springs but they're too short to work.

The brake is now at the perfect height. Just placing the weight of my foot on the pedal will slow the bike down. Much less activation/reaction time and way more leverage now. For the shifter, I lowered it by one spline and shifting is almost identical to before the footpeg swap.

As previously mentioned, the sidestand hits the peg but I don't mind. In fact, I prefer it, as the rubber isolator for the sidestand spring no longer gets burned by the exhaust pipe. One photo shows the approximate installed height of the stocker to give you an idea of the height difference. I paid $36 per side from St Paul HD. 20190316 002700 20190316 002909 20190316 002928
 
Old post I know, but would these footpegs fit and have the same effect on a 2008 Norge? And does anyone know the part number for the related springs?

FootPegs: Gold Wing Pegs......................... I think the Italian Designers have little legs........... Or they like a super tight seating position. Seems like this is the case on all current MG's with the exception of the Stelvio or Cali, and even the Cali is tight for a big cruiser. Too tight for me. I have the KD Knight pegs on my Griso and find them FUGLY......... But it is a Thug so dont mind it. Not so on the Norge....... I want to keep the clean look and lines and design, so I wanted to keep the silver peg and black rubber. If you look at the stock pegs on the newer Norges, you will see that it has a 1"+ block of rubber. After looking around, I found a set of 2005 Goldwing Pegs, they are flat, quality construction, have a small drop and are much thinner, give a little wider surface for stability and are over an inch lower, look great, and without all the complications of lowering the brake and shift lever. Plus they are $50. I found a set on sleaze bay, but these are just like them.
 
Installed the goldwing pegs and windscreen and both really make a huge improvement. Measuring from the floor to the top of the rubber, the Stock peg was about 15 5/8" The Goldwing pegs measure 14 3/8" so about 1 1/8" inch drop and really feels so much more comfortable. No interference with the side stand and no need to adjust the brake or shift levers. The gap between the pin and peg is too large for the spring to work, so will need to address this in the future.
Looking to do the same thing on my 2014 Norge. Do u have any close up pics of the new pegs installed? Thanks
 
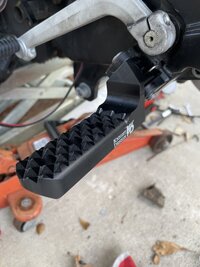
im getting ready to start this project. i have the goldwing pegs but i have a set of knightdesign pegs coming too.
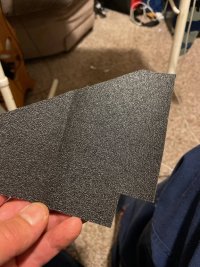
has anybody tried filling in the stock peg channel with jb weld and put 3m nonskid tape over it. might try that first. my knees have been takin a beating with stock peg height. if your 6 foot or over this is a must do
 

Attachments

  • IMG_4285.JPG
    IMG_4285.JPG
    49.7 KB · Views: 3
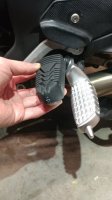
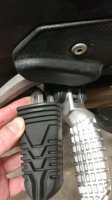
I found brand new GL1800 pegs that the Honda owner removed in favour of Foot Boards. I bought the pair for $35.00 CDN! I discovered that RS Honda spring fits in perfectly on the Norge LS. The LS Honda spring requires a hole to be drilled on the Norge RS. See photos.
i ordered springs from revzilla. ebay was to expensive.
 
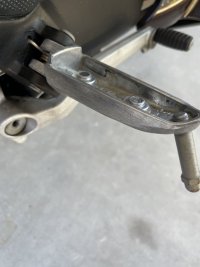
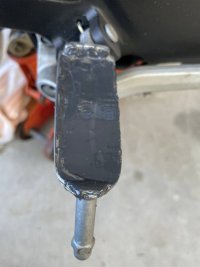
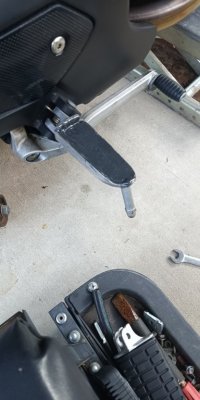
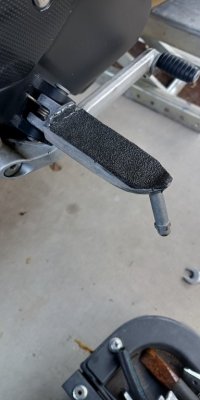
here is first prototype
thinking about hooping o-rings on the peg also
 

Attachments

  • IMG_20221019_174616_548.jpg
    IMG_20221019_174616_548.jpg
    64.7 KB · Views: 10
  • IMG_20221019_174728_316.jpg
    IMG_20221019_174728_316.jpg
    44.1 KB · Views: 10
the knight design drop pegs bolt right up. only fun you will have to try to load torsion spring while pushing pin thru to capture it. i cursed quite a bit
 
Back
Top