• Ciao Guest - You’ve landed at the ultimate Guzzi site. NEW FORUM REGISTRATIONS REQUIRE EMAIL ACTIVATION - CHECK YOUR SPAM FOLDER - Use the CONTACT above if you need help. New to the forum? For all new members, we require ONE post in the Introductions section at the bottom, in order to post in most of the other sections. ALWAYS TRY A SEARCH BEFORE STARTING A NEW TOPIC - Most questions you may have, have likely been already answered. DON'T BE A DRIVE-BY POSTER: As a common courtesy, check back in and reply within 24 hours, or your post will be deleted. Note there's decades of heavily experienced Guzzi professionals on this site, all whom happily give endless amounts of their VALUABLE time for free; BE COURTEOUS AND RESPECTFUL!
  • There is ZERO tolerance on personal attacks and ANY HYPERLINKS to PRODUCT(S) or other competing website(s), including personal pages, social media or other Forums. This ALSO INCLUDES ECU DIAGnostic software, questions and mapping. We work very hard to offer commercially supported products and to keep info relevant here. First offense is a note, second is a warning, third time will get you banned from the site. We don't have the time to chase repeat (and ignorant) offenders. This is NOT a social media platform; It's an ad-free, privately funded website, in small help with user donations. Be sure to see the GTM STORE link above; ALL product purchases help support the site, or you can upgrade your Forum profile or DONATE via the link above.
  • Be sure to see the GTM STORE link also above for our 700+ product inventory, including OEM parts and many of our 100% Made-in-SoCal-USA GTM products and engine kits. In SoCal? Click the SERVICE tab above for the best in service, tires, tuning and installation of our products or custom work, and don't miss our GT MotoCycles® (not) art on the BUILDS tab above. WE'RE HERE ONLINE ONLY - NO PHONE CALLS MADE OR RECEIVED - DO NOT EMAIL AND ASK QUESTIONS OR ASK TO CALL YOU.
  • Like the new V100, GuzziTech is full throttle into the future! We're now running on an all-new server and we've updated our Forum software. The visual differences are obvious, but hopefully you'll notice the super-fast speed. If you notice any glitches or have any issues, please post on the Site Support section at the bottom. If you haven't yet, please upgrade your account which is covered in the Site Support section or via the DONATE tab above, which gives you full site access including the DOWNLOADS section. We really appreciate every $ and your support to keep this site ad-free. Create an account, sign in, upgrade your account, and enjoy. See you on the road in 2024.

Replacing Stock Stelvio Plug Caps With NGK SB05E

leafman60

Cruisin' Guzzisti
Joined
Jan 7, 2009
Messages
219
Location
Pensacola, FL
Problems are associated with the stock sparkplug caps on the Stelvio and other 8V motors.

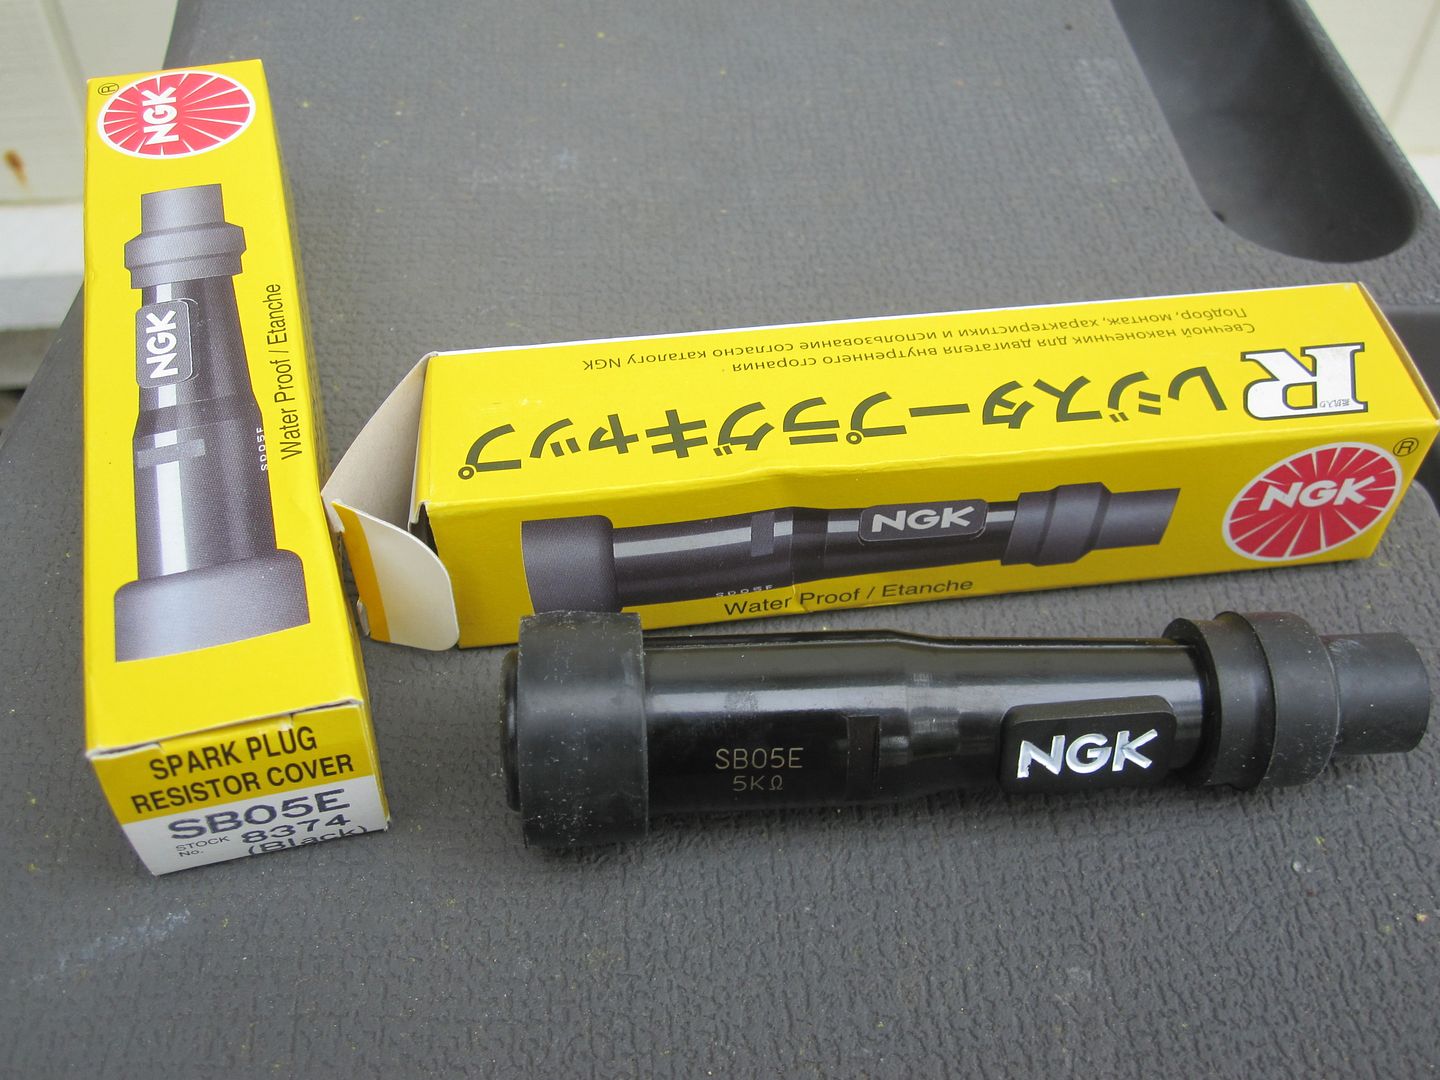
Commonly-used replacement spark plug caps are NGK SB05E. If found, SD05E should fit tighter around the plug insulator and provide a better weather seal. Likewise, the sealing boot from an SD05F threaded terminal type cap can be installed on the SB05E to provide proper tight fit on the plug.


You do not need to remove any of the side covers of the bike for this operation. I did not need any wires longer than the stock leads and I did not need to re-route the stock leads.

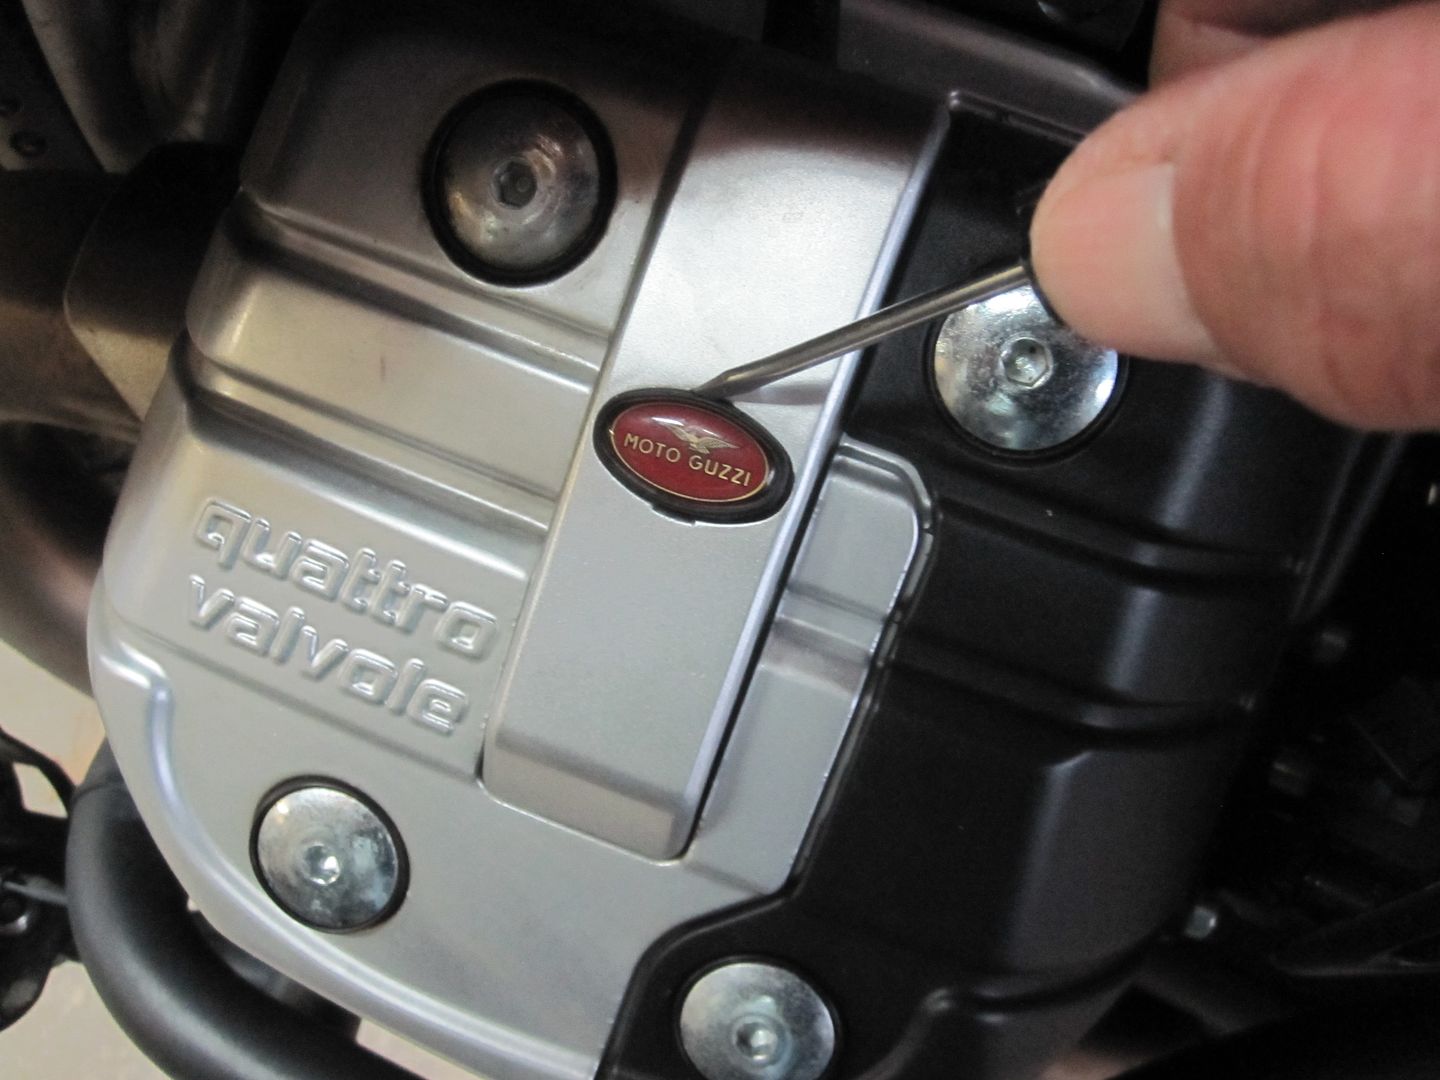
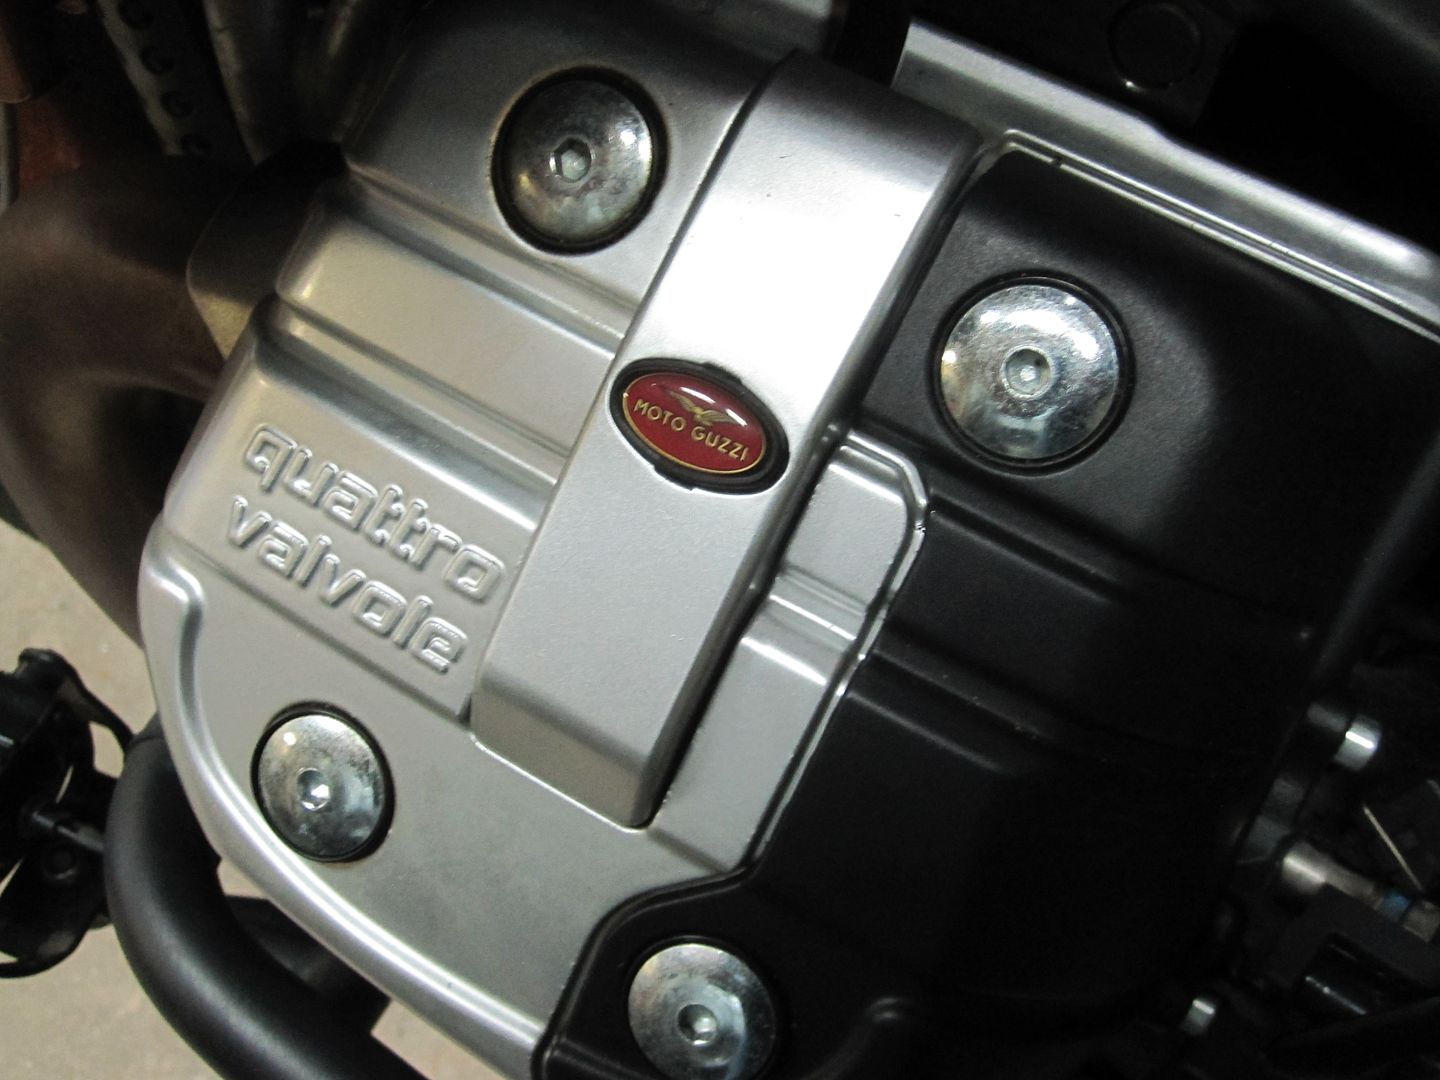
First, remove the snapped-in MG logo badge with a small screwdriver or similar pry.


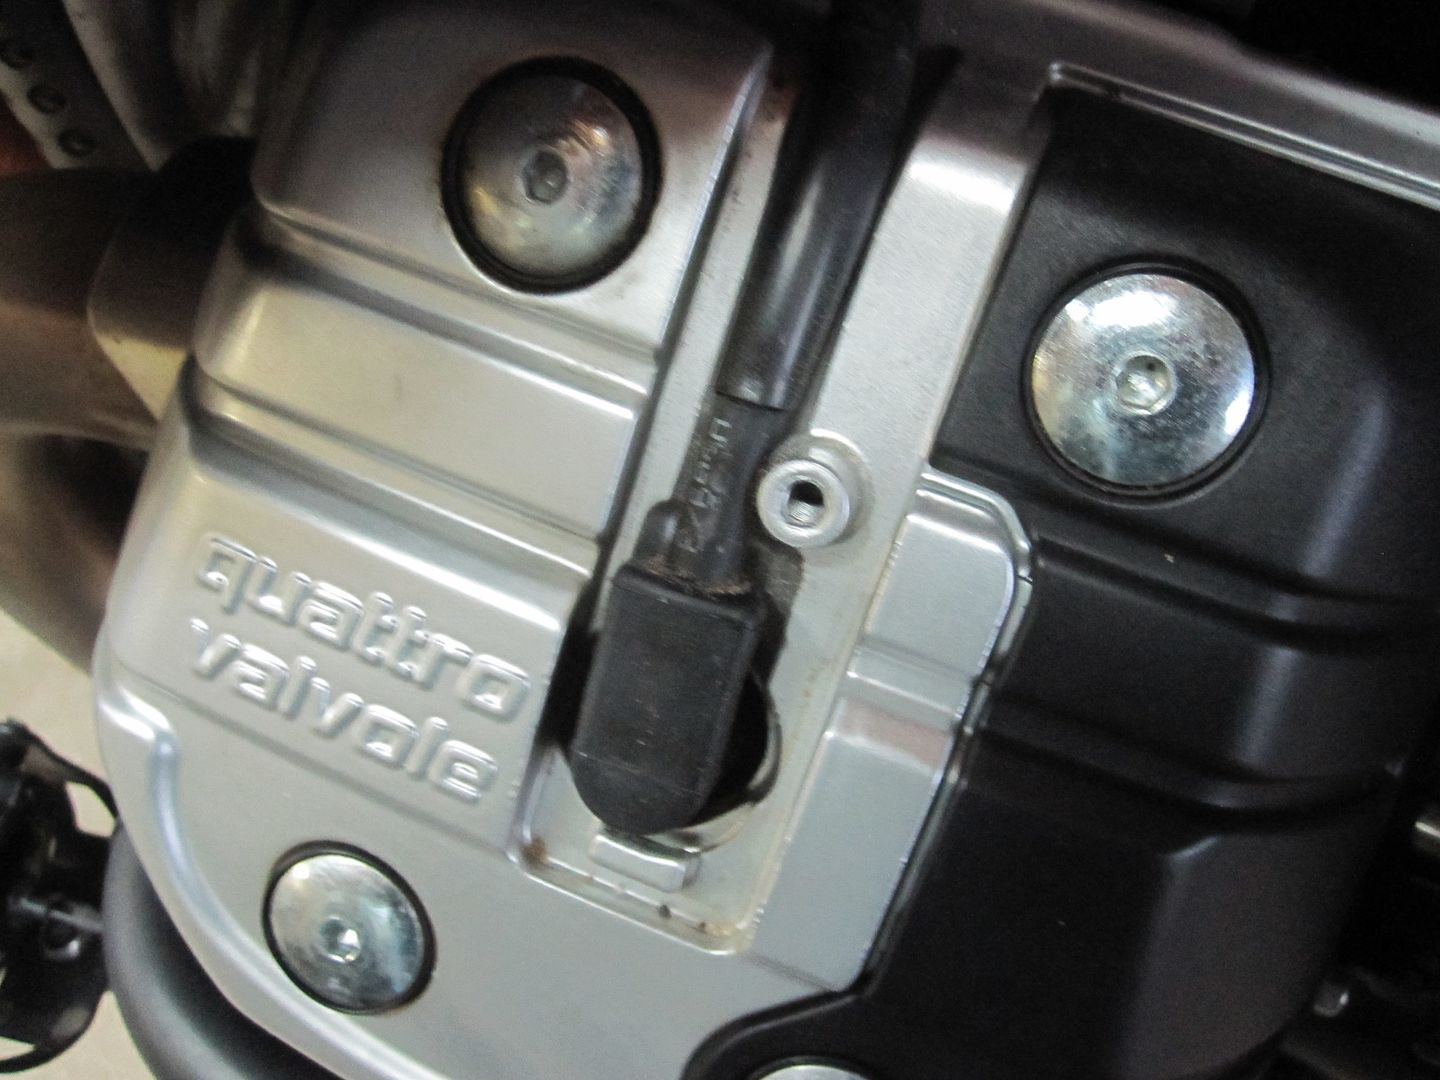
Remove the screw that holds the silver wire cover.


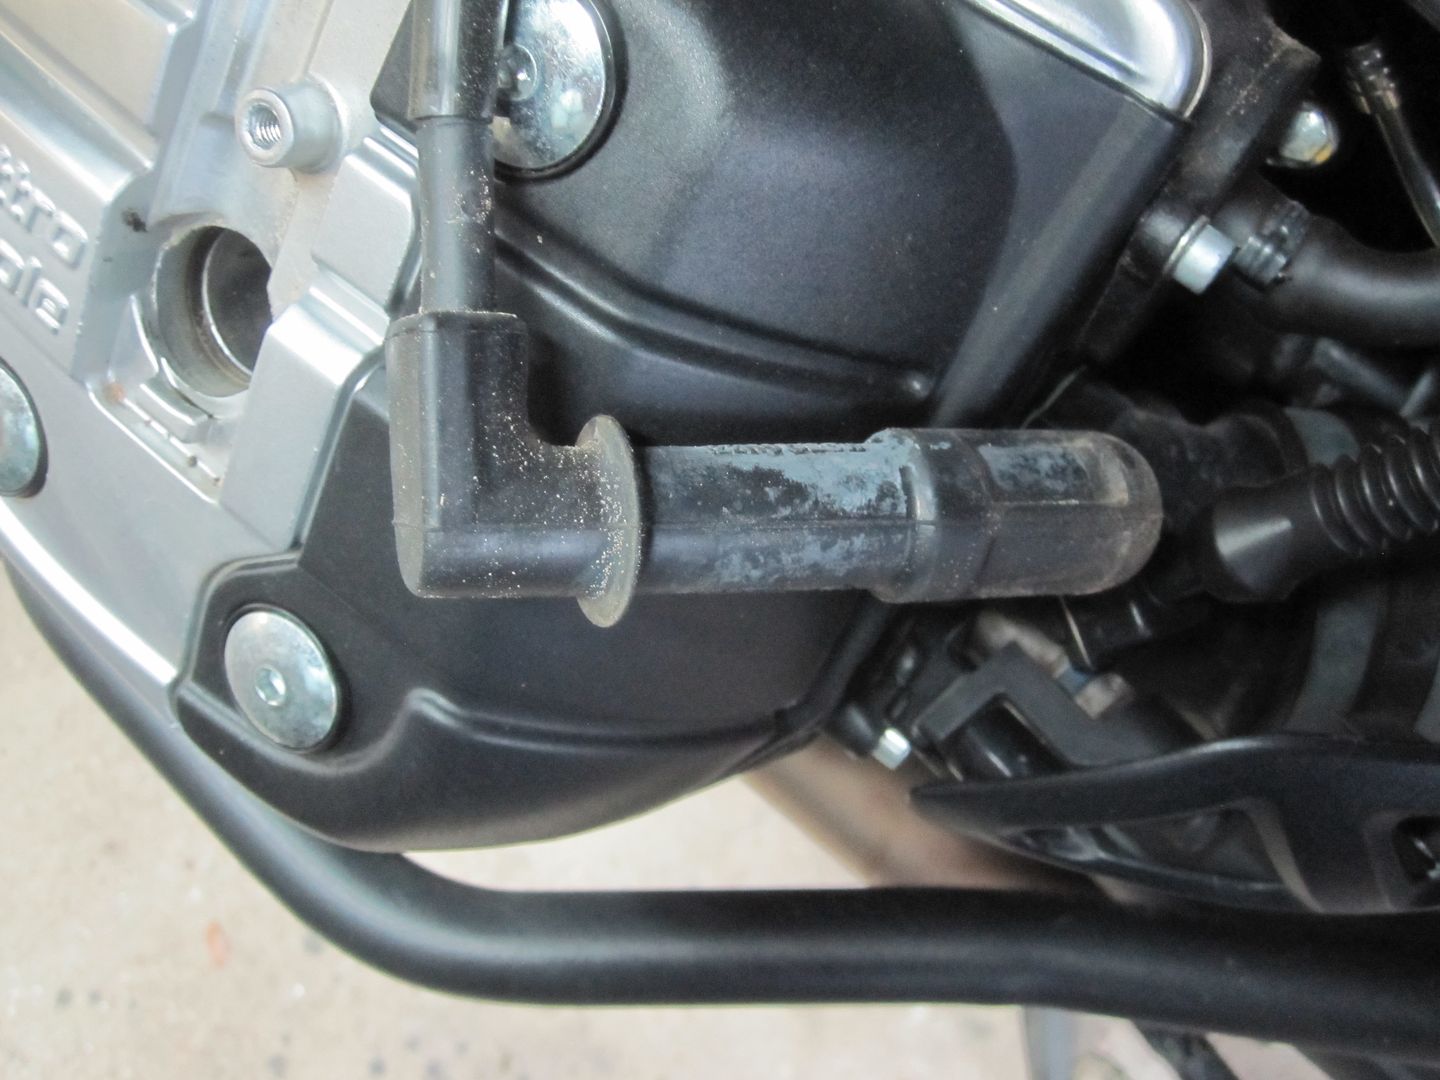
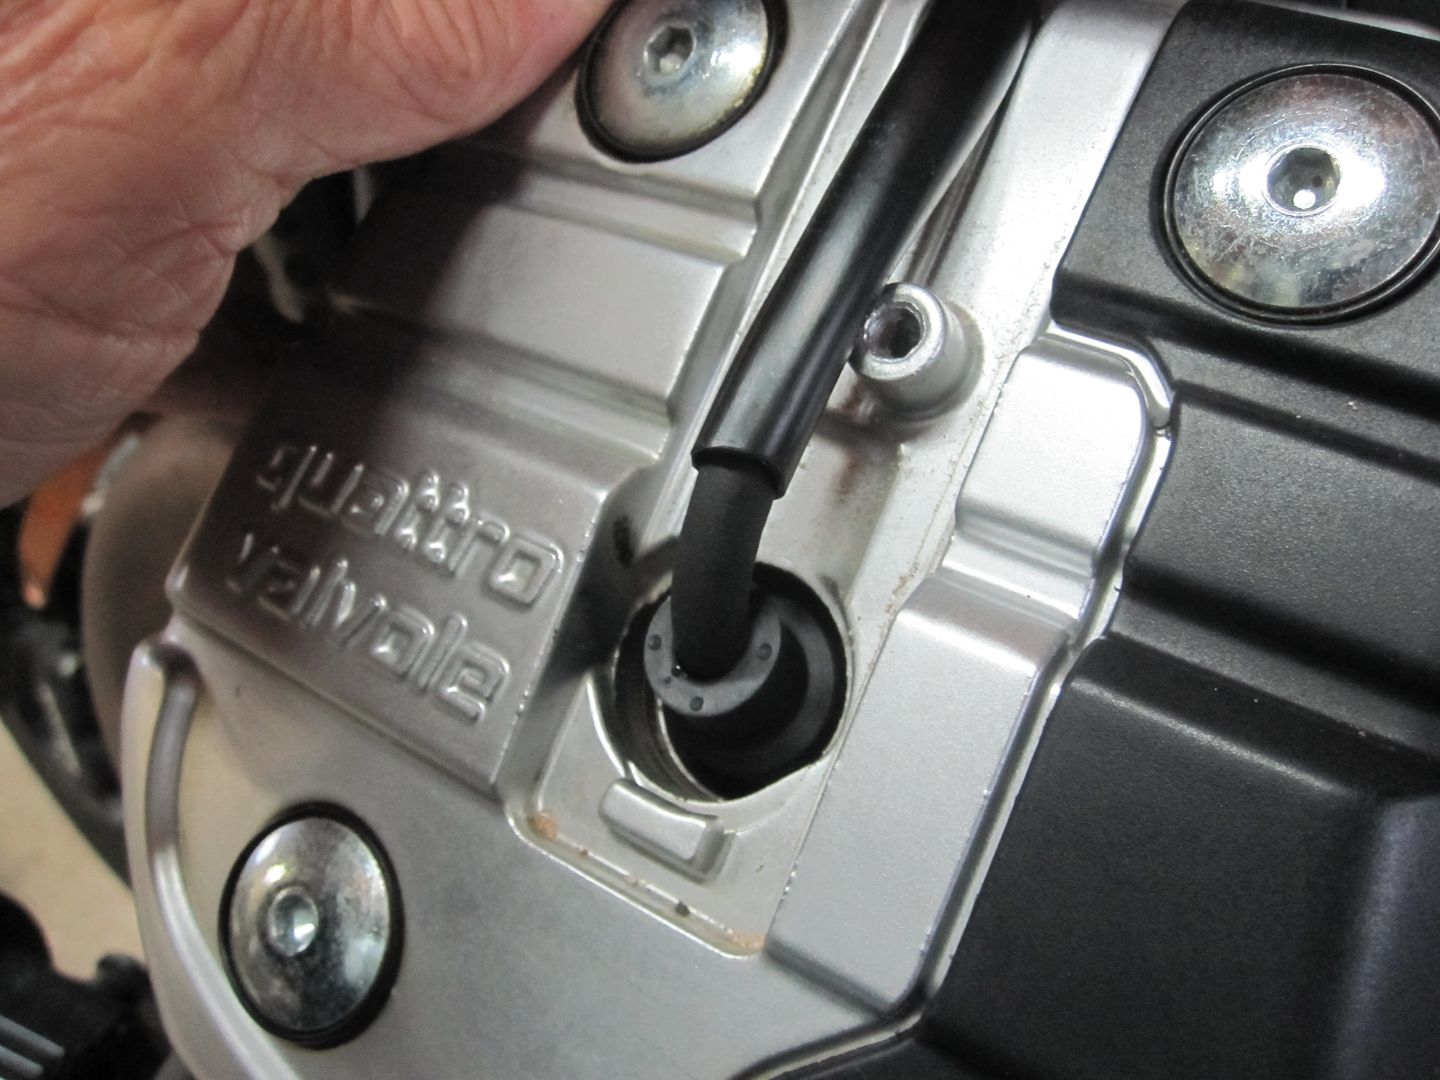
The stock spark plug boot cap is exposed.


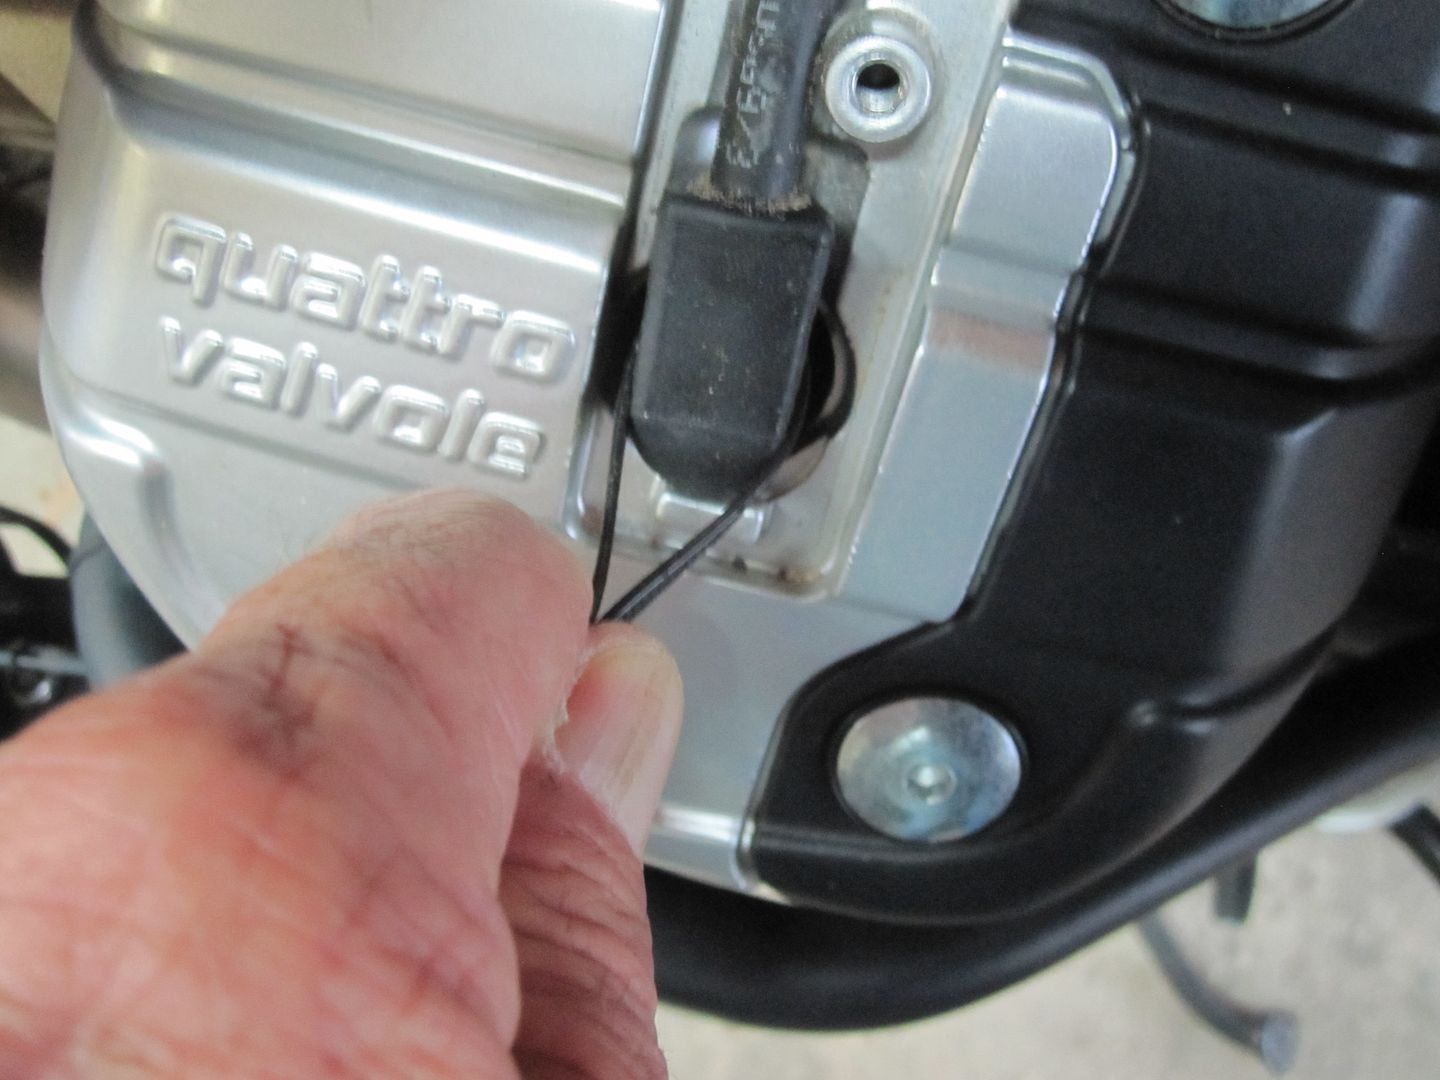
Pull the boot cap off the spark plug. I typically use a nylon tie wrapped around the boot.
It should come off easily. The Guzzi manual says to use a screwdriver inserted through the exhaust port cooling fins to pry up on the bottom of the boot.


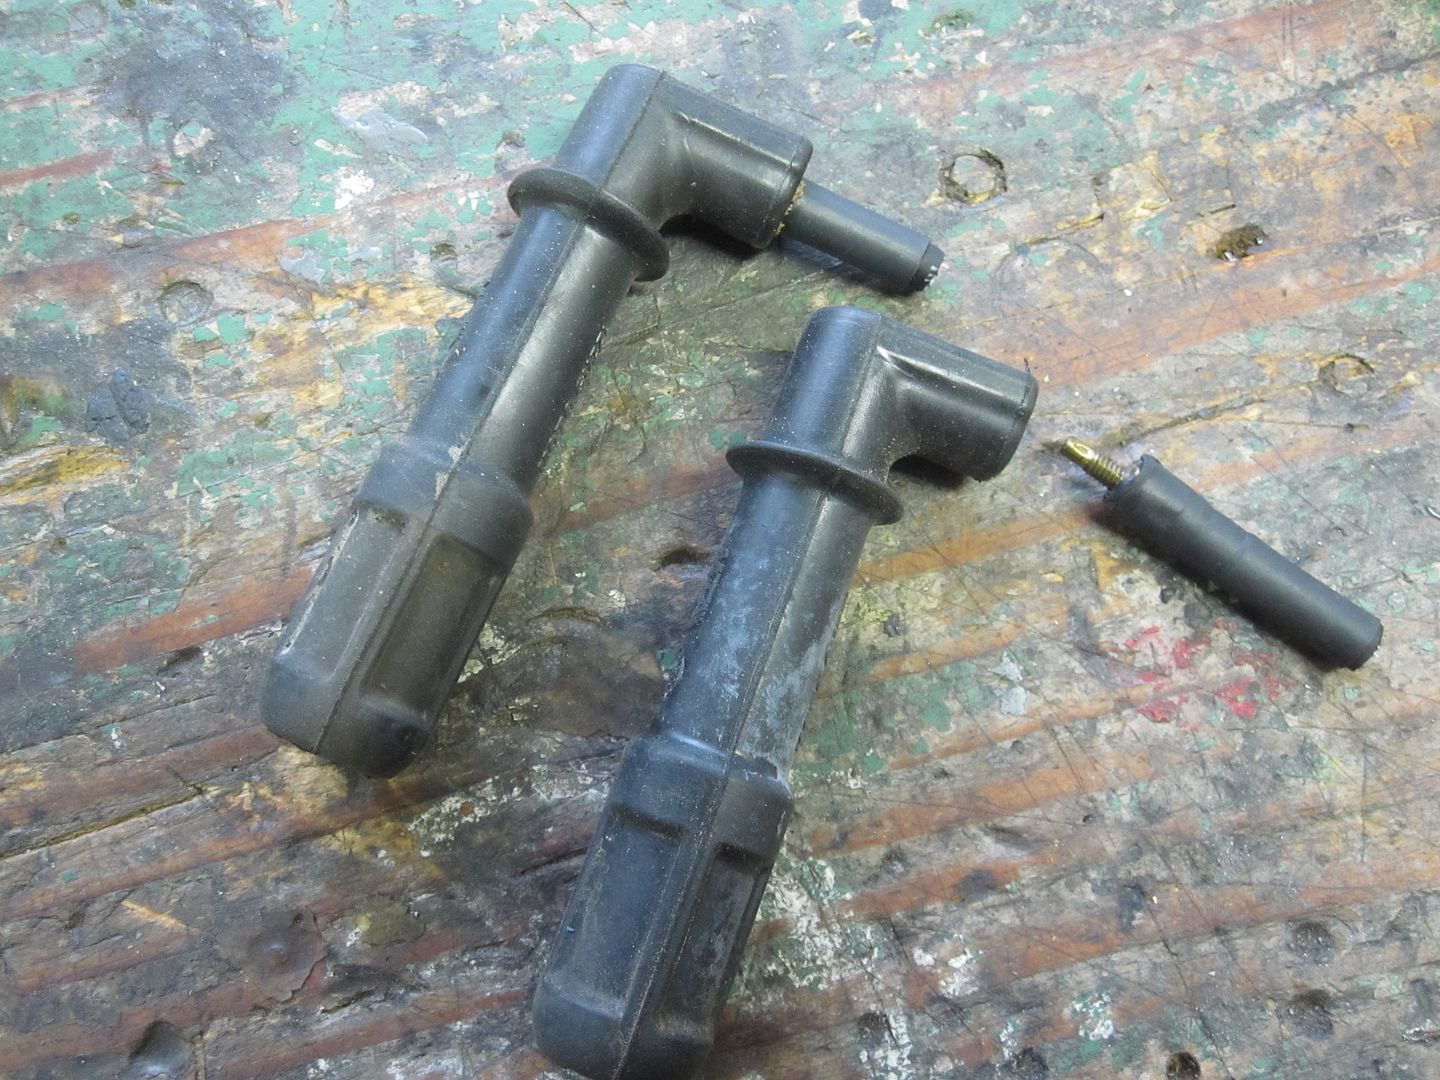
If you wish to remove the wire lead from the boot before cutting it, grasp the wire firmly and screw it out from the rubber boot. The brass threads of the wire terminal end is obvious.


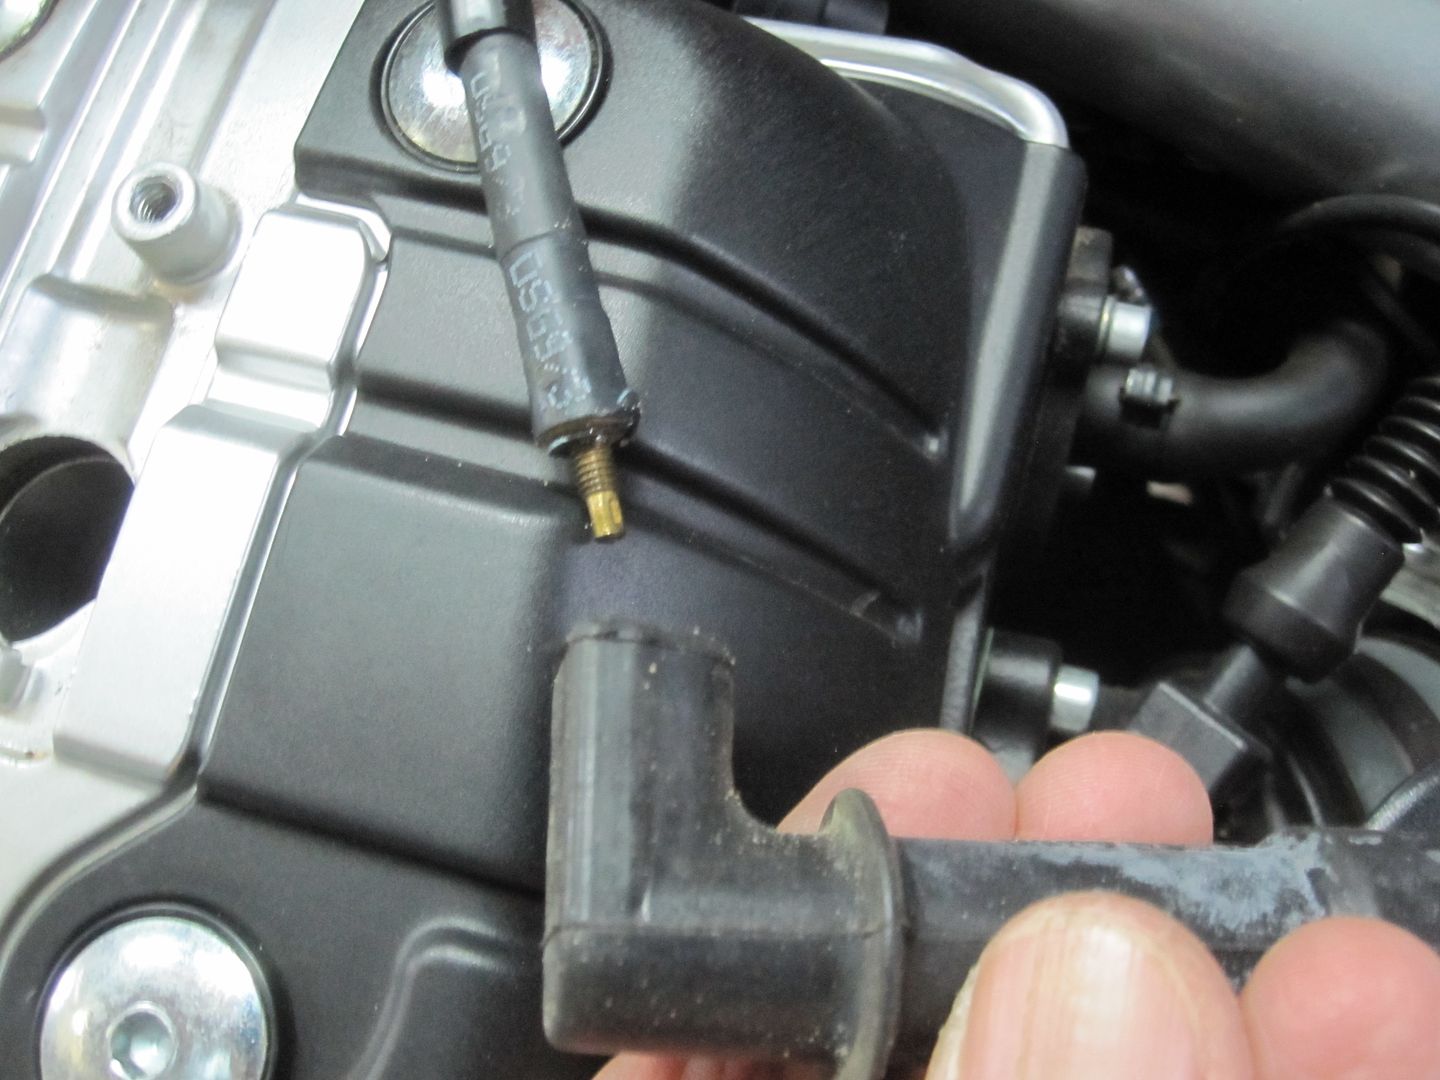
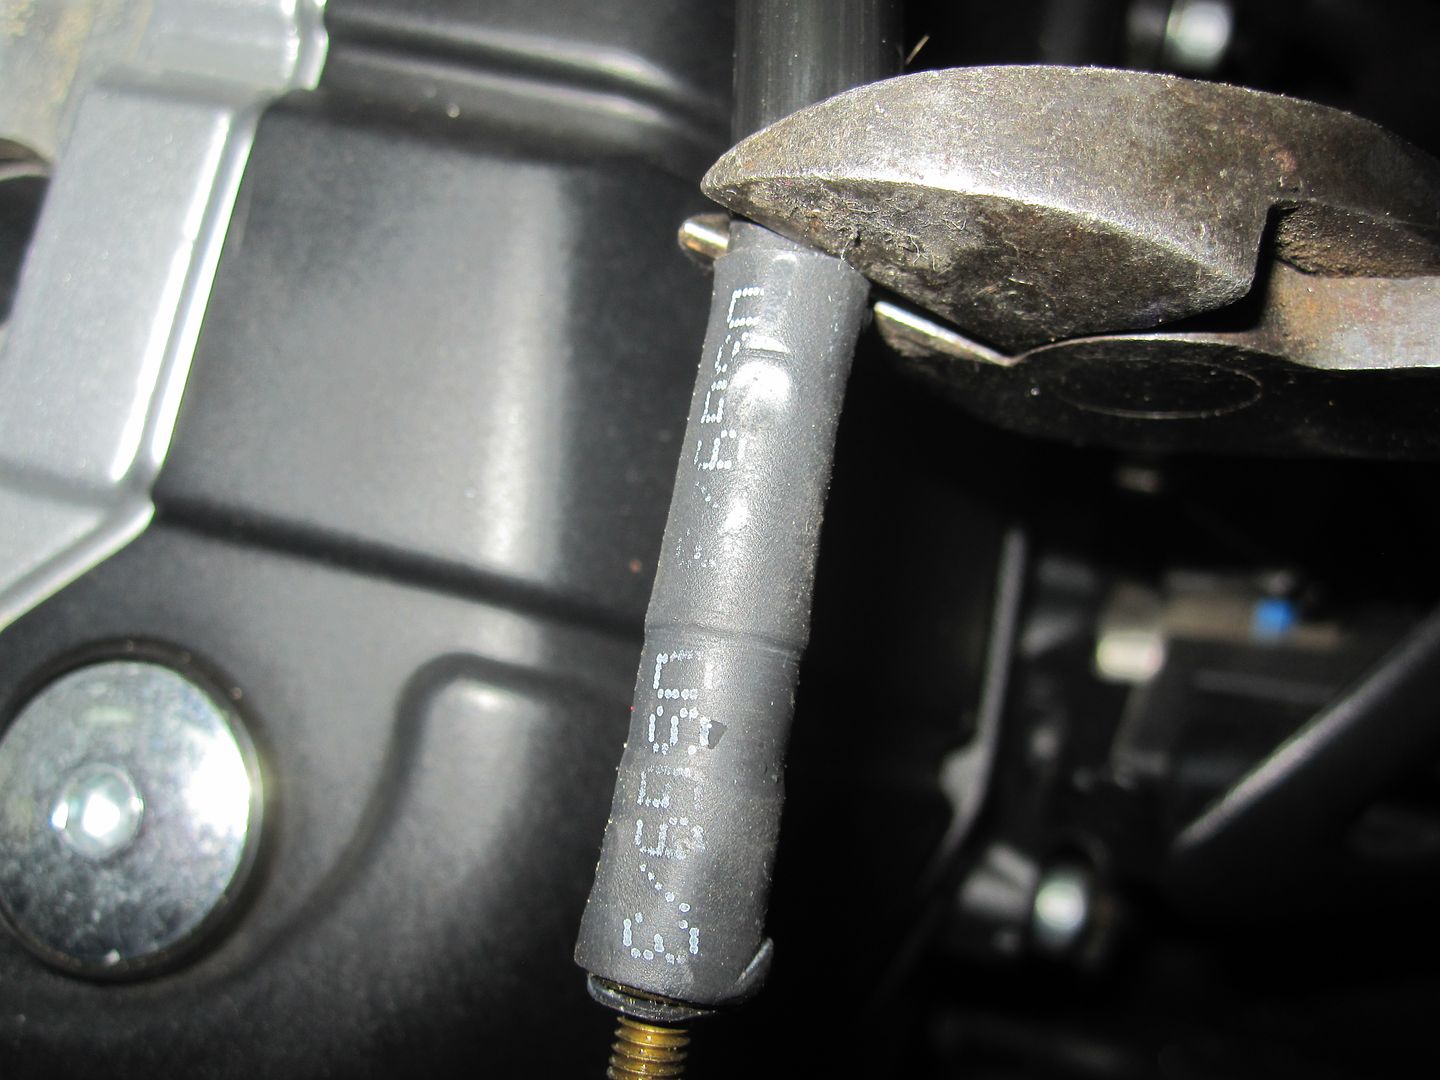
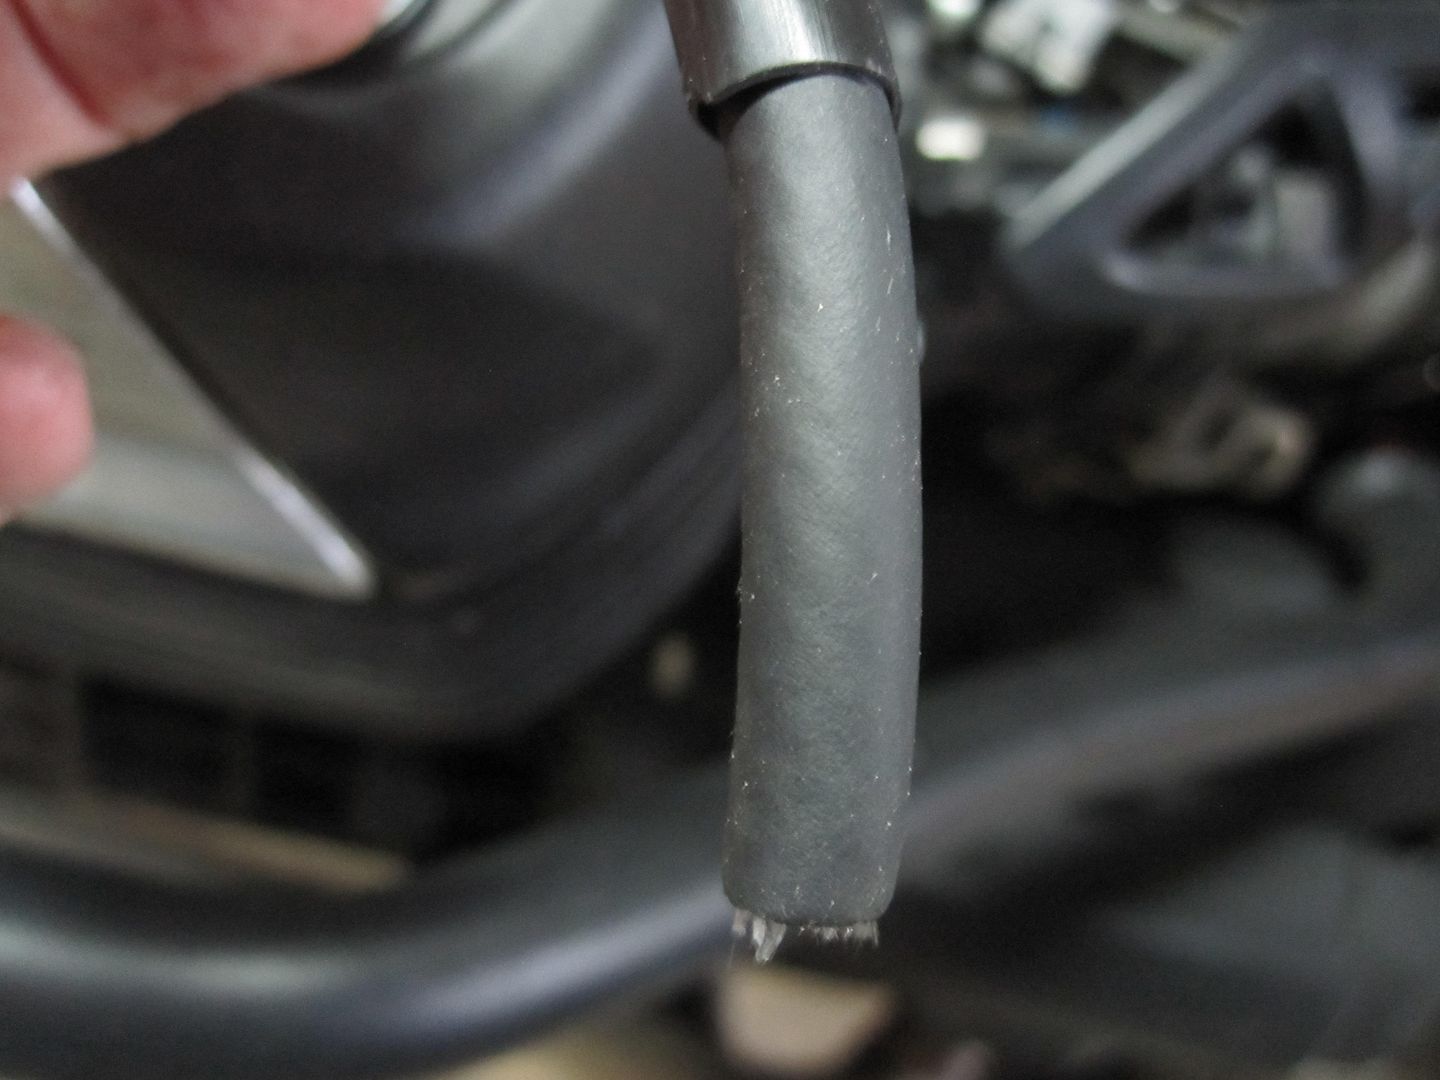
Cut the stock wire above the shrink-fit covering of the terminal end.


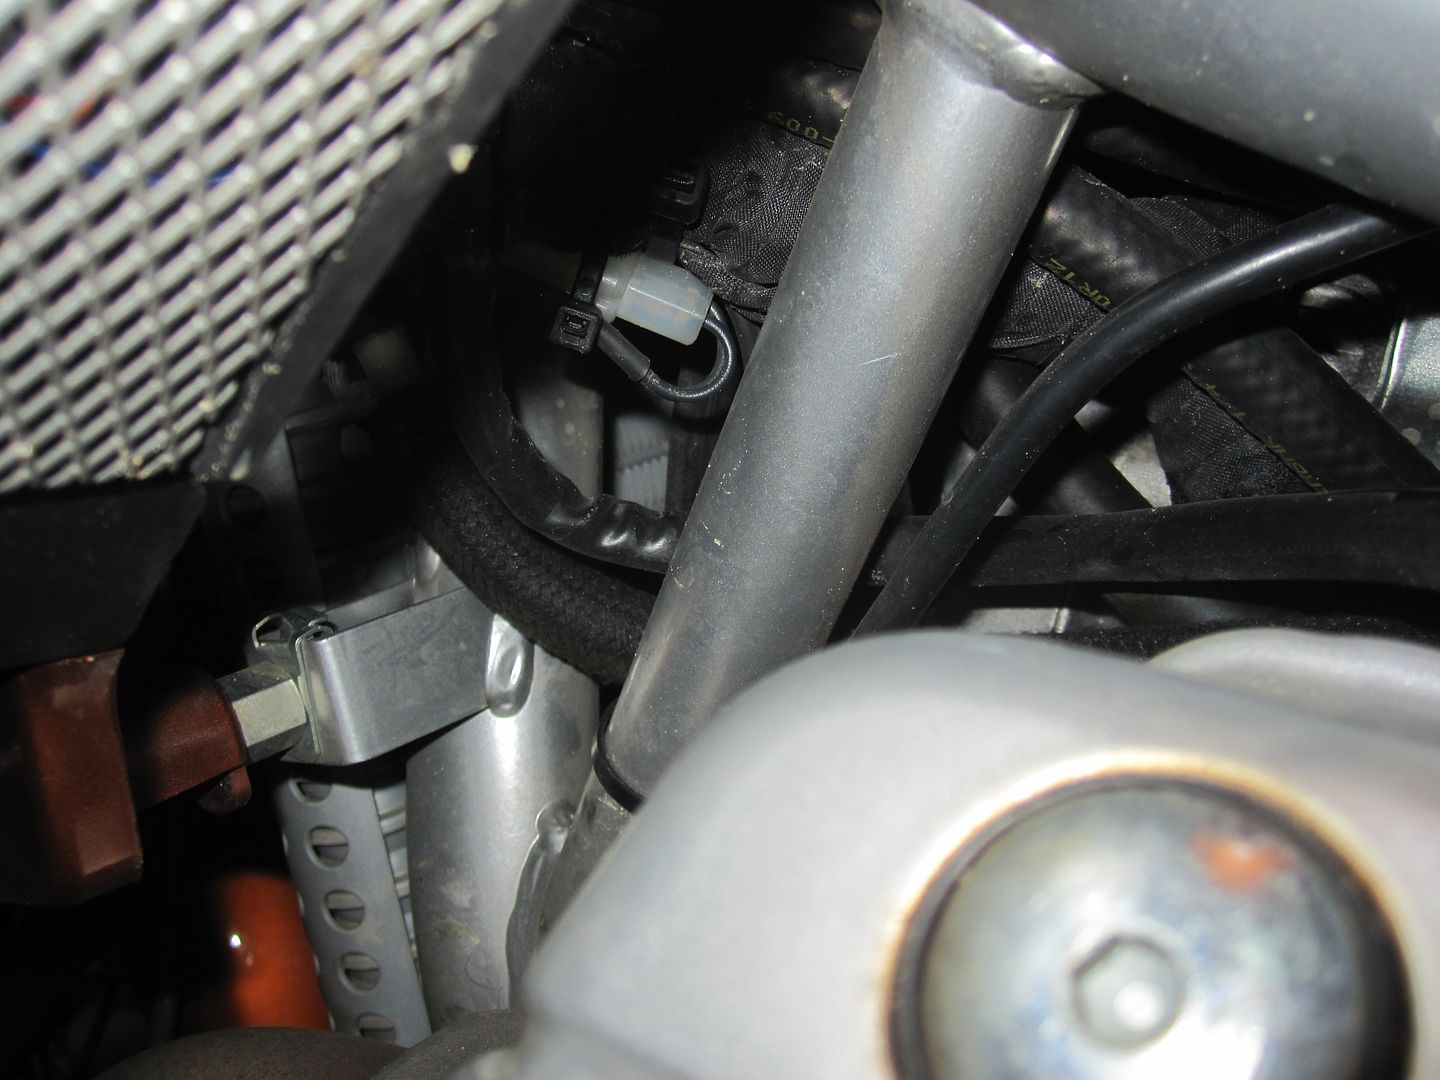
Check the length of the wire to verify that it is long enough to reach to the top of the plug well. My Stelvio had more than enough wire on both left and right cylinder to easily reach the plug well. If the left side is too short, you can re-route the wire around the frame member, shown here near the coil, to gain more slack.


Note that the plug wire is routed inside a protective plastic conduit. While performing this task, I discovered one of my conduits filled with water. To make sure water will drain from the conduit and to give enough wire exposure for fitting the new spark plug cap, cut back the protective conduit about an inch and a half or 35-40 mm.


I suggest removing the weather seal boot from the NGK cap instead of trying to insert the wire through it.


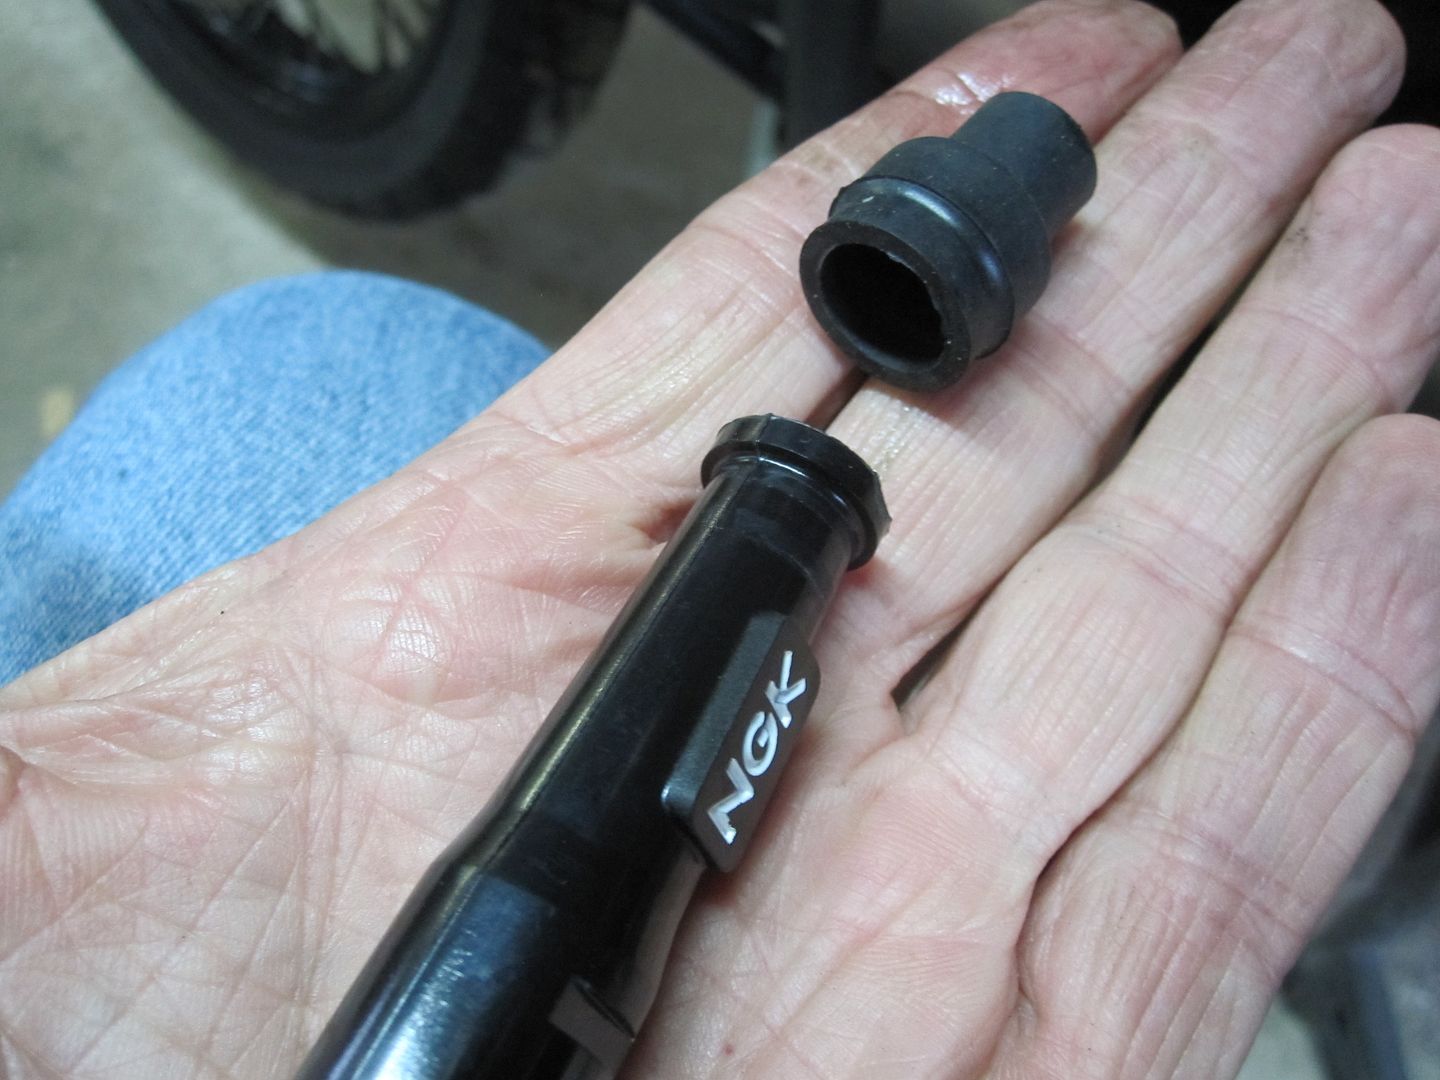
The wire end of the NGK replacement cap showing the male threads that go up into the plug wire end in order to make electrical contact.


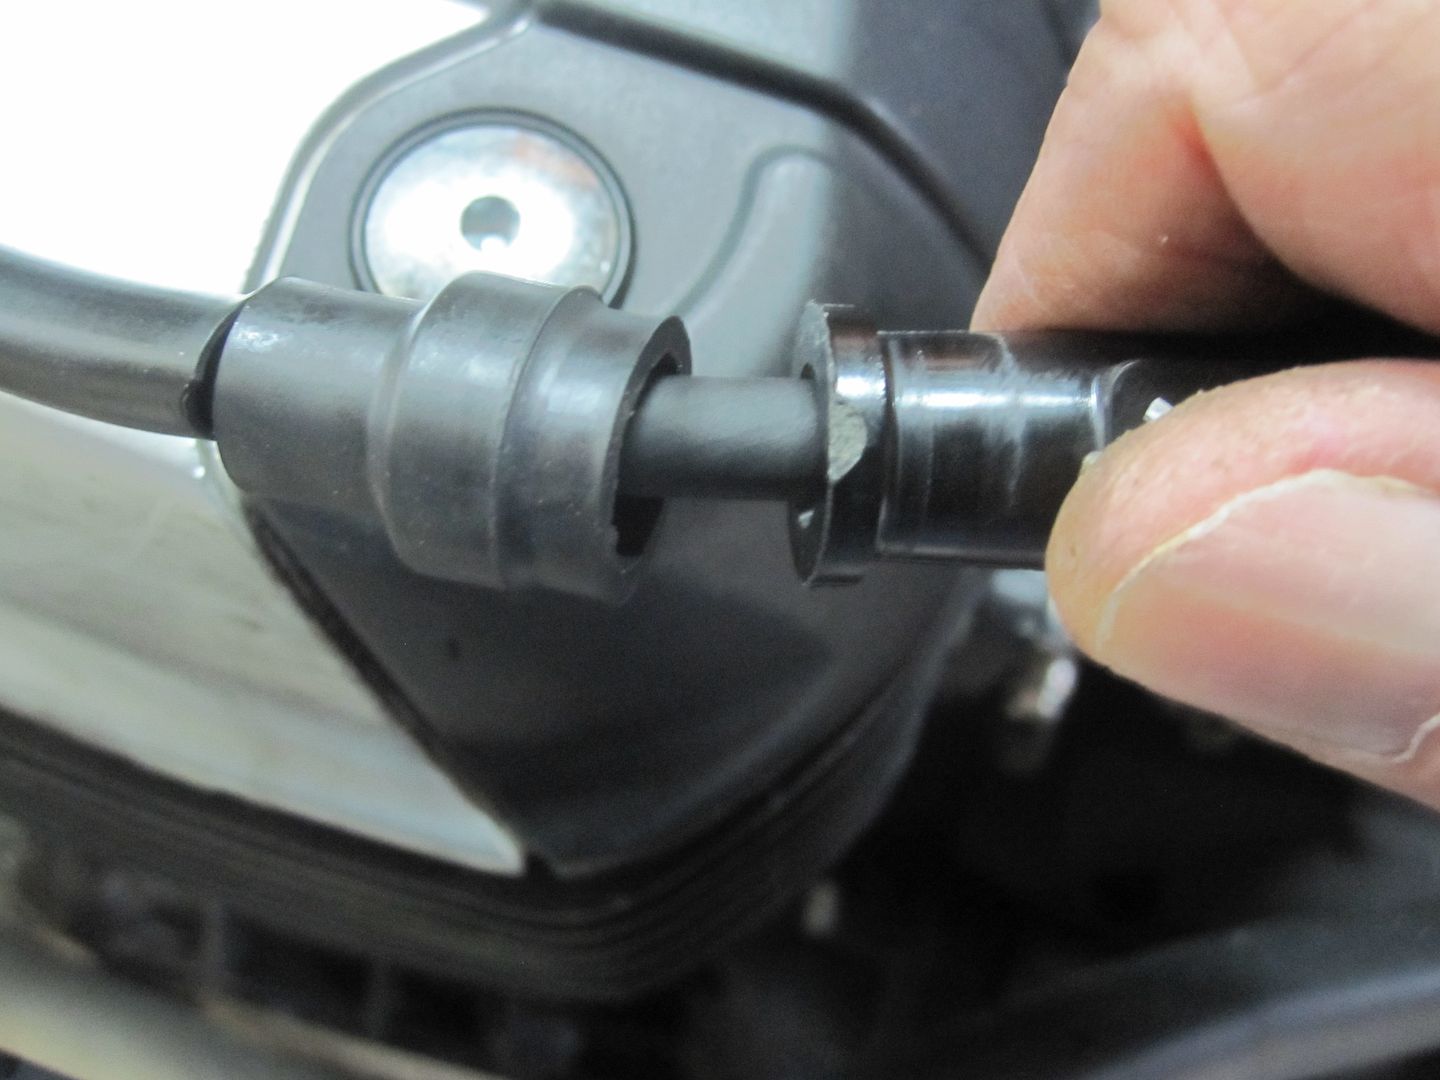
Slip the sealing boot onto the plug wire. Then, hold the wire and cap firmly. Insert the wire end into the cap and screw the wire onto the male threads inside the cap. The male threads screw up into the metal wire conductor in the center of the insulated plug wire.


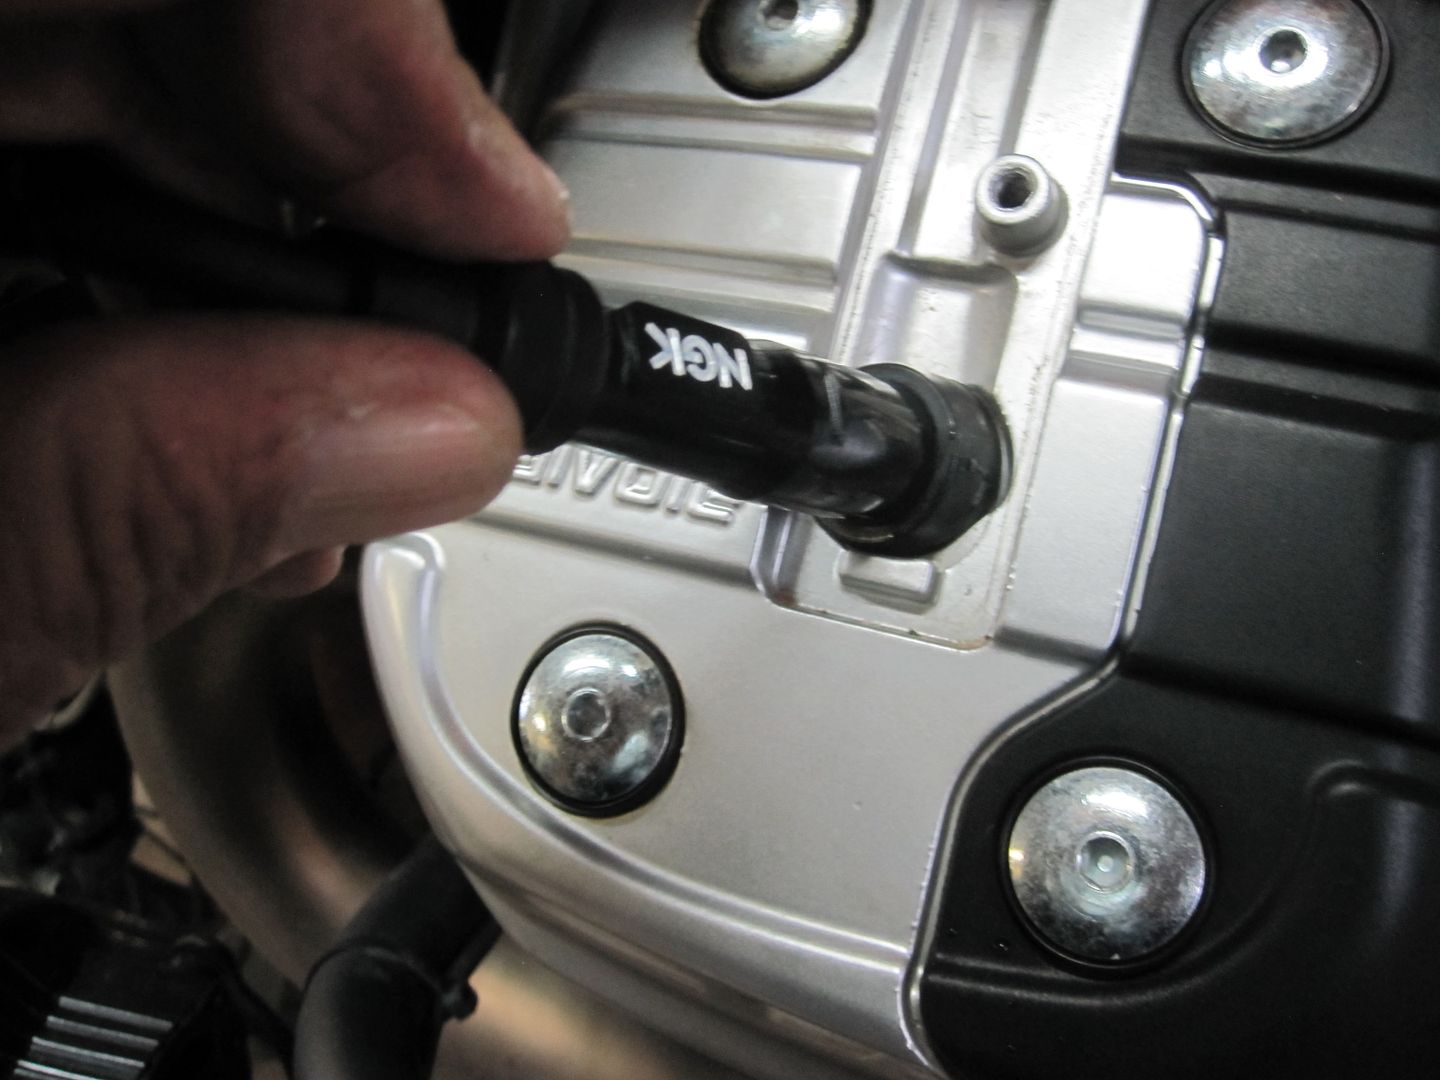
Work the rubber sealing boot onto the plastic plug cap and insert the cap down into the valve cover until it snap snugly onto the spark plug. A small amount of dielectric grease on the plug insulator or the inside of the sealing boot will help.


Fit the wire down into the holding area and install the silver cover with the small screw and reinstall the snap-in MG logo piece. A good idea is to apply some silicone or glue under the logo badge to make sure it does not vibrate out.


I actually bought those from Todd but have yet to install them. Question here for me is; Won't the removal process advocate putting extra strain on the wire itself? With the proper 90 degree version you would be pulling at the hard corner and pulling on hard plastic. I know the supposed correct method is to slide a slotted screwdriver in the hole between the fins and pry up but I much rather liked the idea of seeing what you are pulling on.
 
I am going to cut-open one of the stock wire ends and caps to see where the problem was. Looks like the stress break, if that is what it was, may be in the terminal end of the stock wire where you can feel the hard parts that extend up from the stock male threaded stud on the wire. It's either that or the female connection on the stock boot cap. Of course, it could be a short through the insulator material of the cap around the spark plug terminal.

An added point is that I do not believe the problem with the stock set-up is from improper removal of the caps. My caps were never removed by pulling on the wires. Further, this last episode looks like a failure of a new cap that had replaced the original failed cap. This replacement cap had never been removed.

I am theorizing that the failure may be due to vibration in much the same way that the notorious errant auxiliary lighting wires abrade and break with time. If so, the breaking point is not the flexible wire conductor itself but some weak point in the hard parts used at the terminal connections.

The NGK cap is a simpler design. You eliminate the hard terminal end and stud on the stock wire. As with old-fashioned plug wires, the simple NGK threaded stud screws directly up into the wire end. Even if you put some stress on the wire when removing the NGK cap, I don't believe you'd risk the kind of problem experienced with the stock caps.

Removing the NGK cap is not difficult. I'd recommend trying the screwdriver-through-the fins trick first to push up from the bottom. I have not tried it yet but a nylon tie may could be attached to the top of the NGK as a grab tab.

You can also work up the cap with a pry on the top sealing boot that is firmly attached to the NGK cap. Again, a little pressure on the wire will most likely not create a hard break somewhere. As a safety measure, Id always give the NGK caps a little twist before reinstallation to make sure the connector screw was firmly in the wire end.

Point is, I know of no failure reports from several people who have used the NGK caps.

Now, is there a cap even better than the NGK SB05E? Maybe. NGK makes a 90 degree version but it is not imported to north America and it is difficult to find. A few folks in europe who have used it say the SB05E would have been just as good or better.

Of most interest to me was a set of BMW wires. Having owned many BMW bikes in recent times, I remembered the wires on the 1100- 1150 series before BMW went to spark plug situated coils that eliminated traditional plug wires. I'm thinking a set of wires and caps from, say, an 1150GS MAY work.

The BMW wires are all made up with a boot cap connector on the end. BMW also sells, as you'd expect from BMW, a special little plastic tool gadget that attaches to the plug cap and allows you to pull it off. See, they try to think of everything.

My local BMW dealer had none in stock for me to try but the parts diagram makes me think it may work. It may fit. If anyone has access to a BMW wire from the 1100-1150 series, try it on the Guzzi. I don't remember if the plug stud is threaded or push-on. I am curious if the BMW boot cap fits inside the Guzzi plug well.

If they work, that's another choice. Of course, be aware that two of them will cost you about $170 from BMW.

For now, I'll try the $3 NGK SB05E that seems to work just fine.
 
leafman60 said:
Of most interest to me was a set of BMW wires. Having owned many BMW bikes in recent times, I remembered the wires on the 1100- 1150 series before BMW went to spark plug situated coils that eliminated traditional plug wires. I'm thinking a set of wires and caps from, say, an 1150GS MAY work.

The BMW wires are all made up with a boot cap connector on the end. BMW also sells, as you'd expect from BMW, a special little plastic tool gadget that attaches to the plug cap and allows you to pull it off. See, they try to think of everything.

.

Blasphemer! You'd create an abomination? :eek:
I'm picturing you at the top of your castle tower screaming, "It's alive, It's alive!" :woohoo:
 
Nice write up Leafman. I do better with pictures. Thanks.

One question, Any idea how well the wire will stay attached? It looks like you must pull on the wire to disengage it from the spark plug.
 
RonStelvio said:
One question, Any idea how well the wire will stay attached? It looks like you must pull on the wire to disengage it from the spark plug.

I was thinking the same, there's not much to grab onto with that NGK cap.

I was thinking maybe a set of slim sparkplug pliers?

spin_prod_221356601


The other thing I was thinking about was making a pull loop that was tied to the cap, maybe from fishing line or ???

Let us know how you guys are safely pulling them out.
 
danketchpel said:
RonStelvio said:
One question, Any idea how well the wire will stay attached? It looks like you must pull on the wire to disengage it from the spark plug.

I was thinking the same, there's not much to grab onto with that NGK cap.

I was thinking maybe a set of slim sparkplug pliers?

spin_prod_221356601


The other thing I was thinking about was making a pull loop that was tied to the cap, maybe from fishing line or ???

Let us know how you guys are safely pulling them out.

You aren't supposed to 'pull' them out from above. You are supposed to push them up from underneath. A long screwdriver into the opening over the exhaust pipe will pry it off with no harm. Pulling them from above is what damages them in the first place.
 
Wayne Orwig said:
You aren't supposed to 'pull' them out from above. You are supposed to push them up from underneath. A long screwdriver into the opening over the exhaust pipe will pry it off with no harm. Pulling them from above is what damages them in the first place.
OK, gotcha.

Thanks for the clarification. I didn't realize there was sufficient room to do that, it's a much better method.
 
Got a small issue.

Picked up the SB50EP variety in Canada since the non "P" variety is not available here. Heard of many guys putting these in, however, the boot on the end of the plug is larger and does not fit in the plug hole. Does this just need to be forced in or just removed. I removed it for now and the bike runs perfectly fine....actually sounds better than before so I may have had an issue.

Any help would be greatly appreciated
 
When I did this mod I fastened a wire tie (zip tie) to each plug cap and folded it down under the cover, next time I needed to pull them it worked a treat.

windy
 
danketchpel said:
Wayne Orwig said:
You aren't supposed to 'pull' them out from above. You are supposed to push them up from underneath. A long screwdriver into the opening over the exhaust pipe will pry it off with no harm. Pulling them from above is what damages them in the first place.
OK, gotcha.

Thanks for the clarification. I didn't realize there was sufficient room to do that, it's a much better method.

I am not sure removal of the plugs caps without pulling on the wires is the sole culprit in cap failure. I've had two caps fail. The first one was never pulled except by using a nylon ties secured around the rubber boot.

This was replaced by Steve at Riders Hill. Then, about 3000 miles later, this replaced cap has apparently failed even though it has never been removed !

I am suspecting that engine vibration may have something to do with it. I hope to dissect a failed cap to see where and what the damage could be.

I've actually tried the screwdriver trick originally. Another friend tried it and ended up cutting into the rubber boot where it seales around the plug insulator.
 
canuck1969 said:
Got a small issue.

Picked up the SB50EP variety in Canada since the non "P" variety is not available here. Heard of many guys putting these in, however, the boot on the end of the plug is larger and does not fit in the plug hole. Does this just need to be forced in or just removed. I removed it for now and the bike runs perfectly fine....actually sounds better than before so I may have had an issue.

Any help would be greatly appreciated


Yes, canuck IS on to something here. The much-used SB05E does not snugly fit and seal around the plug insulator. The plugs used with the Stelvio are 10 mm, not 14 mm. SD is for 10-12 mm, SB is for 14mm.

The SD is apparently very hard to find, though. I'm gonna look further into this and see if I can procure a reasonable source.

This is an SB05E installed on a Stelvio CR8EKB plug. It looks tight and it is close but there is a small space between the rubber sealing boot and the plug insulator. Water could penetrate.


This is an SB05E WITHOUT the sealing boot installed on the CR8EKB plug.
 
Not sure what to think anymore on these caps. Have the SB installed without the boot and seems to be working fine. The plugs on the earlier Stelvio's is also 10mm since the alternate plug for them is the same as the plug on the 12+ (CR8EKB).

Tried with the water hose again yesterday while I was washing it. Sprayed with the hose into the drains above the exhaust port with the motor running. Water was pouring out the opposite side and again, not a hiccup. I don't think water intrusions will be an issue from the rain. Don't suspect humidity will cause any problems also. Only thing I can see is if some dirty gets under the cap and then gets wet from humidity. Could find a path of lease resistance but have heard from some guys with the "P" version of the cap (needed to remove boot) and they have not reported any issues to date

This would only happen without the boot. Don't think a slightly over sized boot would be susceptible to dirt. At least if it starts to hiccup I know where to look.
 
I couldn't get the plug cap to pop off using the screwdriver. I could see the spark plug & cap through the port that is just above the exhaust pipe. But I couldn't get it to slide off the plug. :( Ended up using the zip-tie under the cap tip.

I did something different that what others have done. Seeing that the cap unscrews from the wire gave me a idea. I separated the two and inserted some heat-shrink tubing over the part of the cap that is 90 degrees to the plug. Re-installed the wire and the shrunk the tubing in place with the heat gun. The extra insulation should help... We'll see how this works long term.
 
RonStelvio said:
I couldn't get the plug cap to pop off using the screwdriver. I could see the spark plug & cap through the port that is just above the exhaust pipe. But I couldn't get it to slide off the plug. :( Ended up using the zip-tie under the cap tip.

I did something different that what others have done. Seeing that the cap unscrews from the wire gave me a idea. I separated the two and inserted some heat-shrink tubing over the part of the cap that is 90 degrees to the plug. Re-installed the wire and the shrunk the tubing in place with the heat gun. The extra insulation should help... We'll see how this works long term.

Good idea with the shrink tube. Every little bit will help. Only problem is that it does not always arc at the 90. Saw one today that had been replaced and it was arcing near the bottom of the boot. Once it finds an opening, it only gets worse.

As for the screw driver, took me a few tries to finally get it. With me, it needs to be a thin long screw driver. Just make sure you are not putting it in the hole that is actually part of the exhaust port bracket. This too will go to the plug but it is too small to move around. Use the port directly above the port bracket. It is actually in the fins. Goes right through to the other side of the jug.
 
I just got word from an NGK dealer that the SD05E is not available in the US. The SD05F IS available. It is the same as the SD05E except the cap is designed for threaded spark plug terminals. I'm ordering a pair of SD05F caps. I will remove the lower rubber seals from the SD caps and install them on my SB05E caps on the Stelvio. That way, I will have a good, tight moisture seal around the plug insulator. This may be overkill.

Pics will come later.
 
Okay, here we go.

The sealing boot of the SB05E does not fit tightly around the stock Stelvio spark plug.


The proper cap would be an SD05E but they are not available in US. The solution is to swap a smaller sealing boot from an SD05F cap (that is available) onto the SB05E. The SD05F will not fit the terminal of the stock plug but its boot fits tightly around the stock plug.


Boots are easily swapped between the SB05E and SD05F


A little dielectric grease will help installation of cap onto plug


A grab tab can be fashioned to the cap to facilitate removal later


Inserting new cap into plug well may require slight working but it fits easily
 
Back
Top