• Ciao Guest - You’ve landed at the ultimate Guzzi site. NEW FORUM REGISTRATIONS REQUIRE EMAIL ACTIVATION - CHECK YOUR SPAM FOLDER - Use the CONTACT above if you need help. New to the forum? For all new members, we require ONE post in the Introductions section at the bottom, in order to post in most of the other sections. ALWAYS TRY A SEARCH BEFORE STARTING A NEW TOPIC - Most questions you may have, have likely been already answered. DON'T BE A DRIVE-BY POSTER: As a common courtesy, check back in and reply within 24 hours, or your post will be deleted. Note there's decades of heavily experienced Guzzi professionals on this site, all whom happily give endless amounts of their VALUABLE time for free; BE COURTEOUS AND RESPECTFUL!
  • There is ZERO tolerance on personal attacks and ANY HYPERLINKS to PRODUCT(S) or other competing website(s), including personal pages, social media or other Forums. This ALSO INCLUDES ECU DIAGnostic software, questions and mapping. We work very hard to offer commercially supported products and to keep info relevant here. First offense is a note, second is a warning, third time will get you banned from the site. We don't have the time to chase repeat (and ignorant) offenders. This is NOT a social media platform; It's an ad-free, privately funded website, in small help with user donations. Be sure to see the GTM STORE link above; ALL product purchases help support the site, or you can upgrade your Forum profile or DONATE via the link above.
  • Be sure to see the GTM STORE link also above for our 700+ product inventory, including OEM parts and many of our 100% Made-in-SoCal-USA GTM products and engine kits. In SoCal? Click the SERVICE tab above for the best in service, tires, tuning and installation of our products or custom work, and don't miss our GT MotoCycles® (not) art on the BUILDS tab above. WE'RE HERE ONLINE ONLY - NO PHONE CALLS MADE OR RECEIVED - DO NOT EMAIL AND ASK QUESTIONS OR ASK TO CALL YOU.
  • Like the new V100, GuzziTech is full throttle into the future! We're now running on an all-new server and we've updated our Forum software. The visual differences are obvious, but hopefully you'll notice the super-fast speed. If you notice any glitches or have any issues, please post on the Site Support section at the bottom. If you haven't yet, please upgrade your account which is covered in the Site Support section or via the DONATE tab above, which gives you full site access including the DOWNLOADS section. We really appreciate every $ and your support to keep this site ad-free. Create an account, sign in, upgrade your account, and enjoy. See you on the road in 2024.

Rider back rest

Robert Gibson

High Miler
GT Contributor
Joined
Jul 20, 2016
Messages
590
Location
Menorca, Spain
Image
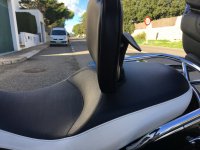
I just saw this and thought I would put it out there, as far as I am aware no one else makes a rider backrest for the Cali 1400,(apart from Corbin where it is an option for their seat). For those that are happy enough with the stock seat it seems a viable option. A colleague mounted one of the Utopia rests on his Anniversary Goldwing and is more than happy with the product.
 
View attachment 15870
I just saw this and thought I would put it out there, as far as I am aware no one else makes a rider backrest for the Cali 1400,(apart from Corbin where it is an option for their seat). For those that are happy enough with the stock seat it seems a viable option. A colleague mounted one of the Utopia rests on his Anniversary Goldwing and is more than happy with the product.
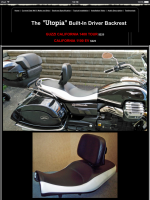
Further to the above, for those with an Eldorado and MGX who wish to retain the solo drivers seat, if Bob (Email: info@utpr.com) can have access to a rear seat at his shop he can manufacture a drivers back rest for those models as well.
 
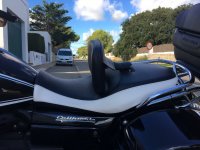
Update. I went ahead and bought the rider back rest from Utopia, the back rest is adjustable for height and lean angle and also hinges forward making it easier for the pillion to mount. I also find I can still swing my leg over the saddle rather than push my leg through, over the seat. Very easy to install and I am very happy with the result, I find that I sit straighter in the saddle and strangely enough has aided my slow speed manoeuvrability, also when seated and moving the bike rearward It gives something to brace against. I have been monitoring the "Corbin seat on a 2016 Eldorado" post and would certainly say for those, if the Corbin is beyond financial reach or if you are happy with the stock seat and want back support, the Utopia back rest is a viable option.
As stated in my previous post, if any Eldorado owners out there are in the vicinity of Utopia, and are willing to loan the rear seat, Bob can manufacture for their bike also.
Image Image
 
Update. I went ahead and bought the rider back rest from Utopia, the back rest is adjustable for height and lean angle and also hinges forward making it easier for the pillion to mount. I also find I can still swing my leg over the saddle rather than push my leg through, over the seat. Very easy to install and I am very happy with the result, I find that I sit straighter in the saddle and strangely enough has aided my slow speed manoeuvrability, also when seated and moving the bike rearward It gives something to brace against. I have been monitoring the "Corbin seat on a 2016 Eldorado" post and would certainly say for those, if the Corbin is beyond financial reach or if you are happy with the stock seat and want back support, the Utopia back rest is a viable option.
As stated in my previous post, if any Eldorado owners out there are in the vicinity of Utopia, and are willing to loan the rear seat, Bob can manufacture for their bike also.
View attachment 16014 View attachment 16015

Robert, is it a do it yourself job to install or does the seat have to be modified or recovered?
 
Definitely a do it yourself and the seat does not have to be modified in any way or the seat recovered. If you look at Utopia's website there is a video and also the supplied instructions are very clear.
I removed the staples (flat screwdriver and long nosed pliers) securing the seat cover from the rear portion of the seat to the half way point. I then gently raised the foam sufficiently to fit the bracket. Once fitted I pushed down on the foam against the bracket and used a sharp pointed long bladed knife to cut a slit sufficiently for the bracket to emerge. The next step is to stretch the cover over the bracket and restaple it. I used a heavy duty hand stapler and stainless steel staples although a pneumatic stapler is recommended in the instructions, alternatively take the seat to your local upholsterer for this. The final stage is to cut a slit for the bracket to emerge through the seat cover and fit the supplied covering piece over the bracket. (I warmed this with a hair drier first to ensure maximum adhesion).
Easy Peasy.
 
Back
Top