• Ciao Guest - You’ve landed at the ultimate Guzzi site. NEW FORUM REGISTRATIONS REQUIRE EMAIL ACTIVATION - CHECK YOUR SPAM FOLDER - Use the CONTACT above if you need help. New to the forum? For all new members, we require ONE post in the Introductions section at the bottom, in order to post in most of the other sections. ALWAYS TRY A SEARCH BEFORE STARTING A NEW TOPIC - Most questions you may have, have likely been already answered. DON'T BE A DRIVE-BY POSTER: As a common courtesy, check back in and reply within 24 hours, or your post will be deleted. Note there's decades of heavily experienced Guzzi professionals on this site, all whom happily give endless amounts of their VALUABLE time for free; BE COURTEOUS AND RESPECTFUL!
  • There is ZERO tolerance on personal attacks and ANY HYPERLINKS to PRODUCT(S) or other competing website(s), including personal pages, social media or other Forums. This ALSO INCLUDES ECU DIAGnostic software, questions and mapping. We work very hard to offer commercially supported products and to keep info relevant here. First offense is a note, second is a warning, third time will get you banned from the site. We don't have the time to chase repeat (and ignorant) offenders. This is NOT a social media platform; It's an ad-free, privately funded website, in small help with user donations. Be sure to see the GTM STORE link above; ALL product purchases help support the site, or you can upgrade your Forum profile or DONATE via the link above.
  • Be sure to see the GTM STORE link also above for our 700+ product inventory, including OEM parts and many of our 100% Made-in-SoCal-USA GTM products and engine kits. In SoCal? Click the SERVICE tab above for the best in service, tires, tuning and installation of our products or custom work, and don't miss our GT MotoCycles® (not) art on the BUILDS tab above. WE'RE HERE ONLINE ONLY - NO PHONE CALLS MADE OR RECEIVED - DO NOT EMAIL AND ASK QUESTIONS OR ASK TO CALL YOU.
  • Like the new V100, GuzziTech is full throttle into the future! We're now running on an all-new server and we've updated our Forum software. The visual differences are obvious, but hopefully you'll notice the super-fast speed. If you notice any glitches or have any issues, please post on the Site Support section at the bottom. If you haven't yet, please upgrade your account which is covered in the Site Support section or via the DONATE tab above, which gives you full site access including the DOWNLOADS section. We really appreciate every $ and your support to keep this site ad-free. Create an account, sign in, upgrade your account, and enjoy. See you on the road in 2024.

Service warning light on only at high speed

Forget torque settings for the switch, you can't get to that easy enough. You may if you are good get to it from the left front using a combination wrench (I think 22mm). Be sure to get a new crush washer and it just needs to be snug enough to seal. Pay particular attention to the electrical connection so that it is clean and tight. BTW, it the light goes out when you increase RPM, you probably don't have an oil pump issue. If you had ridden many miles before the roller conversion, metal particles may have damaged the pump.
Thanks John,
The roller cam was done at about 3,500 miles so not a lot of milage. Pictures of the cam showed DLC just starting to come off the center of the valves so I'll keep my fingers crossed. Also had the shop flush the bottom end before adding new oil.
I believe I tried increasing rpm once and the light went out so l'll try that again tomorrow when I try to duplicate the problem. Hopefully I'll get the same code. One strange thing is that the folks that did the cam swap changed out the O2 sensor after checking guzzidiag. The mechanic working on my warning light this week also replaced an 02 sensor after getting a guzzidiag code yet the code I had in the onboard display was 08. I wonder if both mechanics replaced 02 sensors when the issue was actually the oil pressure switch???
 
I wonder if both mechanics replaced 02 sensors when the issue was actually the oil pressure switch???

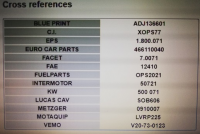
Hard to say. This site doesn't really address that software as we prefer professionally supported software that was run out of business by that guy. Can't say if it is reliable at all. I would say check the electrical connections first, but just getting to those, you might just as well replace the sensor.
 
Occam's razor…

What oil (weight) is in the motorcycle?

I have this nagging feeling with this.

Great minds think alike! I called the shop yesterday and they said they used 10w60. That said I think I noticed a little more clatter when in neutral and clutch released, could just be my age I suppose. I guess the only way to be sure is to change it again @&$^%! What is the best way to connect a gauge to check the oil pressure? After changing the oil I want to try to rule out any mechanical problem. At least then I could ride the bike with confidence until I get the sensor. Speaking of the sensor, I have read soooo much from so many different sites and manuals I am getting dizzy. Is it true that there is an exact replacement at local auto parts stores? Looks like the Guzzi replacement has a spade connector that will require changing the connector on the wiring.
I dread removing the gas tank and plastics again. Did this when I changed the fuel sender while the bike was new. Got really nervous about some of those screws that go into inserts in plastic as well as the dreaded fuel line connector.
 
You may be able to just place the tank to the side to access the oil pressure sensor so you won't need to disconnect the fuel line.
 
Having done this oil pressure sensor thing (forgot to put the gasket on and screamed as oil pissed down the left side of the bike), the replacing the vent hoses thing, the replacing the fuel line thing as well as the left a small screwdriver thing in the V of the engine, its best to take the tank off and after you have done this too many times it becomes second nature. Don't be scared of the fuel line connector, as once mastered (thanks to experts on here), it also is simple and logical. Worst part is having a full tank when trying to lift it off and hoping in mid carry that you will be able to find at least one of your testicles after the hernia develops!
 
Hard to say. This site doesn't really address that software as we prefer professionally supported software that was run out of business by that guy. Can't say if it is reliable at all. I would say check the electrical connections first, but just getting to those, you might just as well replace the sensor.
AH Ha.... Nuff said - I had an idea that might be the case....
 
Having done this oil pressure sensor thing (forgot to put the gasket on and screamed as oil pissed down the left side of the bike), the replacing the vent hoses thing, the replacing the fuel line thing as well as the left a small screwdriver thing in the V of the engine, its best to take the tank off and after you have done this too many times it becomes second nature. Don't be scared of the fuel line connector, as once mastered (thanks to experts on here), it also is simple and logical. Worst part is having a full tank when trying to lift it off and hoping in mid carry that you will be able to find at least one of your testicles after the hernia develops!
 

Yep,

Sounds familiar. I actually enjoy tinkering around with things but inevitably I end up spending 5 hours on something that should take one. I guess that is part of the learning process.... I have to spend some time next week taking care of my ageing parents and getting ready for another hurricane season. In the meantime I'll try to find the correct sensor. Found the updated (spade connector) one in several places but I would like to get an exact fit with the nail head connector as I understand that is what is what is in the bike now. As far as the fuel line quick connect, thanks for the reassurance. That along with several videos I have watched make me feel better about the task if it becomes necessary. Let see, push fuel line toward fitting while pulling back on grey ring - GENTLY!
 
A fault at a certain rpm or speed seems to me to harmonically related.
Something is loose somewhere and becomes critical at that speed.
Oh, and could someone kindly link me to where Peter Roper says a cam box swap only takes 20 minutes?

Chris.
 
A fault at a certain rpm or speed seems to me to harmonically related.
Something is loose somewhere and becomes critical at that speed.
Oh, and could someone kindly link me to where Peter Roper says a cam box swap only takes 20 minutes?

Chris.

I noticed Pete does it with the engine already out of the bike. Different story when in the bike as the plug for the RH chain tension release is blocked by the frame. With the supposed easy kit it took me 3 hours to do one.
 
I noticed Pete does it with the engine already out of the bike. Different story when in the bike as the plug for the RH chain tension release is blocked by the frame. With the supposed easy kit it took me 3 hours to do one.
Now that I recall he was performing the work on a Griso. My bad, it's been a couple of years since I watched the video. If memory serves there was mention of the Stelvio frame being in the way and adding some time. I'll look for the video and pass it on.
 
And it was to pull 1 cam box, no reassembly. Took just over 13 minutes and Pete mentions the same amount of time to remove the other side so under 30 minutes for both on a GRISO. Figure the same for installation and it would be about an hour. Whole different story on Stelvio as John says. The point of the video was to give folks an idea of what was involved so they would be informed when they approached a dealer to have the work done. Some dealers were charging 9 hours labor for the job. Sorry about the misinformation, as I said it was a long time ago and my memory isn't what it was. It was a u tube video called "tappet inspection on flattie 8V"
 
Oil Pressure Switch is easy to replace.
Tank off job, which is a bit of an a**e-ache on the small Tank model, much easier on the later big Tanks.
Switch is a generic item, used on millions of cars and Bikes.
Original connector is a Bosch EV-1 type, same as the Injectors use, but only having one Terminal Socket fitted.

List of alternatives . . .
Upload 2021 6 4 9 57 9

I've replaced it on both my Stelvios.
If you want to double check what your local car spares shop has, these are the specs;

Oil Pressure Switch is ‘Normally Closed’ (NC).
Contacts open when Oil Pressure is present (above the threshold pressure).


LENGTH ~ 41.25 mm

SPANNER SIZE ~ 24

THREAD ~ M12 x 1,5 mm

SWITCH POINT TO ~ 0.5 bar

SWITCH POINT FROM ~ 0.2 bar

THREAD LENGTH ~ 12 mm

Overall length and Thread length aren't
critical, the one fitted to my 2009 Stelvio now, has a slightly longer thread than the original one.
OilPxSwitch1

The original Guzzi connector goes straight on, so it's a direct replacement.
IMG 20190707 104336

You can buy the Bosch EV-1 Connectors, they come in 'Kit' form, and use the same Seals and Terminal type as the SuperSeal Connectors.
BoschEV1


Attachments

  • IMG_20190707_104336.jpg
    IMG_20190707_104336.jpg
    92.8 KB · Views: 4
Oil Pressure Switch is easy to replace.
Tank off job, which is a bit of an a**e-ache on the small Tank model, much easier on the later big Tanks.
Switch is a generic item, used on millions of cars and Bikes.
Original connector is a Bosch EV-1 type, same as the Injectors use, but only having one Terminal Socket fitted.

List of alternatives . . .
View attachment 22319

I've replaced it on both my Stelvios.
If you want to double check what your local car spares shop has, these are the specs;

Oil Pressure Switch is ‘Normally Closed’ (NC).
Contacts open when Oil Pressure is present (above the threshold pressure).


LENGTH ~ 41.25 mm

SPANNER SIZE ~ 24

THREAD ~ M12 x 1,5 mm

SWITCH POINT TO ~ 0.5 bar

SWITCH POINT FROM ~ 0.2 bar

THREAD LENGTH ~ 12 mm

Overall length and Thread length aren't
critical, the one fitted to my 2009 Stelvio now, has a slightly longer thread than the original one.
View attachment 22321

The original Guzzi connector goes straight on, so it's a direct replacement.
View attachment 22323

You can buy the Bosch EV-1 Connectors, they come in 'Kit' form, and use the same Seals and Terminal type as the SuperSeal Connectors.
View attachment 22324

THANK YOU for all of the great info and detailed pics!
Just to confirm, the stock connector is the Bosch EV-1and that will work with the switches?
 
Yes.
Not sure if some of the very late models had a different Connector (Female Spade Terminal to suit the later Switches), but both my 2009 and 2012 have the EV-1 Plugs.
And yes, they plug straight on.

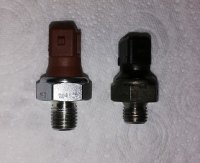
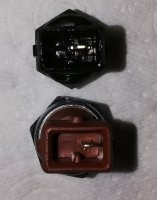
Original on top (it was leaking through the plastic body).
OilPxSwitch

Only one Terminal used as you can see, it earths through the body of the Switch.

If the Switch has been replaced with the Spade Connector type, then you'll need to refit an EV-1 Connector.
You can pick up a set of four for around £10 ~ $15 or so on Ebay.
I replaced my Injector ones, as the Boots were perished, very common.
s-l1600.jpg


You will need the correct Crimping Tool for the Terminals, as mentioned, they're the same type as the Super-Seal Terminals, which are used elsewhere on most Guzzis, so they're worth having.
BD-CR_02-2.jpg

https://www.vehiclewiringproducts.co.uk/technical-information-3-superseal-connector-assembly-guide
 
Last edited:
Yes.
Not sure if some of the very late models had a different Connector (Female Spade Terminal to suit the later Switches), but both my 2009 and 2012 have the EV-1 Plugs.
And yes, they plug straight on.

Original on top (it was leaking through the plastic body).
View attachment 22329

Only one Terminal used as you can see, it earths through the body of the Switch.

If the Switch has been replaced with the Spade Connector type, then you'll need to refit an EV-1 Connector.
You can pick up a set of four for around £10 ~ $15 or so on Ebay.
I replaced my Injector ones, as the Boots were perished, very common.
s-l1600.jpg


You will need the correct Crimping Tool for the Terminals, as mentioned, they're the same type as the Super-Seal Terminals, which are used elsewhere on most Guzzis, so they're worth having.
BD-CR_02-2.jpg

https://www.vehiclewiringproducts.co.uk/technical-information-3-superseal-connector-assembly-guide

Thanks so very much. I'm always on the lookout for tools and fittings. Hopefully the crimping tool and terminals are available here in the U.S. I have a switch ordered from MG Cycle (new Guzzi switch with spade connector) but in the meantime I'll try the auto parts stores (and European car dealers) for one of the switches in your cross reference.

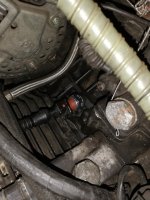
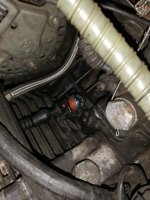
That said I have an update, I dropped my Stelvio off to have the oil pressure checked just to rule out any oil pump issues. The mechanic (same guy that spent 8 hours trying to get the bike to throw a code and suggested the ecu might be the problem) said he could check the oil pressure while I waited for the bike and it wouldn't take more than an hour or so. The results were as expected with the oil pressure being perfect. The real surprise came when the mechanic showed me a video on his phone of the oil pressure readings he was getting from my bike. He then asked if I had received the new switch yet and if so he could install it right there and then. I told him I was going to do the work myself and that it was a tank off the bike job. He then said come on back into the shop "i want to show you something." The switch was already out of the bike and he had taken the oil pressure readings from the port where the switch had been removed. Now keep in mind this guy has some wrench time on Guzzi's as he used to work for a Guzzi dealership. Anyway he accessed the switch by simply removing the fuel cap, the plastic cover in front of the seat and the center plastic cover over the fuel tank. He loosened the plastic fairing on the right side (facing the bike) and had a fellow mechanic gently pull the fairing away from the tank. This provided just enough room between the tank and the fairing to get to the switch. Long story short the old switch is out and as soon as I receive a new switch (will try some more stores and European car dealers tomorrow) the mechanic will install it and button up the plastics. I will ask him to let me watch so I can pass on what tools he used to get to the switch and step by step replacement procedure. Hopefully I can return some favors by passing on a procedure that will save Guzzi folks some time and aggravation the next time the red triangle light decides to illuminate...
 
In regards to the oil pressure switch replacing.
I have gone through 5 of these over the years and smelled a rat.
Every failed switch bar one that had a cracked housing cleaned up with a bath of Kero and proved fine for service.
It's my opinion that the most common event here is fouling not failure, and that the cul de sac the switch sits in is to blame.
It's an appendix that collects and attracts sludge readily.
Just my opinion, add salt to taste.
Chris.
 
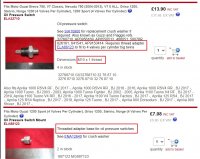
I don't know if there is more than one type of Switch with the Spade Terminal, but if you order one from a Guzzi place here (UK), they'll sell you an Adaptor Fitting as well, as the Threads are different (so the Switch won't screw into the Engine).
OilPxSw
 
Back
Top