Andrew D Neufeld
Just got it firing!
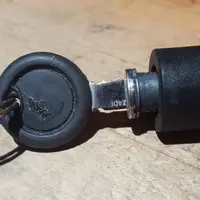
The Norge that I purchased recently came without side bags and I wanted them, so I purchased 2 on ebay. I ended with a system needing 3 keys. I was able to successfully re-key the bags to work with the ignition key. it is not a difficult process but it is picky. Here is a tutorial.
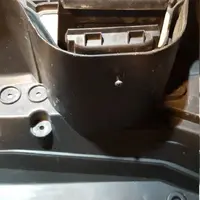
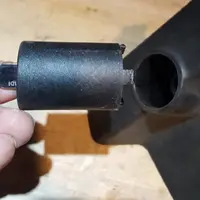
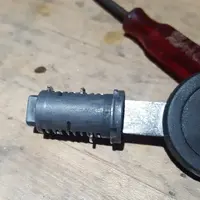
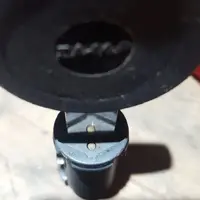
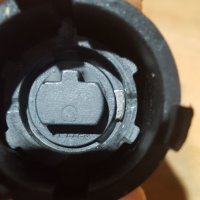
The first picture shows the start point - the mechanism that locks the bag to the bike's frame has been removed (note the empty screw holes). That removal is a straightforward process, which I will not address:
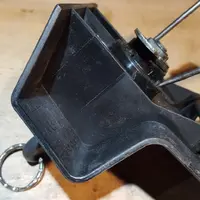
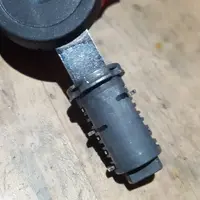
When you remove the single screw that is shown remaining, the locking mechanism pulls upward from the case. Second photo in this pair shows the locking mechanism on the benchtop

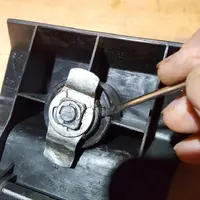
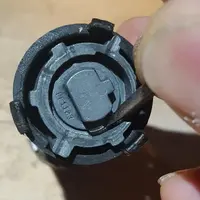
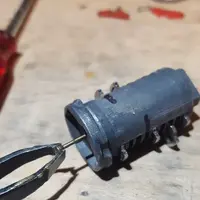
Now look at the back of the locking mechanism. You will see three little plastic tabs that hold the cylinder into the locking mechanism. Here, I am pointing to one of them with a small screwdriver.
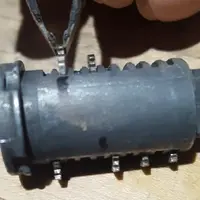
You will need to depress two of these and hold them inward, toward the center of the cylinder. In the next photo you see that I have wedged two small screwdrivers in, to hold two of the tabs where they need to be. The screwdrivers need to be very tiny; this is a very fine and crucial operation. You will be tempted to use something sharper than a screwdriver. You may also be tempted to force a fat screwdriver in to make it work. These are both bad ideas as they risk damaging the plastic tabs. If you damage the plastic you will not be able to put the mechanism back together. You can grind down a screwdriver point to make it enter more smoothly, but do not use one that is ground to a sharp point. Another idea that occurs to me now would be to displace the two tabs inward with a screwdriver and then hold them inward with toothpicks. Give it a try, it sounds like the way I should have done it. But here, two screwdrivers keep two tabs flexed inward.
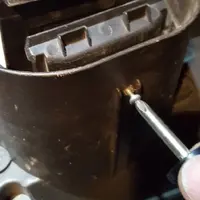
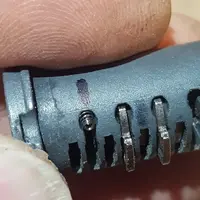
Next, push the third tab inward with a broader tip screwdriver while pulling on the key. The locking cylinder will come out.
In the two that I have done, I found one with a spring under the cylinder, between the clyinder and the latching mechanism. If yours has a spring, collect it and put it back in when you re-assemble. Of the two that i now have - one without the spring and one with - I find that they operate equally well. But I'd say if you have a spring there, leave it there. Next, look at the silver tab at the tail end of the locking cylinder that you just removed. This tab functions as a turn limiter for the entire mechanism, but it also holds the inner cylinder, with the tumblers, in place inside its plastic case. The next photos show the location of the tab, pushing the tab inward toward the center of the cylinder with the ubiquitous small screwdriver, then pulling the inner cylinder easily out with the key.

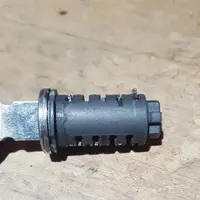
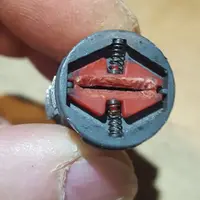
The next photo is the inner locking cylinder with its original key inserted. Note that the only tumbler protruding is the one at the very end, which you just depressed to remove the mechanism. You'll leave that one alone. The second photo shows the cylinder with the key removed. Note that all of the tumblers now protrude. That's what locks the mechanism; the protruding tumblers. The picture you see here has a few tumblers removed, but yours will probably have two neat rows of tumblers, all protruding. If it dosen't, someone's already altered it. Which is no big deal.

Now put in the key that you want to use (your ignition key). Note which tumblers protrude; those are the ones that need your attention. Mark them with a permanent marker. You want marks that won't rub off when you touch them with your fingers.
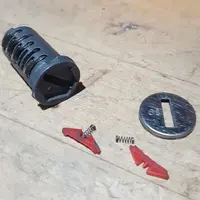
Now take out the key and pry off the chrome end cover from the inner cylinder. Be very careful here as there are tiny parts inside that will want to jump away. Remove the tiny parts with pair of tweezers, moving the springs first.
Next, I've put a key back in to use it's reflection to show you a small brass pin that has to come out. This pin holds the many tumblers in place. Once you remove it, they can all fall out. If they do progress is not impossible, but more difficult, because you have to put them all back. To remove the pin, tap the cylinder on your bench top to move the pin slightly, hold the tumblers in place with one hand, and pull the pin out with a tweezer. Then carefully set the cylinder down. The three photos that follow do not show the procedure exactly, because I needed a hand to hold the camera. I hope you get the idea.

Now, you will attend to the tumblers that you have marked. Your goal is to have none that protrude with the new key, your ignition key, in place. There are basically three ways to achieve this. The first is preferred: remove one tumbler and replace it with another. In this example, I would first attempt swapping the two that protrude. That may achieve your goal. If you take the cylinders out of both of your side cases at the same time you will have more options for swapping. The next photo shows removing a tumbler with a tweezer. The one after that shows the tiny spring that is behind each tumbler. As you remove tumblers, the biggest danger is paying such close attention to one tumbler that others fall out. That is just a bother, but it causes you extra work.
If you cannot achieve the goal - all tumblers in, flush with the cylinder itself, with the ignition key inserted - by swapping, there are 2 other options. If the tumbler protrudes only slightly you can take it out and file or grind it down. If you do this, the tumbler will still be of some function, because when the key is removed it will still protrude somewhat. If there are tumblers that you cannot fix by the first two methods, simply remove them. Of course with tumblers removed a lock is less secure. But in this case the entire housing mechanism for the tumblers is plastic, and that's a far greater security risk than a few missing tumblers.
Continue working with the above three methods until you can insert your ignition key into the cylinder and no tumblers protrude except the last one that holds it all in place. The only thing left to do is to put it all back together. Remember to put the brass pin back in to hold the tumblers in place. One note of caution regarding re-assembling the tiny pieces at the front of the cylinder. All of your tools, including your tweezers, may have become magnetized at this point. I would suggest moving these pieces into place using a tooth pick.
Best wishes, and good luck.
The first picture shows the start point - the mechanism that locks the bag to the bike's frame has been removed (note the empty screw holes). That removal is a straightforward process, which I will not address:
When you remove the single screw that is shown remaining, the locking mechanism pulls upward from the case. Second photo in this pair shows the locking mechanism on the benchtop
Now look at the back of the locking mechanism. You will see three little plastic tabs that hold the cylinder into the locking mechanism. Here, I am pointing to one of them with a small screwdriver.
You will need to depress two of these and hold them inward, toward the center of the cylinder. In the next photo you see that I have wedged two small screwdrivers in, to hold two of the tabs where they need to be. The screwdrivers need to be very tiny; this is a very fine and crucial operation. You will be tempted to use something sharper than a screwdriver. You may also be tempted to force a fat screwdriver in to make it work. These are both bad ideas as they risk damaging the plastic tabs. If you damage the plastic you will not be able to put the mechanism back together. You can grind down a screwdriver point to make it enter more smoothly, but do not use one that is ground to a sharp point. Another idea that occurs to me now would be to displace the two tabs inward with a screwdriver and then hold them inward with toothpicks. Give it a try, it sounds like the way I should have done it. But here, two screwdrivers keep two tabs flexed inward.
Next, push the third tab inward with a broader tip screwdriver while pulling on the key. The locking cylinder will come out.
In the two that I have done, I found one with a spring under the cylinder, between the clyinder and the latching mechanism. If yours has a spring, collect it and put it back in when you re-assemble. Of the two that i now have - one without the spring and one with - I find that they operate equally well. But I'd say if you have a spring there, leave it there. Next, look at the silver tab at the tail end of the locking cylinder that you just removed. This tab functions as a turn limiter for the entire mechanism, but it also holds the inner cylinder, with the tumblers, in place inside its plastic case. The next photos show the location of the tab, pushing the tab inward toward the center of the cylinder with the ubiquitous small screwdriver, then pulling the inner cylinder easily out with the key.
The next photo is the inner locking cylinder with its original key inserted. Note that the only tumbler protruding is the one at the very end, which you just depressed to remove the mechanism. You'll leave that one alone. The second photo shows the cylinder with the key removed. Note that all of the tumblers now protrude. That's what locks the mechanism; the protruding tumblers. The picture you see here has a few tumblers removed, but yours will probably have two neat rows of tumblers, all protruding. If it dosen't, someone's already altered it. Which is no big deal.
Now put in the key that you want to use (your ignition key). Note which tumblers protrude; those are the ones that need your attention. Mark them with a permanent marker. You want marks that won't rub off when you touch them with your fingers.
Now take out the key and pry off the chrome end cover from the inner cylinder. Be very careful here as there are tiny parts inside that will want to jump away. Remove the tiny parts with pair of tweezers, moving the springs first.
Next, I've put a key back in to use it's reflection to show you a small brass pin that has to come out. This pin holds the many tumblers in place. Once you remove it, they can all fall out. If they do progress is not impossible, but more difficult, because you have to put them all back. To remove the pin, tap the cylinder on your bench top to move the pin slightly, hold the tumblers in place with one hand, and pull the pin out with a tweezer. Then carefully set the cylinder down. The three photos that follow do not show the procedure exactly, because I needed a hand to hold the camera. I hope you get the idea.
Now, you will attend to the tumblers that you have marked. Your goal is to have none that protrude with the new key, your ignition key, in place. There are basically three ways to achieve this. The first is preferred: remove one tumbler and replace it with another. In this example, I would first attempt swapping the two that protrude. That may achieve your goal. If you take the cylinders out of both of your side cases at the same time you will have more options for swapping. The next photo shows removing a tumbler with a tweezer. The one after that shows the tiny spring that is behind each tumbler. As you remove tumblers, the biggest danger is paying such close attention to one tumbler that others fall out. That is just a bother, but it causes you extra work.
If you cannot achieve the goal - all tumblers in, flush with the cylinder itself, with the ignition key inserted - by swapping, there are 2 other options. If the tumbler protrudes only slightly you can take it out and file or grind it down. If you do this, the tumbler will still be of some function, because when the key is removed it will still protrude somewhat. If there are tumblers that you cannot fix by the first two methods, simply remove them. Of course with tumblers removed a lock is less secure. But in this case the entire housing mechanism for the tumblers is plastic, and that's a far greater security risk than a few missing tumblers.
Continue working with the above three methods until you can insert your ignition key into the cylinder and no tumblers protrude except the last one that holds it all in place. The only thing left to do is to put it all back together. Remember to put the brass pin back in to hold the tumblers in place. One note of caution regarding re-assembling the tiny pieces at the front of the cylinder. All of your tools, including your tweezers, may have become magnetized at this point. I would suggest moving these pieces into place using a tooth pick.
Best wishes, and good luck.
Attachments
-
 20200418_090740.jpg73.7 KB · Views: 3
 -
 20200418_090810.jpg65.6 KB · Views: 3
 -
 20200418_090844.jpg59.9 KB · Views: 5
 -
 20200418_090910.jpg109.2 KB · Views: 7
 -
 20200418_090940.jpg94.6 KB · Views: 6
 -
 20200418_091008.jpg69.7 KB · Views: 4
 -
 20200418_091049.jpg67 KB · Views: 2
 -
 20200418_091134.jpg82.1 KB · Views: 3
 -
 20200418_091214.jpg103.2 KB · Views: 3
 -
 20200418_090331.jpg93.6 KB · Views: 2
 -
 20200418_090302.jpg60.5 KB · Views: 2
 -
 20200418_091456.jpg91.4 KB · Views: 2
 -
 20200418_091555.jpg89.2 KB · Views: 3
 -
 20200418_091326.jpg71.3 KB · Views: 2
 -
 20200418_091427.jpg100.3 KB · Views: 2
 -
 20200418_091527.jpg44.6 KB · Views: 2
 -
 20200418_091621.jpg66.9 KB · Views: 2
 -
 20200418_091654.jpg56.2 KB · Views: 2
 -
 20200418_091825.jpg64.9 KB · Views: 2
 -
 20200418_091900(1).jpg114 KB · Views: 1
Last edited:


