• Ciao Guest - You’ve landed at the ultimate Guzzi site. NEW FORUM REGISTRATIONS REQUIRE EMAIL ACTIVATION - CHECK YOUR SPAM FOLDER - Use the CONTACT above if you need help. New to the forum? For all new members, we require ONE post in the Introductions section at the bottom, in order to post in most of the other sections. ALWAYS TRY A SEARCH BEFORE STARTING A NEW TOPIC - Most questions you may have, have likely been already answered. DON'T BE A DRIVE-BY POSTER: As a common courtesy, check back in and reply within 24 hours, or your post will be deleted. Note there's decades of heavily experienced Guzzi professionals on this site, all whom happily give endless amounts of their VALUABLE time for free; BE COURTEOUS AND RESPECTFUL!
  • There is ZERO tolerance on personal attacks and ANY HYPERLINKS to PRODUCT(S) or other competing website(s), including personal pages, social media or other Forums. This ALSO INCLUDES ECU DIAGnostic software, questions and mapping. We work very hard to offer commercially supported products and to keep info relevant here. First offense is a note, second is a warning, third time will get you banned from the site. We don't have the time to chase repeat (and ignorant) offenders. This is NOT a social media platform; It's an ad-free, privately funded website, in small help with user donations. Be sure to see the GTM STORE link above; ALL product purchases help support the site, or you can upgrade your Forum profile or DONATE via the link above.
  • Be sure to see the GTM STORE link also above for our 700+ product inventory, including OEM parts and many of our 100% Made-in-SoCal-USA GTM products and engine kits. In SoCal? Click the SERVICE tab above for the best in service, tires, tuning and installation of our products or custom work, and don't miss our GT MotoCycles® (not) art on the BUILDS tab above. WE'RE HERE ONLINE ONLY - NO PHONE CALLS MADE OR RECEIVED - DO NOT EMAIL AND ASK QUESTIONS OR ASK TO CALL YOU.
  • Like the new V100, GuzziTech is full throttle into the future! We're now running on an all-new server and we've updated our Forum software. The visual differences are obvious, but hopefully you'll notice the super-fast speed. If you notice any glitches or have any issues, please post on the Site Support section at the bottom. If you haven't yet, please upgrade your account which is covered in the Site Support section or via the DONATE tab above, which gives you full site access including the DOWNLOADS section. We really appreciate every $ and your support to keep this site ad-free. Create an account, sign in, upgrade your account, and enjoy. See you on the road in 2024.

Stripped thread?

David Toll

Tuned and Synch'ed
GT Contributor
Joined
Nov 23, 2021
Messages
25
Location
Queensland, Australia
Hello Folks,
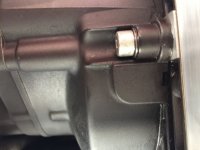
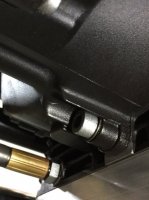
I can't seem to tighten this hex head at the back of the motor behind the sump. There is no oil drip there but there is a light "smudge" of oil/grease. Is there a seal that this screw tightens against? If I take it out to inspect the thread will I aggravate a fairly grim situation? Only had the bike two weeks so I trust the PO hasn't stripped this thread. Recutting it would prove a nightmare. Been over the manual but can't find reference to the thing. Doesn't appear in the parts list unless I'm looking in the wrong place. I assume that is the clutch housing above(?) Isn't it a dry clutch?
Any suggestions or insights?
IMG 0695
 
If you stripped it, the only way to repair the thread is to split the bike in half. I think this is on a 750 and it is possible the hole is a through hole and oil might migrate along the threads but I can't be certain. There is no seal there and you can check the parts manual for your bike in the downloads section. If it is a through hole once the threads are repaired use loctite 242 on the screw threads. That will prevent oil migration.
 
Sorry, but By tighten, do you mean you’re in there with a ratchet/wrench and it just keeps turning clockwise ?

How did you get to this point, did A drip on the floor lead you there ?
 
It's OK you have 5 more to keep your trans on the block. Should be 18-23 ftlbs. Screws into pockets in block. 5pcs 35mm long and 1 @ 50mm long. Those bolts are on the page w/clutch parts. No oil behind any of it, it came from somewhere else.
 
I see this all the time, along with the same basic explanation of “It was leaking so I just tightened it.”

This is how aluminum threads are destroyed by steel bolts.

The torque of these bolts are very important and they do not tolerate being over tightened well at all.
 
Thanks for your responses gentlemen. Let me respond in order.
John: I discovered this issue while inspecting the tightness of the fixtures on the underside. After three years rebuilding the XS, I am familiar with the danger of being ham-fisted with steel in aluminium threads so, no, I didn't strip it but the result remains the same and the cure is scary.
D.E.: No, I was checking the tension of the underside fixtures with a hand held Allen key as part of my initial "getting to know you act" and being cautious. As you say, this thread seems to begin to tighten then loosens again if pressed using far less than what I would imagine is the recommended torque. No drips - just a smudge which could come from a breather I suppose, (if I could find where they are located).
Steve: That's encouraging. I was imagining that I may be able to re-thread it with a Helicoil or Time sert but a pocket could make that difficult not to mention the restricted access in that area. A flexible drive piece may allow me to drill and re-thread the hole but I would have to be bloody careful. Don't want to pull the motor if I can possibly avoid it. No oil behind is good news.
D.E: I haven't pulled the hex bolt as I was wary about getting it back in . I'll bite the bullet and unscrew it to gat a measurement.
John: I have the manual from Guzzitech. I also paid $30 (AUD) for a workshop manual from "Online Manuals". You can imagine my horror when I opened the purchased item and found it was the same thing only 30 bills more expensive. (Sigh). Is there a genuine workshop manual I can access? Don't mind paying for it. I'll heck out the clutch page in the parts manual.
Scott: Yes correct torque is king - never stripped a single thread on a total rebuild previously. If I'd made that mistake, I'd own up but, this one came with the bike.

Appreciate your interest and responses gents. I've learned this
  • The hex shouldn't be leaking oil so, if there is an oil smudge at that spot, it must come from somewhere else. I am familiar enough with oil leaks to start at the top, at the front and work back - could be a talcum powder exercise
  • There are other bolts holding the trans so, this may not be as crucial as I first imagined.
  • the 35mm hex may be short - a long shot but worth a look.
  • Only a fool over tightens a steel bolt in an alloy head. Carry a properly calibrated torque wrench at all times and don't be afraid to use it.
Thanks for the assistance. I do feel somewhat better. By the way, she is certainly a beautiful thing.
Cheers
 
Hello Folks,
Can anyone tell me the purpose of the plastic piece with the rectangular hole that appears in the picture below the hex head? Is it removable?
Cheers
IMG 0707
 
Hello Kev,
Yes there is a washer under the head but there appears to be one on some of the fixtures on the parts list and they're on the other hex bolts around the perimeter.
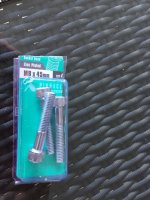
I appear to have had some success in repair. I took the hex bolt out and measured it at 35mm of thread. Steve & DE had suggested that this may be a 50mm hole. I bought some45mm hex heads from a local parts store and fitted one up. It appeared too long so I took off a couple of mm, fitted a copper crush washer outside the existing washer and tightened it up. It appears to be holding. Not sure of the torque as I need a "wobble head" to fit my torque spanner but, it is comfortably tight. The question is, will it hold or rattle loose?
Tomorrow's ride will tell.
Cheers
IMG 0714
 
Hello Folks,
Can anyone tell me the purpose of the plastic piece with the rectangular hole that appears in the picture below the hex head? Is it removable?
Cheers
View attachment 23789

Uncertain but it does look like an inspection hole cover.

Also, about the manual. This is discussed over and over periodically.

The service manuals are written as references for experienced mechanics.

They were never designed for the layman and none of them contain step by step instructions.

The link in the downloads section is broken for me but I found another copy.

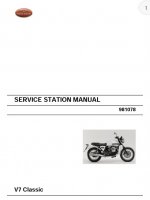
If yours looks like this, then you have it.

5EB8A6F6 FACC 4524 86F1 6118E6880D5C
 
You might want to look at stock pics of USA bikes. I think the EVAP can sat off that bolt. I've removed plenty of them. Might be why bolt was wrong size after bracket gone.
 
Hello Scott,
Yes, that's the one I've got, (twice), Lacks any real detail to get down and dirty but , given the complexity of the bike, that might be just as well. Fortunately, we have an excellent Forum to fill in the gaps.

An EVAP can hey Steve? I'll check it out
Cheers
 
Last edited:
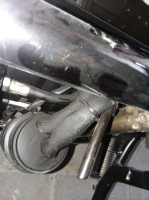
Looks like you're right Steve. This pic shows the EVAP can in place and it looks to be suspended from that bolt. Mine is gone. Fascinating!

EVAP can
 
Back
Top