I just made a simple tool. Removing the left side clutch cover is a common task for clutch work or dinamo work. To the inexperienced, it may present some risks to your motor. Once the flywheel is removed, the crankshaft gear bears outward against the inner surface of the cover and pushes outward driven by a hefty spring behind the gear. Now, as you remove the perimeter cover screws, the movement of the cover by spring pressure may stress the screws or the threaded holes in your left crankcase half. To be correct, each screw should be loosened half a turn as you repeatedly go around the perimeter of the cover to relieve stress evenly. Even so, the last turn or so puts a lot of stress on the first turn of thread in the casing. Do it carelessly and you could be in for some helicoiling repairs or screw replacements. The safe way is to have someone else hold pressure on the cover while you remove all of the screws. The inverse happens when we install the cover and so again, a helper is necessary to hold against the spring pressure.
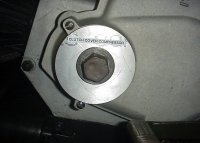
Not having extra hands available, I made this tool yesterday. After the flywheel is away, the tool is placed in the center of the cover bore and the flywheel nut reused, hand tight, to clamp the cover to the casing. Now, all the perimeter screws can quickly be removed without stress from the spring loaded cover. For reinstallation, the cover is set in place over the gears, the tool applied, the flywheel nut used to compress the cover home, then the perimeter screws installed.
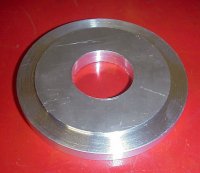
I'm sure it could also be made from flat-stock rather than a full disc, although the full circle ensures a more uniform clamping force. The interior lip isn't absolutely necessary if you can handle aligning the cover by hand. The lip does the alignment for you.
The tool in place.
The interior of the tool to show centering step or recess.
Here are the dimensions. I made it very quickly and roughly, so there was no attempt at precision dimension. I made this for the SuperAlce. I presume it will also fit the Falcone as well, but I'm not tearing that apart just to check. YMMV. Your case dimensions could be slightly different. The only concern is to use thick enough stock so that the flywheel nut doesn't bottom out before the case is fully compressed home. If so, just use thicker stock or add a washer under the nut. Dimensions:
Thickness = 9.94mm (probably nominal 3/8" stock)
Bore hole = 35mm
OD = 99mm
Step OD = 77.7mm
Step depth = 1.9mm
Anyone is welcome to borrow it, but it might be quicker and cheaper to find a neighbor with a lathe and turn one up in a few minutes.
Patrick Hayes - pehayes at comcast.net
Fremont CA
Not having extra hands available, I made this tool yesterday. After the flywheel is away, the tool is placed in the center of the cover bore and the flywheel nut reused, hand tight, to clamp the cover to the casing. Now, all the perimeter screws can quickly be removed without stress from the spring loaded cover. For reinstallation, the cover is set in place over the gears, the tool applied, the flywheel nut used to compress the cover home, then the perimeter screws installed.
I'm sure it could also be made from flat-stock rather than a full disc, although the full circle ensures a more uniform clamping force. The interior lip isn't absolutely necessary if you can handle aligning the cover by hand. The lip does the alignment for you.
The tool in place.
The interior of the tool to show centering step or recess.
Here are the dimensions. I made it very quickly and roughly, so there was no attempt at precision dimension. I made this for the SuperAlce. I presume it will also fit the Falcone as well, but I'm not tearing that apart just to check. YMMV. Your case dimensions could be slightly different. The only concern is to use thick enough stock so that the flywheel nut doesn't bottom out before the case is fully compressed home. If so, just use thicker stock or add a washer under the nut. Dimensions:
Thickness = 9.94mm (probably nominal 3/8" stock)
Bore hole = 35mm
OD = 99mm
Step OD = 77.7mm
Step depth = 1.9mm
Anyone is welcome to borrow it, but it might be quicker and cheaper to find a neighbor with a lathe and turn one up in a few minutes.
Patrick Hayes - pehayes at comcast.net
Fremont CA