• Ciao Guest - You’ve landed at the ultimate Guzzi site. NEW FORUM REGISTRATIONS REQUIRE EMAIL ACTIVATION - CHECK YOUR SPAM FOLDER - Use the CONTACT above if you need help. New to the forum? For all new members, we require ONE post in the Introductions section at the bottom, in order to post in most of the other sections. ALWAYS TRY A SEARCH BEFORE STARTING A NEW TOPIC - Most questions you may have, have likely been already answered. DON'T BE A DRIVE-BY POSTER: As a common courtesy, check back in and reply within 24 hours, or your post will be deleted. Note there's decades of heavily experienced Guzzi professionals on this site, all whom happily give endless amounts of their VALUABLE time for free; BE COURTEOUS AND RESPECTFUL!
  • There is ZERO tolerance on personal attacks and ANY HYPERLINKS to PRODUCT(S) or other competing website(s), including personal pages, social media or other Forums. This ALSO INCLUDES ECU DIAGnostic software, questions and mapping. We work very hard to offer commercially supported products and to keep info relevant here. First offense is a note, second is a warning, third time will get you banned from the site. We don't have the time to chase repeat (and ignorant) offenders. This is NOT a social media platform; It's an ad-free, privately funded website, in small help with user donations. Be sure to see the GTM STORE link above; ALL product purchases help support the site, or you can upgrade your Forum profile or DONATE via the link above.
  • Be sure to see the GTM STORE link also above for our 700+ product inventory, including OEM parts and many of our 100% Made-in-SoCal-USA GTM products and engine kits. In SoCal? Click the SERVICE tab above for the best in service, tires, tuning and installation of our products or custom work, and don't miss our GT MotoCycles® (not) art on the BUILDS tab above. WE'RE HERE ONLINE ONLY - NO PHONE CALLS MADE OR RECEIVED - DO NOT EMAIL AND ASK QUESTIONS OR ASK TO CALL YOU.
  • Like the new V100, GuzziTech is full throttle into the future! We're now running on an all-new server and we've updated our Forum software. The visual differences are obvious, but hopefully you'll notice the super-fast speed. If you notice any glitches or have any issues, please post on the Site Support section at the bottom. If you haven't yet, please upgrade your account which is covered in the Site Support section or via the DONATE tab above, which gives you full site access including the DOWNLOADS section. We really appreciate every $ and your support to keep this site ad-free. Create an account, sign in, upgrade your account, and enjoy. See you on the road in 2024.

Tips/ideas for Griso tool pouch

myke8329

Tuned and Synch'ed
Joined
Jan 11, 2009
Messages
41
Location
Brisbane, Australia
In a quest to replace my standard Griso under-the-seat-tool-kit tools with some higher quality and extra items (whilst still enabling it to all fit into the capacious cavity so generously allotted by Moto Guzzi) in the event of roadside inconveniences, I’ve come up with the following for my tool pouch:

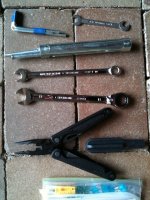
The following are all the standard tools within the kit. These items will fit inside the spark plug tube; its handle, the screwdriver shaft and the three Allen keys (taped together with electrical tape);

The standard screwdriver handle I keep separate inside the tool pouch;

The standard black, plastic-coated wire with eye rings at both ends (I use to remove the spark plug boot from the spark plug);

A small clip-seal bag containing spare fuses/zip ties;

The standard 13-10mm open-end spanner I’ve replaced with separate 13mm and 10mm ring/open enders. These are both Sidchrome and offer a bit more length to the shaft (as we all want in one way or another), yet still fit inside the tool pouch;

An old Sidchrome 5/16 Ignition spanner (compliments of dad’s tool chest) which is a fraction under 8mm (I use this to adjust the lock nut associated with valve adjustment clearance screw); &

The standard pliers I’ve replaced with a Leatherman Skeletool (which basically only contains pliers, knife and screwdriver heads). I managed to pick this one up brand new on eBay and posted to Australia for $AU 46.53!

All of the above mentioned will fit into the tool pouch and inside the cavity without bulging the cavity lid/face plate.

With the seat removed, I’ve also triple zip tied extra zip ties along the inside tubular arm near the air filter box. Again, along the inside tubular arm, but further back near the air intake box, but before the seat securing latch, I’ve double zip tied (vertically) a roll of electrical tape (about 1/3rd left on the roll). These do not interfere with the seat in any way. I’ll replace the zip ties holding these items on as they show signs of wear.

These are some of the issues I found with trying to fit extra items into the tool pouch. I initially had a set of foldaway Allen keys, but found they were just too bulky. In the event that I need more leverage, or a better grip, upon an Allen key I would use my Leatherman. If I damage that Allen key in doing so, I can always replace it fairly cheaply.

I carry a small 6” shifter in my carry bag. This was just too bulky to fit inside the tool pouch and too dangerous to zip tie to any tubular arms. Ideally I’d love to have it in my tool pouch, but am restricted by size.

These are just a couple of handy ideas I thought I’d share with my fellow Guzzi enthusiasts. I’m open to any suggestions/comments/ideas (polite or otherwise). :woohoo:
 

Attachments

  • photo 1.JPG
    photo 1.JPG
    145.9 KB · Views: 776
  • photo.JPG
    photo.JPG
    292.3 KB · Views: 773
I'd love to find a spot to carry a tire repair kit and some CO2 cartridges (like my BMW used to have).
 
A hardcopy (paper print out) of the ECU and Dash error codes with their respective definitions will be handy, it doesn’t take up much space too.

Of course you can store the whole repair manual and wiring diagrams in your smart phone these days, along with Pete Roper's phone number :mrgreen:

Phang
 
Phang said:
A hardcopy (paper print out) of the ECU and Dash error codes with their respective definitions will be handy, it doesn’t take up much space too.

Of course you can store the whole repair manual and wiring diagrams in your smart phone these days, along with Pete Roper's phone number :mrgreen:

Phang

I've typed it all out and it fits onto a single piece of A4 paper. See attached pdf document.

Regards
 

Attachments

  • Griso Codes.pdf
    25.6 KB · Views: 153
I like that smart phone idea. Down load the manual right to the phone plus access to this site. For allen heads and screw driver heads you could fit quite a few into one of the mini altoid tins and use a t handle tool to stick them in. I like to carry a few more tools and tire plug kit with co2 so I'm going to try and pick up one of those kriega fanny pack for next year.
 
myke8329 said:
Phang said:
A hardcopy (paper print out) of the ECU and Dash error codes with their respective definitions will be handy, it doesn’t take up much space too.

Of course you can store the whole repair manual and wiring diagrams in your smart phone these days, along with Pete Roper's phone number :mrgreen:

Phang

I've typed it all out and it fits onto a single piece of A4 paper. See attached pdf document.

Regards
Thanks for doing that ! It now resides in my Kindle Fire that pretty much goes every where I go.
 
Am probably freeloading a bit but for those of us that are just getting into maintaining our own bikes, was wondering if someone could do a summary of what basic tasks the home mechanic can do and which are better left to those with more expertise. Might be the engineer in me, but that seems a better basis to work out what tools and consumables (grease, gaskets, o-rings, fuses, anti-seize, loctite etc) are needed for different situations once I know what tasks I am likely to do.

To start the list:

Throttle cable adjustment
Throttle body balance
Valve Adjustment
TPS Reset
Engine oil change
Gearbox oil change
CARC oil change
Speed sensor seal
Battery maintenance/charging
Parts that need greasing?
Brake pads
 
Years ago I used to carry tubes, tyre levers and hand pump under my seat along with enough tools for an engine rebuild.

After modding the Bella (its still got tubes) I've chucked the tool kit and it now runs a tiny lithium battery.
All I got under the seat is daylight.
I now carry mobile phone and a credit card. :lol:
 
gvw said:
Am probably freeloading a bit but for those of us that are just getting into maintaining our own bikes, was wondering if someone could do a summary of what basic tasks the home mechanic can do and which are better left to those with more expertise. Might be the engineer in me, but that seems a better basis to work out what tools and consumables (grease, gaskets, o-rings, fuses, anti-seize, loctite etc) are needed for different situations once I know what tasks I am likely to do.

To start the list:

Throttle cable adjustment
Throttle body balance
Valve Adjustment
TPS Reset
Engine oil change
Gearbox oil change
CARC oil change
Speed sensor seal
Battery maintenance/charging
Parts that need greasing?
Brake pads


The only jobs that I've personally done are;
valve adjustment
air filter
oil changes (engine, gearbox & CARC) &
brake pads
tightening miscellaneous loose screws & bolts.

As for the battery, mine is a the standard sealed unit and I've done nothing to it. It does have a terminal protection spray coating over it though.

With respect to greasing I've only use a light cover of copper grease on spark plug threads and dielectric grease for the spark plug boot. I made a few enquiries for lubrication of calliper brake pins as I need a pin punch to extract mine for the rear set. Pete Roper advised completely against any lubrication on the pin and others suggested a very, very light coating of aluminium grease.

I did have a problem with the small arm coming loose from the side stand and ended up threading its bolts. The guys over at Pipemaster (Albion) put a heli coil down it for me, but the rubber washer later deteriorated to the point it was useless. Tom Newell (Woolloongabba) came up with a couple of split washers and slightly grounded (to reduce the diameter of the head) allen key bolts. This has worked a treat!

Hope this helps.
 
Thanks myke

That is what I am capable of (tool wise anyway) with the addition of Throttle Body balancing. Carbtune on the way and bought a HP Mini Netbook for $69 on Gray's online so can do the TPS reset with Ducatidiag.

Will have to go and pick up some spare fuses, gaskets and o-rings one of these days.

Do you find the BMC filter is noticeably different to stock?
 
gvw said:
Thanks myke

That is what I am capable of (tool wise anyway) with the addition of Throttle Body balancing. Carbtune on the way and bought a HP Mini Netbook for $69 on Gray's online so can do the TPS reset with Ducatidiag.

Will have to go and pick up some spare fuses, gaskets and o-rings one of these days.

Do you find the BMC filter is noticeably different to stock?

Initially at first, but I think the ECU might have adjusted itself to the new air/fuel mixture, or I may have just gotten used to it. Either way I prefer it over the standard filters as you clean them after 25, 000km.
 
Guilty! also I with my Shoria Battery and My cellphone... which does have the service codes and manuals.

So how does anyone mount tools under the Seat with the BMC airfilter with the CNC air filterholder and a PCV and autotune also installed? do you strap the tool pack to the back or something?

ghezzi said:
Years ago I used to carry tubes, tyre levers and hand pump under my seat along with enough tools for an engine rebuild.

After modding the Bella (its still got tubes) I've chucked the tool kit and it now runs a tiny lithium battery.
All I got under the seat is daylight.
I now carry mobile phone and a credit card. :lol:
 
Back
Top