The only thing to add to the clear and concise instructions PDF above, is the fact that I used Loctite 243 blue on the M8 fasteners and torqued them to 20Nm.
Navigation
Install the app
How to install the app on iOS
Follow along with the video below to see how to install our site as a web app on your home screen.
Note: This feature may not be available in some browsers.
More options
-
Ciao Guest - You’ve landed at the ultimate Guzzi site. NEW FORUM REGISTRATIONS REQUIRE EMAIL ACTIVATION - CHECK YOUR SPAM FOLDER - Use the CONTACT above if you need help. New to the forum? For all new members, we require ONE post in the Introductions section at the bottom, in order to post in most of the other sections. ALWAYS TRY A SEARCH BEFORE STARTING A NEW TOPIC - Most questions you may have, have likely been already answered. DON'T BE A DRIVE-BY POSTER: As a common courtesy, check back in and reply within 24 hours, or your post will be deleted. Note there's decades of heavily experienced Guzzi professionals on this site, all whom happily give endless amounts of their VALUABLE time for free; BE COURTEOUS AND RESPECTFUL!
-
There is ZERO tolerance on personal attacks and ANY HYPERLINKS to PRODUCT(S) or other competing website(s), including personal pages, social media or other Forums. This ALSO INCLUDES ECU DIAGnostic software, questions and mapping. We work very hard to offer commercially supported products and to keep info relevant here. First offense is a note, second is a warning, third time will get you banned from the site. We don't have the time to chase repeat (and ignorant) offenders. This is NOT a social media platform; It's an ad-free, privately funded website, in small help with user donations. Be sure to see the GTM STORE link above; ALL product purchases help support the site, or you can upgrade your Forum profile or DONATE via the link above.
-
Be sure to see the GTM STORE link also above for our 700+ product inventory, including OEM parts and many of our 100% Made-in-SoCal-USA GTM products and engine kits. In SoCal? Click the SERVICE tab above for the best in service, tires, tuning and installation of our products or custom work, and don't miss our GT MotoCycles® (not) art on the BUILDS tab above. WE'RE HERE ONLINE ONLY - NO PHONE CALLS MADE OR RECEIVED - DO NOT EMAIL AND ASK QUESTIONS OR ASK TO CALL YOU.
-
Like the new V100, GuzziTech is full throttle into the future! We're now running on an all-new server and we've updated our Forum software. The visual differences are obvious, but hopefully you'll notice the super-fast speed. If you notice any glitches or have any issues, please post on the Site Support section at the bottom. If you haven't yet, please upgrade your account which is covered in the Site Support section or via the DONATE tab above, which gives you full site access including the DOWNLOADS section. We really appreciate every $ and your support to keep this site ad-free. Create an account, sign in, upgrade your account, and enjoy. See you on the road in 2024.
You are using an out of date browser. It may not display this or other websites correctly.
You should upgrade or use an alternative browser.
You should upgrade or use an alternative browser.
V85TT Mods Thread
- Thread starter Faisal
- Start date
Please tell us how well it works in the rain after you have some experience with it.
Will do! 

It doesn’t rain in England… 
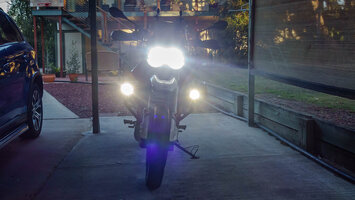
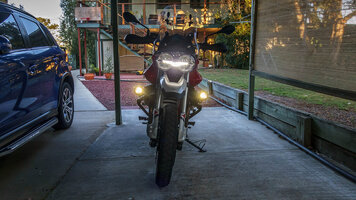
I am disappointed with the Hi beam of my TT, especially with the time change and early commute. On other bikes and assorted cages I have installed auxiliary hi beam actuated lighting. Traditionally I pull power off of the hi beam to trigger relay for power to aux lights.
Any reason the TT's system wouldn't like this arrangement?
Any reason the TT's system wouldn't like this arrangement?
I suggest that you check/adjust headlight vertical aim—the stock LED headlights provide good light patterns on both low and high beams if aimed correctly. The low beams actually stay on when high beam is used to give both near and far illumination.
Thank you, I've been through available adjustments shy of lamps placement in bucket. . There is a gap in the horizontal beams. The bottom of the hi beam doesn't join the top of the low beam. I've been spoiled by V Strom and FJR13 with Auxito lamps behind clear lenses. A distinct horizontal line on top of low, with full fill front wheel to top of power poles on hi.
I have a skene controller set up on my bike, fancy relay, that triggers off the high beam, white wire behind the headlight connector. Allows for aux lights to stay on when the bike is powered, in increments of 10%, and full power with high beam.I am disappointed with the Hi beam of my TT, especially with the time change and early commute. On other bikes and assorted cages I have installed auxiliary hi beam actuated lighting. Traditionally I pull power off of the hi beam to trigger relay for power to aux lights.
Any reason the TT's system wouldn't like this arrangement?
Attachments
I am disappointed with the Hi beam of my TT, especially with the time change and early commute. On other bikes and assorted cages I have installed auxiliary hi beam actuated lighting. Traditionally I pull power off of the hi beam to trigger relay for power to aux lights.
Any reason the TT's system wouldn't like this arrangement?
There are tons of posts on this. I suggest you SEARCH and read.
There have been some wiring disasters experienced by people so I strongly recommend that you read a bit and make some notes on the ones who provided great information and their solution.
Please do not just go chopping into your wiring.
I am afraid that you may end up being very sorry about it.
I tell people all the time, “Never carve into a factory wiring loom”. Never.
I make $$$$ off of customers all the time who violate this rule.
That why I asked here first. I have a 15 Transit van full of "Can Busses", if you look at a wire component it throws a code.Please do not just go chopping into your wiring.
Will look into a Skene type controller
Thank You
GuzzleGuzzy
Just got it firing!
Sweet setup! I almost have all the parts for replicating this setup. I was pleased to see how tiny the skene controller is, it should fit nicely in the small fog light wiring well under the tank. Question, would you happen to have any tips or cheat-sheets on identifying the high-beam wire? TIAI have a skene controller set up on my bike, fancy relay, that triggers off the high beam, white wire behind the headlight connector. Allows for aux lights to stay on when the bike is powered, in increments of 10%, and full power with high beam.
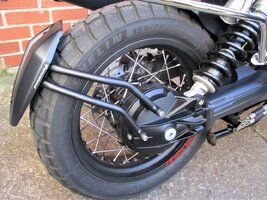
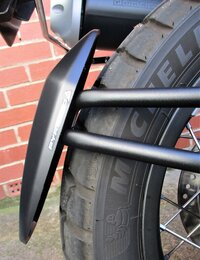
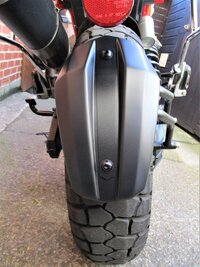
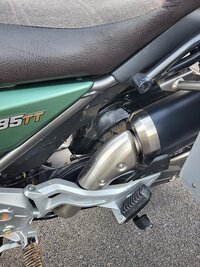
Pleased to report that the Pyramid splash guard works a treat. Picture taken after a very wet 235 mile ride on tarmac. Prior to fitting the guard, the rack/top box, number plate and rear lights would be completely covered in dirt and grit.The only thing to add to the clear and concise instructions PDF above, is the fact that I used Loctite 243 blue on the M8 fasteners and torqued them to 20Nm.

mkc1962
Just got it firing!
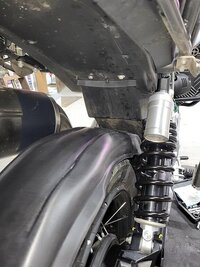
I must admit with many…..the rear splash/spray design of these bikes is ridiculous. For the most part I have my TT for running the back roads of the smoky mountains, but also on occasion back country hard packed type roads. Just in the rain alone makes a total mess. I’m pretty anal about the condition of all I own, this was a topic I had to come up with a solution for…..at least for me
Ive seen the Pyramid plastics, Splash guard, and Hugger. They look good, but to me still if even together wont take care of it all….Not that I have seen anyone do both anyway. However Pyramid is incredibly proud of their plastic and in some cases takes a long time to obtain. So I started searching other options. I ran across a post somewhere of an individual using a splash guard designed for a Honda NC750D. Ebay around $50, but coming from China took about 2 weeks. In Appearance near identical to the Pyramid product, but one does have to modify the mounting bracket that comes with it to mate up to the OE holes in the rear drive. After install did seem to help with most of the road spray during rain conditions, but did basically nothing at all for swingarm, bags, rear shock protection when in any sort of offroad condition. Still grit, mud etc., everywhere.

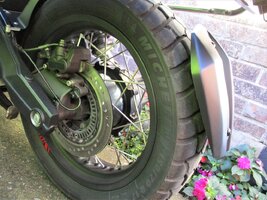
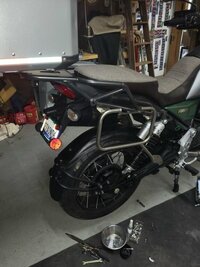
Where I went next was to create an entire cover for the rear wheel all the way to the swing arm. I used a molded in black ABS universal dirt bike front fender. Acerbis brand. Amazon $25. Yes I had to use a heat gun to reshape it to better mate to the situation. I also created a mounting bracket for the swingarm end using ¼” lexan sheet. Nothing attached permanently, no holes drilled etc. The 2 vertical mold tabs on the top of the swingarm act as positioning guides to hold my bracket in a solid place. I made brackets that go around the swing arm for attaching. I also have a large worm gear strap coming for lower profile bracket mounting. But really don’t think it is needed.


My prototype mount, which would move a little side to side is what I road trialed. I went for a 100 mile ride. 20 of it on back country, southern red mud logging roads, some very sloppy with a few water/mud holes that were pan deep. Almost a mistake considering the tires they stuck on my TT from the factory. After the dirt section, I stopped and took a few pictures which show basically nothing at all mud or otherwise on anything in the rear swingarm,shock,bags. I was serious impressed with the lack of filth considering all I had just gone through. The rest of the ride got into some light rain, which for the most part only washed off what little I did get on the bike. To add to this I was also wanting to make sure my mod also had good clearance for suspension movement. I did hit a few pretty large woops/dips and potholes. I saw no sign of any sort of my mod hitting the bottom of the supposed stock fender area. But considering the fact I plan to ride 99% of pavement and nowhere near the type of what I just trialed on, I have no concerns at all…..If a readers plans are to use your TT as a serious off road dirt bike, you would have to assess the situation for yourself.


To me part of owning a new bike is doing mods and making it your own. Sadly sometimes we have to fab up things to overcome poor OE designs. My mod is not this picture perfect factory OE or aftermarket look. But to me it surely does the job, and with the bags on it, you don’t even see it. It takes about 5 minutes to remove the entire Splash/fender addition. And other than my design time, was incredibly cheap. I hope others find this of value.
Ive seen the Pyramid plastics, Splash guard, and Hugger. They look good, but to me still if even together wont take care of it all….Not that I have seen anyone do both anyway. However Pyramid is incredibly proud of their plastic and in some cases takes a long time to obtain. So I started searching other options. I ran across a post somewhere of an individual using a splash guard designed for a Honda NC750D. Ebay around $50, but coming from China took about 2 weeks. In Appearance near identical to the Pyramid product, but one does have to modify the mounting bracket that comes with it to mate up to the OE holes in the rear drive. After install did seem to help with most of the road spray during rain conditions, but did basically nothing at all for swingarm, bags, rear shock protection when in any sort of offroad condition. Still grit, mud etc., everywhere.
Where I went next was to create an entire cover for the rear wheel all the way to the swing arm. I used a molded in black ABS universal dirt bike front fender. Acerbis brand. Amazon $25. Yes I had to use a heat gun to reshape it to better mate to the situation. I also created a mounting bracket for the swingarm end using ¼” lexan sheet. Nothing attached permanently, no holes drilled etc. The 2 vertical mold tabs on the top of the swingarm act as positioning guides to hold my bracket in a solid place. I made brackets that go around the swing arm for attaching. I also have a large worm gear strap coming for lower profile bracket mounting. But really don’t think it is needed.
My prototype mount, which would move a little side to side is what I road trialed. I went for a 100 mile ride. 20 of it on back country, southern red mud logging roads, some very sloppy with a few water/mud holes that were pan deep. Almost a mistake considering the tires they stuck on my TT from the factory. After the dirt section, I stopped and took a few pictures which show basically nothing at all mud or otherwise on anything in the rear swingarm,shock,bags. I was serious impressed with the lack of filth considering all I had just gone through. The rest of the ride got into some light rain, which for the most part only washed off what little I did get on the bike. To add to this I was also wanting to make sure my mod also had good clearance for suspension movement. I did hit a few pretty large woops/dips and potholes. I saw no sign of any sort of my mod hitting the bottom of the supposed stock fender area. But considering the fact I plan to ride 99% of pavement and nowhere near the type of what I just trialed on, I have no concerns at all…..If a readers plans are to use your TT as a serious off road dirt bike, you would have to assess the situation for yourself.
To me part of owning a new bike is doing mods and making it your own. Sadly sometimes we have to fab up things to overcome poor OE designs. My mod is not this picture perfect factory OE or aftermarket look. But to me it surely does the job, and with the bags on it, you don’t even see it. It takes about 5 minutes to remove the entire Splash/fender addition. And other than my design time, was incredibly cheap. I hope others find this of value.
Attachments
Last edited:
I love the engineering and sheer determination of accomplishing this task... I hear you frustration with pyramid plastics cost and availability. Nice work sirI must admit with many…..the rear splash/spray design of these bikes is ridiculous. For the most part I have my TT for running the back roads of the smoky mountains, but also on occasion back country hard packed type roads. Just in the rain alone makes a total mess. I’m pretty anal about the condition of all I own, this was a topic I had to come up with a solution for…..at least for me
Ive seen the Pyramid plastics, Splash guard, and Hugger. They look good, but to me still if even together wont take care of it all….Not that I have seen anyone do both anyway. However Pyramid is incredibly proud of their plastic and in some cases takes a long time to obtain. So I started searching other options. I ran across a post somewhere of an individual using a splash guard designed for a Honda NC750D. Ebay around $50, but coming from China took about 2 weeks. In Appearance near identical to the Pyramid product, but one does have to modify the mounting bracket that comes with it to mate up to the OE holes in the rear drive. After install did seem to help with most of the road spray during rain conditions, but did basically nothing at all for swingarm, bags, rear shock protection when in any sort of offroad condition. Still grit, mud etc., everywhere.
View attachment 28395
Where I went next was to create an entire cover for the rear wheel all the way to the swing arm. I used a molded in black ABS universal dirt bike front fender. Acerbis brand. Amazon $25. Yes I had to use a heat gun to reshape it to better mate to the situation. I also created a mounting bracket for the swingarm end using ¼” lexan sheet. Nothing attached permanently, no holes drilled etc. The 2 vertical mold tabs on the top of the swingarm act as positioning guides to hold my bracket in a solid place. I made brackets that go around the swing arm for attaching. I also have a large worm gear strap coming for lower profile bracket mounting. But really don’t think it is needed.
View attachment 28406View attachment 28407
My prototype mount, which would move a little side to side is what I road trialed. I went for a 100 mile ride. 20 of it on back country, southern red mud logging roads, some very sloppy with a few water/mud holes that were pan deep. Almost a mistake considering the tires they stuck on my TT from the factory. After the dirt section, I stopped and took a few pictures which show basically nothing at all mud or otherwise on anything in the rear swingarm,shock,bags. I was serious impressed with the lack of filth considering all I had just gone through. The rest of the ride got into some light rain, which for the most part only washed off what little I did get on the bike. To add to this I was also wanting to make sure my mod also had good clearance for suspension movement. I did hit a few pretty large woops/dips and potholes. I saw no sign of any sort of my mod hitting the bottom of the supposed stock fender area. But considering the fact I plan to ride 99% of pavement and nowhere near the type of what I just trialed on, I have no concerns at all…..If a readers plans are to use your TT as a serious off road dirt bike, you would have to assess the situation for yourself.
View attachment 28412View attachment 28413View attachment 28414View attachment 28415View attachment 28408View attachment 28409View attachment 28416
View attachment 28417
To me part of owning a new bike is doing mods and making it your own. Sadly sometimes we have to fab up things to overcome poor OE designs. My mod is not this picture perfect factory OE or aftermarket look. But to me it surely does the job, and with the bags on it, you don’t even see it. It takes about 5 minutes to remove the entire Splash/fender addition. And other than my design time, was incredibly cheap. I hope others find this of value.
mkc1962
Just got it firing!
Thank you sir for the compliment.
the thing that gets me is you have a company like Pyramid, willing to sort of try to solve a problem, but either one end of the spray or the other. Which to me is not at all a solution to the OE design flaw. Hence, I notice not many that are willing to pursue the pricey options. They could have easily professionally engineered and molded something like I have created. THAT the masses would probably embrace. Oh well, mine is solved and such challenges are always enjoyed!!
the thing that gets me is you have a company like Pyramid, willing to sort of try to solve a problem, but either one end of the spray or the other. Which to me is not at all a solution to the OE design flaw. Hence, I notice not many that are willing to pursue the pricey options. They could have easily professionally engineered and molded something like I have created. THAT the masses would probably embrace. Oh well, mine is solved and such challenges are always enjoyed!!
Some time back in the late 80s the "industry" decided to stop using real fenders. Apparently they were paying too much attention to the fringe public that Bobbed or chopped their bikes up for fashion. Ignoring the riders who actually ride year round everywhere. A few Retro "UJMs" turn up now and again. One has to go back in time to find a good affordable Utilitarian bike.
mkc1962
Just got it firing!
Very true.......with more than just fenders at times.Some time back in the late 80s the "industry" decided to stop using real fenders. Apparently they were paying too much attention to the fringe public that Bobbed or chopped their bikes up for fashion. Ignoring the riders who actually ride year round everywhere. A few Retro "UJMs" turn up now and again. One has to go back in time to find a good affordable Utilitarian bike.
Clifton
Cruisin' Guzzisti
The industry stylists believe fashion sells and I imagine they are right to some extent. If they wished to cater to those who really ride and clean their bikes, as well as hipsters, they could mould a "cut here line" across the undersides of full size, functional, front and rear fenders. Two other examples of the current "style does not follow function" are oversize TW200 style tires on retro bikes and angling mufflers up 45* which compromises fitting panniers.Some time back in the late 80s the "industry" decided to stop using real fenders. Apparently they were paying too much attention to the fringe public that Bobbed or chopped their bikes up for fashion. Ignoring the riders who actually ride year round everywhere. A few Retro "UJMs" turn up now and again. One has to go back in time to find a good affordable Utilitarian bike.
fastlaners
Tuned and Synch'ed
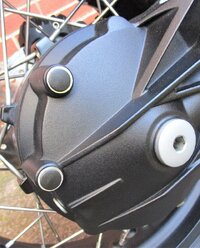
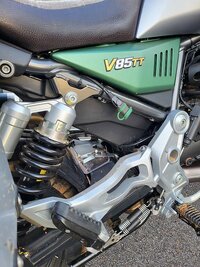
Thanks for the post Chris; it will make it easier for myself and others that may follow your lead on this rear fender; so removing the rear wheel and brake assembly weren’t a real tedious task? Thanks; JohnI have recently installed the Pyramid rear hugger on my V85TT. Hopefully, this series of pictures will prove useful to someone contemplating buying one or about to fit one.
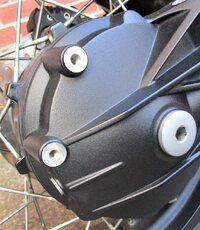
As you would expect the instructions supplied with the hugger are more than adequate to complete the task. The rear wheel must be removed so you can access the two inner M8 bolts on the shaft drive housing. Pyramid recommend using a high quality T40 Torx key on these bolts. I used an extra-long T40 key manufactured in Germany by Stahlwille tools. Their hardened steel Torx keys have correctly formed ends and fit the Guzzi bolts perfectly.
The instructions state that the casing around the bolts must be heated for five minutes with a hot air gun to soften and release the thread lock applied on the production line.
Added 20th January 2021:
I used a cut down extra long allen key and Loctite 262 red when installing the new bolts. The torque figure for these bolts is 25NM.
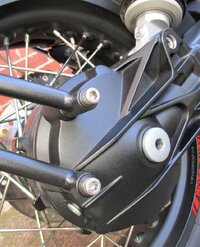
Even though there is a fair amount of work involved to install the right-hand mounting bracket, I am pleased with the result. The hugger is solidly mounted with no flexing and there is more than enough clearance between the swing arm and tyre.
View attachment 21225 View attachment 21226 View attachment 21227 View attachment 21228 View attachment 21229 View attachment 21230 View attachment 21231 View attachment 21232
John, thanks for your feedback.
Fitting this hugger this was the first time I'd removed the rear wheel on the V85TT and I was pleasantly surprised how easy it was. Compared to our Breva 750 and V7, there's plenty of room inside the swing arm and the cush drive rubbers are a breeze to locate on the hub during reassembly.
Fitting this hugger this was the first time I'd removed the rear wheel on the V85TT and I was pleasantly surprised how easy it was. Compared to our Breva 750 and V7, there's plenty of room inside the swing arm and the cush drive rubbers are a breeze to locate on the hub during reassembly.