• Ciao Guest - You’ve landed at the ultimate Guzzi site. NEW FORUM REGISTRATIONS REQUIRE EMAIL ACTIVATION - CHECK YOUR SPAM FOLDER - Use the CONTACT above if you need help. New to the forum? For all new members, we require ONE post in the Introductions section at the bottom, in order to post in most of the other sections. ALWAYS TRY A SEARCH BEFORE STARTING A NEW TOPIC - Most questions you may have, have likely been already answered. DON'T BE A DRIVE-BY POSTER: As a common courtesy, check back in and reply within 24 hours, or your post will be deleted. Note there's decades of heavily experienced Guzzi professionals on this site, all whom happily give endless amounts of their VALUABLE time for free; BE COURTEOUS AND RESPECTFUL!
  • There is ZERO tolerance on personal attacks and ANY HYPERLINKS to PRODUCT(S) or other competing website(s), including personal pages, social media or other Forums. This ALSO INCLUDES ECU DIAGnostic software, questions and mapping. We work very hard to offer commercially supported products and to keep info relevant here. First offense is a note, second is a warning, third time will get you banned from the site. We don't have the time to chase repeat (and ignorant) offenders. This is NOT a social media platform; It's an ad-free, privately funded website, in small help with user donations. Be sure to see the GTM STORE link above; ALL product purchases help support the site, or you can upgrade your Forum profile or DONATE via the link above.
  • Be sure to see the GTM STORE link also above for our 700+ product inventory, including OEM parts and many of our 100% Made-in-SoCal-USA GTM products and engine kits. In SoCal? Click the SERVICE tab above for the best in service, tires, tuning and installation of our products or custom work, and don't miss our GT MotoCycles® (not) art on the BUILDS tab above. WE'RE HERE ONLINE ONLY - NO PHONE CALLS MADE OR RECEIVED - DO NOT EMAIL AND ASK QUESTIONS OR ASK TO CALL YOU.
  • Like the new V100, GuzziTech is full throttle into the future! We're now running on an all-new server and we've updated our Forum software. The visual differences are obvious, but hopefully you'll notice the super-fast speed. If you notice any glitches or have any issues, please post on the Site Support section at the bottom. If you haven't yet, please upgrade your account which is covered in the Site Support section or via the DONATE tab above, which gives you full site access including the DOWNLOADS section. We really appreciate every $ and your support to keep this site ad-free. Create an account, sign in, upgrade your account, and enjoy. See you on the road in 2024.

Valve Cover Replacement

nuberfin

Just got it firing!
Joined
Aug 5, 2011
Messages
7
Location
Saint Louis, MO
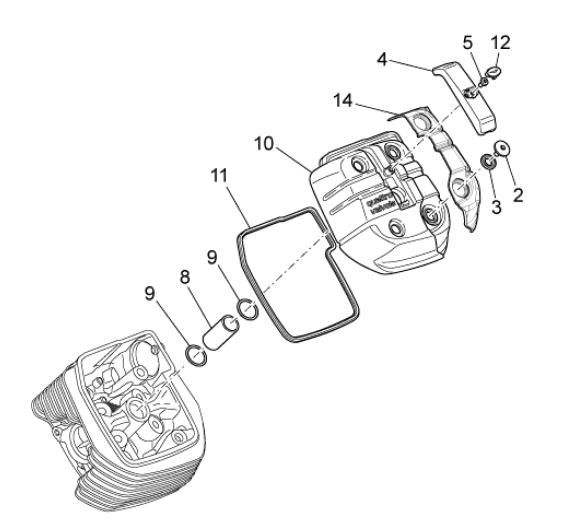
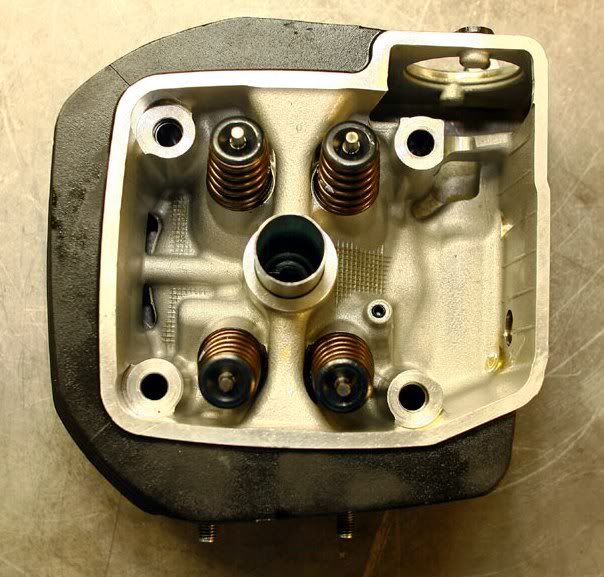
I'm an idiot, dropped my 8V G12 on it's left side thanks to some gravel in a parking lot. I need to replace the valve cover plate (surprisingly the only damage...and not super-visible) and found the parts I need here:

COVERING FOR COVER HEAD LEFT. LH cover.
Part Number: 872740
http://parts.ducatisanantonio.com/p/Mot ... 72740.html

HEAD COVER LEFT. LH Head cover.
Part Number: 872606
http://parts.ducatisanantonio.com/p/__/ ... 72606.html

A couple of questions:

1) I'm no mechanic, but replacing these seems to be a pretty simple process...I have the parts and service manuals and it looks to be a pretty straightforward removal of the old and replacement of the new. Am I fooling myself? Are there any tricky things to be aware of when replacing a damaged valve cover?

2) The bike only has 1,500 miles on it, should I replace the valve cover gasket as well since I'm replacing the valve cover itself? Seems like, unless there's damage to it, it should be fine to re-use.

3) Anyone ever deal with this parts vendor? I wasn't sure if anyone had recommendations for other sources of these parts or if this vendor is reputable.

Thanks in advance for any help...just want to make sure I'm not opening up a can of worms attempting this sort of repair myself.
 
Remove the 'wing' Pry the badge off the plug lead cover and remove the cover, (3mm allen key.). Taking GREAT CARE ONsert a screwdriver underneath the 'L' shaped portion of the plug cap aand with your thumb pressing down on it above the screwdriver steadily apply pressure until the cap lifts. (THE CAPS ARE VERY SOFT AND FRAGILE! BE CAREFULL!).

Once the HT lead is out of the way remove the four cap screws retaining the cover and plastic knee protector. Note the position and orientation of the sealing washers. Get your fingers under the ides of the cover and wriggle and the cover should simply lift off.

Insert the NEW o-ring you will of added to the other two parts on your list into the groove in the plug tunnel in the cover and lube it with a bit of rubber grease. If the gasket has stuck to the head peel it off gently and inspect it before installing it in the new cover. If your bike is MY 11 it may not have the o-ring but will have a re-useable gasket similar to the actual cover gasket around the plug tunnel butI'm betteng it has the o-ring.

Re-install the cover taking care that it slides the o-ring cleanly over the plug tunnel tube, ( judicious and carefull wriggling will achieve this.) re install the plastic knee protector and the sealing washers and then tighten the cap screws to retain the cover. DO NOT OVER TIGHTEN THEM!!!!!!

Put some rubber grease around the sealig rings on the plug cap and re-install. Re install the HT lead cover and the shitty little badge. Re-install wing. Go ride!!!

Pete
 
It is the wise man who fires the engine up to verify no arcing from the plug lead to the valve cover before buttoning everything up. Should arcing be experienced (which is likely unless you've swapped to the NGK plug cap), wrap several turns of electrical tape around the the lead where the arc originates. Start up again and verify no arcing. Then install the lead cover/badge/wing.
 
Thank you so much gentlemen!

I plan on using this method to remove the plug cap, hoping to avoid any damage to the wire (and hence potential arcing Goodvibes mentions)...

http://youtu.be/XPQFl7W-H88

Would that same wise man fire up the engine before the valve cover is screwed down or after tightening the 4 screws on the valve cover (10 Nm torque from what I've found) but "before" putting on the cover and badge over the plug wire?

Again, thanks Pete and Goodvibes for your expertise!
 
Paul's sollution is damned smart! That had never occured to me. I have suggested before that if you stick with the stock caps looping a bit of twine around the cap below the sealing rings and leaving it up, hidden under the lead cover is a good idea. That way next time you can simply tug up on the twine to remove the cap.

Incidentally you'll see that on the caps on Paul's bike there are only two sealing rings on the caps. If yours have three I would strongly suggest contacting your dealer to ensure that your bike has had the cam recall performed. I believe that ALL 'three ring' bikes were within the recall range and new 'two ring' caps were part of the recall. If your caps have thee rings there is a strong possibility it is eligible for the recall and it hasn't been performed. Any doubts? get verification that your bike either isn't eligible or it has been done.

Pete

PS part # for the o-ring is 873626 it's a 26 x 2.5mm viton ring.
 
An alternative to replacement.
Just bought 2nd hand Bella that had scratches to R/H tappet cover from a similar incident.
Bought a can of 3M Heat Proof Engine Paint in ALUMINIUM. (can you get that product Stateside?)
Sanded out the scratches and cleaned with prep-sol first, the paint finish is a dead ringer for stock.

Meanwhile, I would love a set of Cali / Le Mans tappet covers ...........................
 
Thanks for all the great support and assistance guys!

I verified before I bought the bike that the recall was performed (thanks to this forum!), so I'm expecting 2 o-rings, both on order with the valve cover. Hopefully I won't be surprised and find 3.

I'll report back on any helpful details for any others once I have the parts and perform the surgery.

Hopefully, there will be no next time, but I might give the sand and paint repair a shot first, a much cheaper alternative, but parts are on their way, so I'm going to go all out and hope for a swift and successful home-repair.

Thanks all!
 
nuberfin said:
Would that same wise man fire up the engine before the valve cover is screwed down or after tightening the 4 screws on the valve cover (10 Nm torque from what I've found) but "before" putting on the cover and badge over the plug wire?
Doesn't matter if the valve cover is fastened . . . . if it isn't, you will probably weep oil past the gasket during the short arc test run.
 
pete roper said:
If your bike is MY 11 it may not have the o-ring but will have a re-useable gasket similar to the actual cover gasket around the plug tunnel butI'm betteng it has the o-ring.

Pete

I wondered why Guzzi change the design :?: , my spark plug tunnels were bone dry even the o-rings were cut by the Luigi. The replacement o-ring cost me US$0.30 each from the local shop.

PDSCN6834.jpg


New donut gasket
2011valvecover.jpg


Good old o-ring
oldvalvecover.jpg


Phang
 
I w as at the NSWrally this weekend and there was a bloke with an SE that had an oil weep from what I am pretty sure was an o-ring. Luckily I had one with me so we pulled the rocker cover and there were signs of damage to the original ring so we replaced it. No idea if it fixed it!.

Thing is that the donut gasket with, presumably comensurate changes to the base of the cambox, will make oil leaks less likely at or after valve service. Personally I would of thought simply ensuring there was sufficient rubber grease available on assembly and instructing on it's use at service intervals would of been a cheaper option but iven tha many ' Technicians' seem to be unable to read I suppose there is a certain warped logic to it....????

Pete
 
Judging from how tight the clearance between the old spark plug tunnel and the cylinder head, very likely the cover, cambox and the head are revised to accommodate the larger diameter new spark plug tunnel for the donut gasket to butt against.

Until I have the chance to verify against the latest parts diagram, the lower sealing ring of the new spark plug tunnel looks like an o-ring. That’s definitely a warped logic to me :blink:

Phang

MY2011 spark plug tunnel
2011valvecover1.jpg


Pre MY2011 spark plug tunnel
sparkplugtunnel.jpg


sparkplugtunnel2.jpg
 
Thanks for the great photos and advice guys. This is all very helpful for me (and most likely others in the future searching the forum).

Mine being a pre-2011 model, looks like the o-ring is what I'll be dealing with. So, with regard to the rubber-grease that was mentioned; any tips on what kind (or will any do), where to get (Auto parts store?) and how much to use on the o-ring (just exposed edges, grease it before installing in the cover, etc)?

Thanks again gentelmen!
 
Back
Top