Hello everyone! I own a 2010 stelvio ntx 1200 4v abs and the windshield rubs against the hand guards (the black plastic pieces that cover the brake and clutch handles and protect the hands from the wind) when the windshield is all the way down and the bike is in full lock. Do others have the same problem?
Navigation
Install the app
How to install the app on iOS
Follow along with the video below to see how to install our site as a web app on your home screen.
Note: This feature may not be available in some browsers.
More options
-
Ciao Guest - You’ve landed at the ultimate Guzzi site. NEW FORUM REGISTRATIONS REQUIRE EMAIL ACTIVATION - CHECK YOUR SPAM FOLDER - Use the CONTACT above if you need help. New to the forum? For all new members, we require ONE post in the Introductions section at the bottom, in order to post in most of the other sections. ALWAYS TRY A SEARCH BEFORE STARTING A NEW TOPIC - Most questions you may have, have likely been already answered. DON'T BE A DRIVE-BY POSTER: As a common courtesy, check back in and reply within 24 hours, or your post will be deleted. Note there's decades of heavily experienced Guzzi professionals on this site, all whom happily give endless amounts of their VALUABLE time for free; BE COURTEOUS AND RESPECTFUL!
-
There is ZERO tolerance on personal attacks and ANY HYPERLINKS to PRODUCT(S) or other competing website(s), including personal pages, social media or other Forums. This ALSO INCLUDES ECU DIAGnostic software, questions and mapping. We work very hard to offer commercially supported products and to keep info relevant here. First offense is a note, second is a warning, third time will get you banned from the site. We don't have the time to chase repeat (and ignorant) offenders. This is NOT a social media platform; It's an ad-free, privately funded website, in small help with user donations. Be sure to see the GTM STORE link above; ALL product purchases help support the site, or you can upgrade your Forum profile or DONATE via the link above.
-
Be sure to see the GTM STORE link also above for our 700+ product inventory, including OEM parts and many of our 100% Made-in-SoCal-USA GTM products and engine kits. In SoCal? Click the SERVICE tab above for the best in service, tires, tuning and installation of our products or custom work, and don't miss our GT MotoCycles® (not) art on the BUILDS tab above. WE'RE HERE ONLINE ONLY - NO PHONE CALLS MADE OR RECEIVED - DO NOT EMAIL AND ASK QUESTIONS OR ASK TO CALL YOU.
-
Like the new V100, GuzziTech is full throttle into the future! We're now running on an all-new server and we've updated our Forum software. The visual differences are obvious, but hopefully you'll notice the super-fast speed. If you notice any glitches or have any issues, please post on the Site Support section at the bottom. If you haven't yet, please upgrade your account which is covered in the Site Support section or via the DONATE tab above, which gives you full site access including the DOWNLOADS section. We really appreciate every $ and your support to keep this site ad-free. Create an account, sign in, upgrade your account, and enjoy. See you on the road in 2024.
You are using an out of date browser. It may not display this or other websites correctly.
You should upgrade or use an alternative browser.
You should upgrade or use an alternative browser.
Windshield rubs against hand guards when in full lock
- Thread starter Philipp
- Start date
Yes.
They all have some interference in stock configuration like that. It is easily rectified and by doing so you improve the comfort of the motorcycle.
Get the Stelvio risers from Motobits. $75 Install them. Problem solved.
motobits.com/guzzi.htm#StelvioRiser
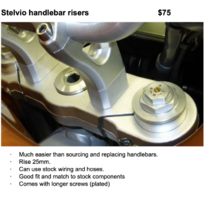
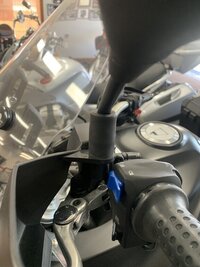
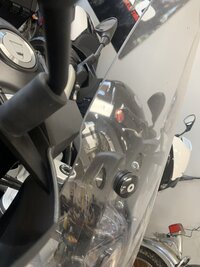
This is the clearance with the windshield in the lowest position. The guards do not touch the windshield. You can see the risers under the stock risers. No additional cables or hoses are necessary. Plug and play. You will have to remove the top triple tree to get the bolts in, but it's not hard at all, just go slow and steady.
Enjoy!

They all have some interference in stock configuration like that. It is easily rectified and by doing so you improve the comfort of the motorcycle.
Get the Stelvio risers from Motobits. $75 Install them. Problem solved.
motobits.com/guzzi.htm#StelvioRiser

This is the clearance with the windshield in the lowest position. The guards do not touch the windshield. You can see the risers under the stock risers. No additional cables or hoses are necessary. Plug and play. You will have to remove the top triple tree to get the bolts in, but it's not hard at all, just go slow and steady.
Enjoy!


Thank you so much! Super helpful!! Much appreciated.Yes.
They all have some interference in stock configuration like that. It is easily rectified and by doing so you improve the comfort of the motorcycle.
Get the Stelvio risers from Motobits. $75 Install them. Problem solved.
motobits.com/guzzi.htm#StelvioRiser
View attachment 24824
This is the clearance with the windshield in the lowest position. The guards do not touch the windshield. You can see the risers under the stock risers. No additional cables or hoses are necessary. Plug and play. You will have to remove the top triple tree to get the bolts in, but it's not hard at all, just go slow and steady.
Enjoy!
View attachment 24823
View attachment 24821
View attachment 24822
If you space your windshield out 1" with 4 spacers they say it smooths the turbulent airflow off the top of the windshield. I am sure that would help with this clearance problem also. I just spaced mine out a couple weeks ago. Only had a couple short rides but it seems to have smoothed my airflow issues.
I also have the Cal Sci tall windshield and Rox risers on mine.
I also have the Cal Sci tall windshield and Rox risers on mine.
I have never ever heard or read anything about this and I have had my Stelvio since new in 2012.
Granted, I’m Italian and we are a vertically challenged people unlike you Dutch, Scandinavian, Germanic, and Eastern European giants! Consequently, the stock configuration of a Stelvio NTX is perfect for me.


I am curious as to where you put these 1” worth of spacers though seeing as how the windshield and its inner and outer rubber gasket washers, ride over the mounting posts of the frame rails which are not even 1/2” long.
Besides, what is holding the forces being applied to the windshield if it is not resting on the mounting posts of the frame rail? Just a very long bolt of some kind…
Granted, I’m Italian and we are a vertically challenged people unlike you Dutch, Scandinavian, Germanic, and Eastern European giants! Consequently, the stock configuration of a Stelvio NTX is perfect for me.
I am curious as to where you put these 1” worth of spacers though seeing as how the windshield and its inner and outer rubber gasket washers, ride over the mounting posts of the frame rails which are not even 1/2” long.
Besides, what is holding the forces being applied to the windshield if it is not resting on the mounting posts of the frame rail? Just a very long bolt of some kind…

Last edited:
I had to go looking…
Found discussion about this modification on advrider, (admittedly, my least favorite site, because it has a lot of bizarre stuff that people do to their motorcycles).
Are you talking about doing work here like this then? Is this where you added your 1" of washers in place of the tubes used here?
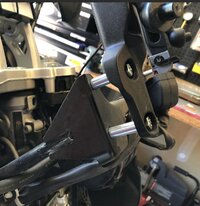
The OP on the site wrote that the above setup was an admittedly, Home Depot attempt at making a solution. (I think he was trying to make an inexpensive version of the real spacer kit from AF1 shown here.)
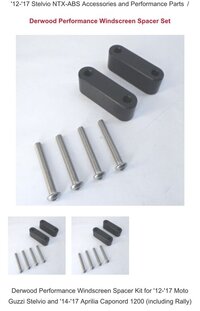
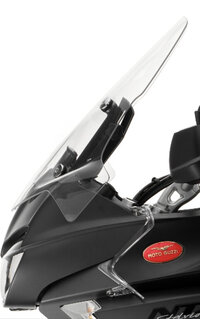
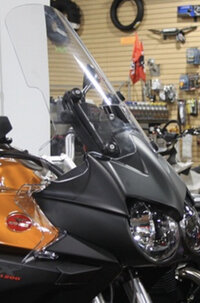
I also assume that with your California Scientific windshield (example below), you must have done it in the same area as the above pics because the windshield itself, mounts in exactly the same position in the posts as a OEM stock shield and you couldn't possibly put 1" of washers there, I'm fairly sure.
I’m am truly positive that the wind forces or vibrational forces from off road riding, which are being transferred into the subframe by using tubes like that, will eventually crack the subframe because of the way the load force is being “pin-point carried” plus the constant vibrational forces of a humongous windshield.
I’m really not convinced that washers are much better. In order to compensate for the uneven drilled centers, most will over tighten the bolt and risk destroying the internal threads.
That is why if I had to do this because of super tall height (I’m Italian and we are a short but proud people) I would only use the actual spacer blocks which are professionally made, and create a solid surface extension, thereby equally distributing the forces on the maximum surface area (the same as the stock setup). (Not the minimal surface area, like the tube design.)
(Scroll back up to the photo of the handlebar risers and imagine just using tubes and long bolts or washers to do that same mounting to the handlebars, and the instability of that design immediately becomes apparent.)
To each their own I guess.
Personally, I will never understand the penchant for wanting to strap a gigantic barn door onto the front of a motorcycle just in terms of aesthetics, which is my own neurosis and quirk. However, I’m short so necessity isn’t a driving factor for me. If I was 6’5” then maybe I would "get it"…


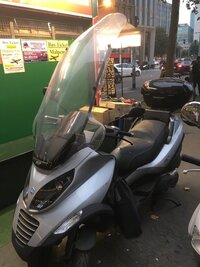
Every time I see these giant windshields, it reminds me of this totally bizarre setup I saw on a Piaggio MP3 scooter in Milan (I own one of these scooters too and love it). I walked around and around that contraption a full 15 minutes trying to figure out the rational.
I concluded with thinking, “Just drive a damn car! “ LOL.
Imagine this in a strong crosswind... Aside from it's ghastly looks, it's a truly terrifying thought to me!
I’m positive that he eventually broke the mounts right off the frame. I’m absolutely sure of its inevitability.
People do bizarre things…
Found discussion about this modification on advrider, (admittedly, my least favorite site, because it has a lot of bizarre stuff that people do to their motorcycles).
Are you talking about doing work here like this then? Is this where you added your 1" of washers in place of the tubes used here?

The OP on the site wrote that the above setup was an admittedly, Home Depot attempt at making a solution. (I think he was trying to make an inexpensive version of the real spacer kit from AF1 shown here.)

I also assume that with your California Scientific windshield (example below), you must have done it in the same area as the above pics because the windshield itself, mounts in exactly the same position in the posts as a OEM stock shield and you couldn't possibly put 1" of washers there, I'm fairly sure.

I’m am truly positive that the wind forces or vibrational forces from off road riding, which are being transferred into the subframe by using tubes like that, will eventually crack the subframe because of the way the load force is being “pin-point carried” plus the constant vibrational forces of a humongous windshield.
I’m really not convinced that washers are much better. In order to compensate for the uneven drilled centers, most will over tighten the bolt and risk destroying the internal threads.
That is why if I had to do this because of super tall height (I’m Italian and we are a short but proud people) I would only use the actual spacer blocks which are professionally made, and create a solid surface extension, thereby equally distributing the forces on the maximum surface area (the same as the stock setup). (Not the minimal surface area, like the tube design.)
(Scroll back up to the photo of the handlebar risers and imagine just using tubes and long bolts or washers to do that same mounting to the handlebars, and the instability of that design immediately becomes apparent.)
To each their own I guess.
Personally, I will never understand the penchant for wanting to strap a gigantic barn door onto the front of a motorcycle just in terms of aesthetics, which is my own neurosis and quirk. However, I’m short so necessity isn’t a driving factor for me. If I was 6’5” then maybe I would "get it"…
Every time I see these giant windshields, it reminds me of this totally bizarre setup I saw on a Piaggio MP3 scooter in Milan (I own one of these scooters too and love it). I walked around and around that contraption a full 15 minutes trying to figure out the rational.
I concluded with thinking, “Just drive a damn car! “ LOL.
Imagine this in a strong crosswind... Aside from it's ghastly looks, it's a truly terrifying thought to me!
I’m positive that he eventually broke the mounts right off the frame. I’m absolutely sure of its inevitability.
People do bizarre things…

Last edited:
Thanks Oscar!If you space your windshield out 1" with 4 spacers they say it smooths the turbulent airflow off the top of the windshield. I am sure that would help with this clearance problem also. I just spaced mine out a couple weeks ago. Only had a couple short rides but it seems to have smoothed my airflow issues.
I also have the Cal Sci tall windshield and Rox risers on mine.
I dreamt about this last night.
If I were to make a modification, I would have made posts that slipped over the existing windshield mounting post, and extended their starting position, 1" further outward. Then all that would be required is 2 longer bolts. The windshield brackets would remain solidly mounted and the forces would be evenly distributed, yet the windshield would have the necessary clearance simply due to the change in the mounting post setup.
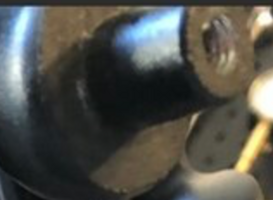
To visualize it, just recreate this exact same shape, except on the underside, make the base as wide as the outer lip and 1" in length, and then drill the center hole on the bottom of this base, just large enough to slide over this post, while providing a new post of the same diameter projecting further out by 1". Slide this adapters over the existing post, get two approximately 1" longer bolts to pass through the OEM windshield mounting hardware, and screw through the adapter and right into these existing threads. Spray pait the whole thing black and you'd never notice the change.
I cannot draw anything to save my life, but this is the general idea... ( I know how to machine this but I cannot draw it! LOL)
The adapter on top, would just slide right over the existing mounting post, but relocate the bottom point of the mounting post, 1" further outward. Alignment and strength would be optimized.
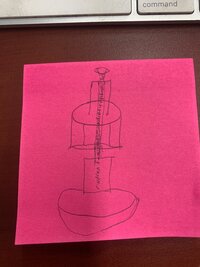
If I were to make a modification, I would have made posts that slipped over the existing windshield mounting post, and extended their starting position, 1" further outward. Then all that would be required is 2 longer bolts. The windshield brackets would remain solidly mounted and the forces would be evenly distributed, yet the windshield would have the necessary clearance simply due to the change in the mounting post setup.

To visualize it, just recreate this exact same shape, except on the underside, make the base as wide as the outer lip and 1" in length, and then drill the center hole on the bottom of this base, just large enough to slide over this post, while providing a new post of the same diameter projecting further out by 1". Slide this adapters over the existing post, get two approximately 1" longer bolts to pass through the OEM windshield mounting hardware, and screw through the adapter and right into these existing threads. Spray pait the whole thing black and you'd never notice the change.
I cannot draw anything to save my life, but this is the general idea... ( I know how to machine this but I cannot draw it! LOL)
The adapter on top, would just slide right over the existing mounting post, but relocate the bottom point of the mounting post, 1" further outward. Alignment and strength would be optimized.

Last edited:
mine doesn't rub, rotate handlebars back a little, readjust brake and clutch lever assy and "Bobs yer uncle"
It will be close on the tank side but no rubbing either end on my 14
Does it strike the tank at all left or right?
I like it. If anyone wants a set of these, ping me direct email; Info at GuzziTech.com -- can do a small batch run if enough interest.I dreamt about this last night.
If I were to make a modification, I would have made posts that slipped over the existing windshield mounting post, and extended their starting position, 1" further outward. Then all that would be required is 2 longer bolts. The windshield brackets would remain solidly mounted and the forces would be evenly distributed, yet the windshield would have the necessary clearance simply due to the change in the mounting post setup.
ScottMastrocinque, first things first, let me admit I have thoroughly enjoyed many of your posts here. Second, let me apologize for affecting your sleep last night. That was never my intention.
About me, I am maybe 5'8" on my best day and my other bike is a Victory Vision, so yeah it is almost car-like in the windflow arena. When I first got my 2015 Stelvio the turbulence was so bad it felt like I could not hold the fluid in my eyeballs still let alone my head and helmet. The Quota I sold before getting the Stelvio had the tallest Gustafsson windshield they offered and it had a pretty quiet pocket of air even at highway speeds.
I have researched about everything ever written on the Stelvio for the last couple of years and I struggled with whether to buy the tallest Cal-Sci windshield or the second tallest. I went with the tallest and I still moved the brackets to the top of their adjustment. Other posters had said the second tallest made them happy and I was basically happy with the tallest one I ended up with.
The Cal-Sci windshields come with some flat washers to space the bottom of the windshield out so it doesn't rub on the fairing at the bottom. At first I didn't add those because I didn't read the directions closely and I didn't want some washers getting rusty under there but, I went back and put them in. My windshield ended up with a small rub line at the bottom because I initially didn't use the washers. Don't care, it doesn't bother me in the slightest. This set up was tolerable but not perfect.
So, after I had bought the $200 windshield I read someone who had posted that putting 1" spacers under the windshield was the answer. Doah! That only makes total sense the problem with the turbulence is the 'dirty' air spilling over the top of the windshield. If you can get some higher pressure air behind the "barn door" shield the air moving across the top should remain more laminar as it spills off the top trailing edge. (That is the reason for the hole at the bottom of the Cal-Sci is to let air spill through the hole and raise the air pressure behind the screen) Man did I wish I had tried this before I bought the $200 Cal-Sci. Truth be told I probably still would have bought the Cal-Sci because like I said I probably won't be happy until I have the still air pocket behind the shield that makes me happy.
Below are a couple photos of my windshield spacers. I had an old selection of nylon spacers that just happened to fit over the post like you had sussed out would be the best way to do this. The bottom rubbers are a little misaligned due to curvature differences. It doesn't look great but it still holds the windshield supported by the rubber so there is no metal to plexi contact anywhere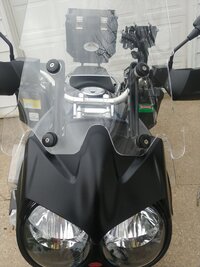 .
.
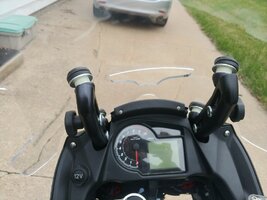
Again, sorry about your lack of sleep last night, Scott but I am not trying to get a space shuttle into orbit, I just want to ride up and down the Mississippi river scenic roads through Iowa, Illinois and Wisconsin. I am sure this is a good solid mount the way I did it.
I am not sure this is the final fix for me but it seemed to make a difference in the couple of short rides I have gotten to take since I did this. Now if only Mother Nature would let us have some decent riding weather in the Midwest.
About me, I am maybe 5'8" on my best day and my other bike is a Victory Vision, so yeah it is almost car-like in the windflow arena. When I first got my 2015 Stelvio the turbulence was so bad it felt like I could not hold the fluid in my eyeballs still let alone my head and helmet. The Quota I sold before getting the Stelvio had the tallest Gustafsson windshield they offered and it had a pretty quiet pocket of air even at highway speeds.
I have researched about everything ever written on the Stelvio for the last couple of years and I struggled with whether to buy the tallest Cal-Sci windshield or the second tallest. I went with the tallest and I still moved the brackets to the top of their adjustment. Other posters had said the second tallest made them happy and I was basically happy with the tallest one I ended up with.
The Cal-Sci windshields come with some flat washers to space the bottom of the windshield out so it doesn't rub on the fairing at the bottom. At first I didn't add those because I didn't read the directions closely and I didn't want some washers getting rusty under there but, I went back and put them in. My windshield ended up with a small rub line at the bottom because I initially didn't use the washers. Don't care, it doesn't bother me in the slightest. This set up was tolerable but not perfect.
So, after I had bought the $200 windshield I read someone who had posted that putting 1" spacers under the windshield was the answer. Doah! That only makes total sense the problem with the turbulence is the 'dirty' air spilling over the top of the windshield. If you can get some higher pressure air behind the "barn door" shield the air moving across the top should remain more laminar as it spills off the top trailing edge. (That is the reason for the hole at the bottom of the Cal-Sci is to let air spill through the hole and raise the air pressure behind the screen) Man did I wish I had tried this before I bought the $200 Cal-Sci. Truth be told I probably still would have bought the Cal-Sci because like I said I probably won't be happy until I have the still air pocket behind the shield that makes me happy.
Below are a couple photos of my windshield spacers. I had an old selection of nylon spacers that just happened to fit over the post like you had sussed out would be the best way to do this. The bottom rubbers are a little misaligned due to curvature differences. It doesn't look great but it still holds the windshield supported by the rubber so there is no metal to plexi contact anywhere
 .
.
Again, sorry about your lack of sleep last night, Scott but I am not trying to get a space shuttle into orbit, I just want to ride up and down the Mississippi river scenic roads through Iowa, Illinois and Wisconsin. I am sure this is a good solid mount the way I did it.
I am not sure this is the final fix for me but it seemed to make a difference in the couple of short rides I have gotten to take since I did this. Now if only Mother Nature would let us have some decent riding weather in the Midwest.
Last edited:
Thank you!


 I didn’t loose sleep. It’s all great!
I dream engineering problems and fabrication techniques when I sleep. It’s something that I have always done.
I like puzzles and I’m a trained scientist through a BS, MS, and PhD program in molecular biology. I have a hard time shutting my brain off. It has a mind of it’s own.
A lot of my post occur right around this time of night (~2am EST) because I wake up to use the restroom. Then I read until I get sleepy again and then I respond to a lot of stuff in this “wind back down” moment.
Wow! I am amazed that this is an issue for somebody as short as me!
Personally, I like the feeling of wind when I ride and have gravitated to fairing-less and/or very small windshield style motorcycles.
I think that’s why I love the Centauro, the 1200 Sport, and why the first thing I did was remove the barn-door from my California Vintage.
However, I now also have a Norge for long distance riding to visit my sister and brother-in-law in NC. . That’s me though…I’m bizzare too.
Mostly though, I am blown away that you actually put your washers in the place I initially thought, but dismissed as not being very likely due to instability of the mounting location the way it is designed.
Live and learn Scott! Just Wow!
However, I am thrilled that Todd likes my engineering design idea and is willing to make a selective batch run. I was going to make some on my mill and/or lathe, but I don’t have CNC, just manual controls albeit with power feed and DRO on all 3 axis so it would take me some time of which I have very little right now.
I think I might toss my name in for a couple of sets!
One for me and one for my best friend and his Stelvio. (I still chuckle when I think how he’s just 10 miles away, out in in podunk Ohio like me, and we met because of our Stelvio NTX’s!). It’s truly a small world when 2 identical motorcycles from Mandello del Lario arrived separately, years apart, here across the world in Northwest Ohio.
I just love that!

Maybe you should toss your name in too? I think it will be a great solution.
Mostly I am grateful though as I think this type of stuff and the fact that we have GuzziTech to share it is with each other, is one of the best things about being a Guzzisti!
Enjoy!
Be happy.
I dream engineering problems and fabrication techniques when I sleep. It’s something that I have always done.
I like puzzles and I’m a trained scientist through a BS, MS, and PhD program in molecular biology. I have a hard time shutting my brain off. It has a mind of it’s own.
A lot of my post occur right around this time of night (~2am EST) because I wake up to use the restroom. Then I read until I get sleepy again and then I respond to a lot of stuff in this “wind back down” moment.
Wow! I am amazed that this is an issue for somebody as short as me!
Personally, I like the feeling of wind when I ride and have gravitated to fairing-less and/or very small windshield style motorcycles.
I think that’s why I love the Centauro, the 1200 Sport, and why the first thing I did was remove the barn-door from my California Vintage.
However, I now also have a Norge for long distance riding to visit my sister and brother-in-law in NC.
Mostly though, I am blown away that you actually put your washers in the place I initially thought, but dismissed as not being very likely due to instability of the mounting location the way it is designed.
Live and learn Scott! Just Wow!
However, I am thrilled that Todd likes my engineering design idea and is willing to make a selective batch run. I was going to make some on my mill and/or lathe, but I don’t have CNC, just manual controls albeit with power feed and DRO on all 3 axis so it would take me some time of which I have very little right now.
I think I might toss my name in for a couple of sets!
One for me and one for my best friend and his Stelvio. (I still chuckle when I think how he’s just 10 miles away, out in in podunk Ohio like me, and we met because of our Stelvio NTX’s!). It’s truly a small world when 2 identical motorcycles from Mandello del Lario arrived separately, years apart, here across the world in Northwest Ohio.
I just love that!
Maybe you should toss your name in too? I think it will be a great solution.
Mostly I am grateful though as I think this type of stuff and the fact that we have GuzziTech to share it is with each other, is one of the best things about being a Guzzisti!
Enjoy!
Be happy.
Last edited:
nope, the horn button is about 2mm from the tank, that's the closest thing.
That’s good but still that’s way too close for my liking.
A damaged tank costs $$$$ to repair and if it touched and marred the finish, it would drive me nuts every time I rode it.
Glad it worked for you and thanks for the info!
