• Ciao Guest - You’ve landed at the ultimate Guzzi site. NEW FORUM REGISTRATIONS REQUIRE EMAIL ACTIVATION - CHECK YOUR SPAM FOLDER - Use the CONTACT above if you need help. New to the forum? For all new members, we require ONE post in the Introductions section at the bottom, in order to post in most of the other sections. ALWAYS TRY A SEARCH BEFORE STARTING A NEW TOPIC - Most questions you may have, have likely been already answered. DON'T BE A DRIVE-BY POSTER: As a common courtesy, check back in and reply within 24 hours, or your post will be deleted. Note there's decades of heavily experienced Guzzi professionals on this site, all whom happily give endless amounts of their VALUABLE time for free; BE COURTEOUS AND RESPECTFUL!
  • There is ZERO tolerance on personal attacks and ANY HYPERLINKS to PRODUCT(S) or other competing website(s), including personal pages, social media or other Forums. This ALSO INCLUDES ECU DIAGnostic software, questions and mapping. We work very hard to offer commercially supported products and to keep info relevant here. First offense is a note, second is a warning, third time will get you banned from the site. We don't have the time to chase repeat (and ignorant) offenders. This is NOT a social media platform; It's an ad-free, privately funded website, in small help with user donations. Be sure to see the GTM STORE link above; ALL product purchases help support the site, or you can upgrade your Forum profile or DONATE via the link above.
  • Be sure to see the GTM STORE link also above for our 700+ product inventory, including OEM parts and many of our 100% Made-in-SoCal-USA GTM products and engine kits. In SoCal? Click the SERVICE tab above for the best in service, tires, tuning and installation of our products or custom work, and don't miss our GT MotoCycles® (not) art on the BUILDS tab above. WE'RE HERE ONLINE ONLY - NO PHONE CALLS MADE OR RECEIVED - DO NOT EMAIL AND ASK QUESTIONS OR ASK TO CALL YOU.
  • Like the new V100, GuzziTech is full throttle into the future! We're now running on an all-new server and we've updated our Forum software. The visual differences are obvious, but hopefully you'll notice the super-fast speed. If you notice any glitches or have any issues, please post on the Site Support section at the bottom. If you haven't yet, please upgrade your account which is covered in the Site Support section or via the DONATE tab above, which gives you full site access including the DOWNLOADS section. We really appreciate every $ and your support to keep this site ad-free. Create an account, sign in, upgrade your account, and enjoy. See you on the road in 2024.

Worn 4v valve guides?

Shrek

Tuned and Synch'ed
Joined
Sep 16, 2015
Messages
96
Location
Australia
33E082A7 BE88 477F 8718 20452DA4A446 Hi all
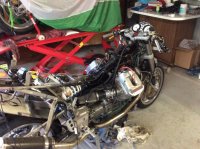
While checking my Centauro valve clearnces,which have never moved,i wanted to check for valve guide wear.
I pushed the valve tops sideways and got about .5mm/20 thou movement on the inlets and more on the exhausts.I didnt measure them but maybe as much as 30-40 thou or 1mm.
Manual tolerance indicates .05 or 2 thou when new.

These are obviously worn,but how bad?
Should i pull the heads now and reco them?

I have been quoted almost $100ea Au for guides alone when the 2v,s cost around $10.Does this sound right?
Something about 4v guides being updated to Borrillium alloy with presumably gold or diamonds?

Has anyone had experience rebuilding these heads and have any advice or cautionary tales.

I would also replace valve seals,belts and valves if required.
Then get a local engine reconditioner to machine seats and grind valves etc
Motor has 70,000km.

This will be my first 4v head job.
Any advice appreciated.
 
You may want to look into inserts in guides, k-line I think is what it's called. Check oil pump if you haven't done this already.
 
+1 on the oil pump. Expensive aftermarket fix but necessary
 
Also those belt drive driven cams are a bitch to set up. Be sure to mark everything. I would recommend doing one side at a time to minimize the risk of getting the valve timing off. Also agree that K-line is the way to go.
 
B5740B44 A892 4A30 8281 EBA73FC01146 EB2AD0E3 DCD9 466E B447 8A542783DFC4 Thanks for the replies

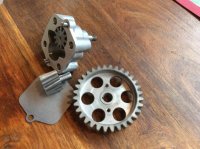
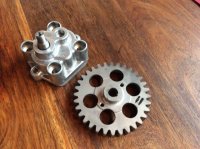
The bike came with what looks to me like a new looking oil pump and gear.
Aluminium housing with steel helical gears and no bearings.
Gear is steel.
Can you identify or confirm these parts are what i need to update the oil pump?
If so,this would suggest the previous owner never got around to updating it.

I will have to research K line valve liners as i am not familiar with them.

Yes John,the cam setup is the major thing that worries me as i dont really understand how to do it.
But i guess i can learn.Just hate to get it wrong.

Thanks for the advice guys
 
After reading all this it seems i have a new uprade steel gear and steal pump gears.
Given the new parts in the box i am guessing its just waitin to be done.
Saves me a few dollars ...i hope.

Thanks for the link jr1967,much appreciated.

Does anybody know a link for setting cams?
 
After reading all this it seems i have a new uprade steel gear and steal pump gears.
Given the new parts in the box i am guessing its just waitin to be done.
Saves me a few dollars ...i hope.

Thanks for the link jr1967,much appreciated.

Does anybody know a link for setting cams?

That procedure is in the Daytona workshop manual. You might be able to find one on line. It does require a special degree wheel and a mounting adapter for it. That is why I suggested one side at a time and reference marks. Without these tools and a dial indicator is is just about impossible to set up the cam timing. Also there is a torque setting for the belt tensioners.
 
Ok,thanks.I have a workshop manual,tensioner tool and dial but no degree wheel.
How do i do one side at a time when both heads need reconditioning?
 
Ok,thanks.I have a workshop manual,tensioner tool and dial but no degree wheel.
How do i do one side at a time when both heads need reconditioning?

Set one side to TDC with valves closed. Mark cam position. Remove that head only and get it done. Then install the repaired head before setting up and removing the other.
 
Back
Top