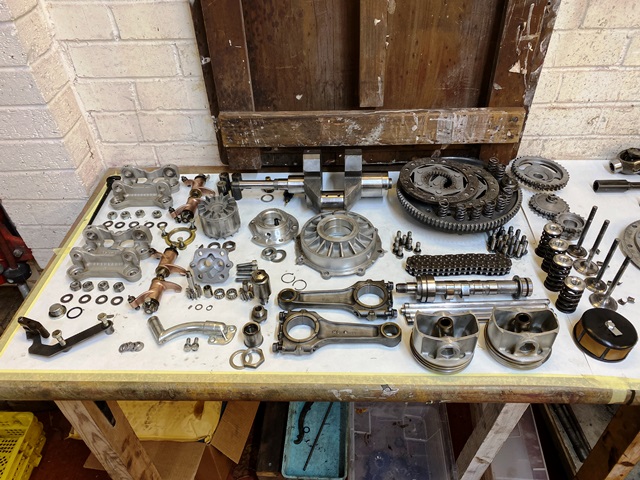
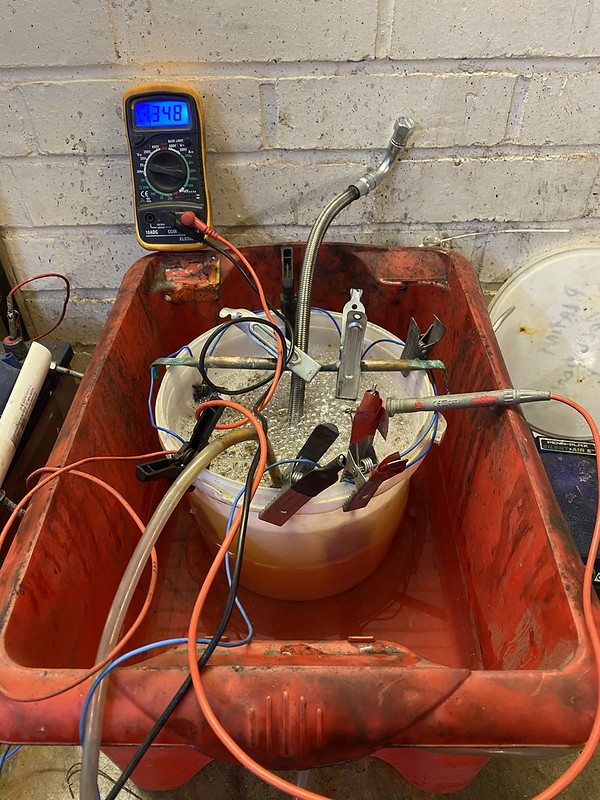
• Ciao Guest - You’ve landed at the ultimate Guzzi site. NEW FORUM REGISTRATIONS REQUIRE EMAIL ACTIVATION - CHECK YOUR SPAM FOLDER - Use the CONTACT above if you need help. New to the forum? For all new members, we require ONE post in the Introductions section at the bottom, in order to post in most of the other sections. ALWAYS TRY A SEARCH BEFORE STARTING A NEW TOPIC - Most questions you may have, have likely been already answered. DON'T BE A DRIVE-BY POSTER: As a common courtesy, check back in and reply within 24 hours, or your post will be deleted. Note there's decades of heavily experienced Guzzi professionals on this site, all whom happily give endless amounts of their VALUABLE time for free; BE COURTEOUS AND RESPECTFUL!
  • There is ZERO tolerance on personal attacks and ANY HYPERLINKS to PRODUCT(S) or other competing website(s), including personal pages, social media or other Forums. This ALSO INCLUDES ECU DIAGnostic software, questions and mapping. We work very hard to offer commercially supported products and to keep info relevant here. First offense is a note, second is a warning, third time will get you banned from the site. We don't have the time to chase repeat (and ignorant) offenders. This is NOT a social media platform; It's an ad-free, privately funded website, in small help with user donations. Be sure to see the GTM STORE link above; ALL product purchases help support the site, or you can upgrade your Forum profile or DONATE via the link above.
  • Be sure to see the GTM STORE link also above for our 700+ product inventory, including OEM parts and many of our 100% Made-in-SoCal-USA GTM products and engine kits. In SoCal? Click the SERVICE tab above for the best in service, tires, tuning and installation of our products or custom work, and don't miss our GT MotoCycles® (not) art on the BUILDS tab above. WE'RE HERE ONLINE ONLY - NO PHONE CALLS MADE OR RECEIVED - DO NOT EMAIL AND ASK QUESTIONS OR ASK TO CALL YOU.
  • Like the new V100, GuzziTech is full throttle into the future! We're now running on an all-new server and we've updated our Forum software. The visual differences are obvious, but hopefully you'll notice the super-fast speed. If you notice any glitches or have any issues, please post on the Site Support section at the bottom. If you haven't yet, please upgrade your account which is covered in the Site Support section or via the DONATE tab above, which gives you full site access including the DOWNLOADS section. We really appreciate every $ and your support to keep this site ad-free. Create an account, sign in, upgrade your account, and enjoy. See you on the road in 2024.

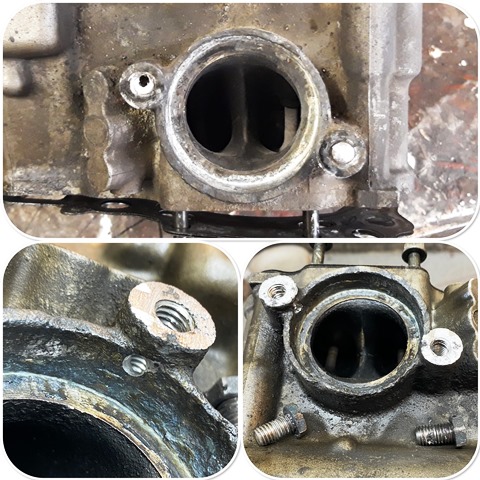
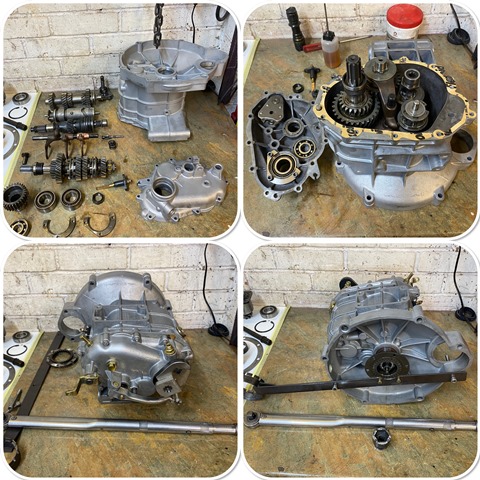
Guzzi 1100 Custom build

I am amazed at how little wear there is on the engine and gearbox components. there is no disenable wear on the crank or bores, pretty good for 30k miles! I cleaned out the sludge trap in the crank but it was clean, glad I did it though as the bung was far too lose for comfort! it has a dab of retaining compound on it now. the only wear I have found so far is a roller bearing in the rear drive, and as you can see there is pitting on the inner race. this will be replaced.

engine-parts-copy.jpg


crank-bung-copy.jpg


diff-build-2.jpg
 
I am amazed at how little wear there is on the engine and gearbox components. there is no disenable wear on the crank or bores, pretty good for 30k miles!
I’m not at all. Guzzi builds one of the most durable engines in existence. Mine looked not far from this at 200k miles.
 
well the frame is back from the powder coaters, along with the plating of all the smaller parts. Its always a dilemma what colour to go on the plated parts… I can have them silver, but the corrosion protection long term is much less than the yellow passivate, so yellow it is!

the frame has come out superb as usual, but the swinging arm is terrible. I knew it was pitted, but he said when he blasted it, big flakes of rust came off, and although he coated it, he knew it would not be acceptable to me. He did say he could improve it, but I decided to try and find one that’s less corroded. We will see.


frame-copy.jpg
 
I forget who, but one of the UK guys here, did a spectacular restoration of his Breva. The plating he used was exceptional.

I’m going to try and find the thread as it is a really good read.

UPDATE:

Well, I searched everywhere and reviewed all of my posts as well. I could not find it. 🙁

This gentleman completely tore down and restored his Breva. It was a lovely yellow-orange color with yellow plating on the metal pieces. The end product was beautiful.

If anybody knows where that went, please make a link to it here.

The guys really did a bang-up job and it was really something.

Maybe he deleted his posts. I don’t know but I’d like to find it again.
 
Last edited:
its actually not that difficult to plate at home... I have done it on quite a few restorations now. the main problem is its so time consuming, and to get it done commercially is cheap if you can find someone you trust. I still do some of the fragile parts myself like pipe ends with my kit. here are a few pictures of my plating setup and the results. it makes a huge difference to the quality of the restoration on something like a set of carbs

0diy-plating-3.jpg


plating-tank.jpg


50691797383_5ae7e23748_o.jpg


plating-copy.jpg


carbs-1.jpg
 
Impressive! I don't have that skill set. Would be nice to learn...

Its surprisingly easy... I bought a kit here in the UK for around £50 and have used it for around 7 years! this is the company I used, some good tutorials on their pages. Always happy to share my knowledge...

 
Well, I searched everywhere and reviewed all of my posts as well. I could not find it.
For some odd reason, it had been deleted. Here go;

 
For some odd reason, it had been deleted. Here go;


There it is!

Thanks Todd.
 
While everything is on hold while I wait for the cases to come back ( blaster has Covid and is really poorly...) I agreed to help a friend of a friend who was struggling with two broken studs in a cylinder head, so I though I would share my knowledge on removing them...

removing broken studs is always a problem, especially where someone has had a go first! in this case they had drilled off centre and then broken an easy out in the bottom! in 50 years of doing this stuff I have NEVER seen an easy out remove a broken stud in alloy… My technique for broken stud removal is to first clean the head of the stud with a burr in a Dremel to get it nice and clean. Then use a half nut the same size of the stud, but drill the threads out so again its nice and clean.

Place the nut central on the stud and start off with the TIG on low amps and just puddle the weld on top of the stud.. This permeates the heat down the stud… Build up the weld inside the nut until its flush. I have the electrode sticking out a bit more than normal to get close to the stud top. Once its cooled a little, give it a tap with a small hammer for a bit of shock. then try working it back and forth… its its too tight, or squeals as you try to turn… it stop. Then if its possible drill a hole into the alloy from the side and JUST into the stud. over a couple of hours feed some Plus Gas (wonderful stuff!) in the hole and work the nut back and forth… I have had great success removing studs this way in alloy.

52434767440_57315a9ed0_o-copy.jpg
 
...in 50 years of doing this stuff I have NEVER seen an easy out remove a broken stud in alloy…

Granted, my method is very much like yours. I TIG a nut onto the end of the broken stud and immediately twist it right out. The heat from the molten metal pool, is always sufficient to release the bolt from the threads.

However, I have been able to successfully remove many dozens of broken studs with EZ Outs but you have to know the trick of how to use them. A wise old machinist set me straight on this. He said...

Unless you CHANGE THE CONDITIONS of the bolt and threads being seized together, the EZ Out will just break too!

This is where 99.9% of the people screw this up, my younger self included!

Now, if I don't have access to my TIG setup, I drill my pilot hole then heat the bolt with a MAPP gas torch, then spray very high quality Penetrating Oil into the assembly. I let it sit and soak in 15 minutes or so. Then repeat again. After two treatments, I then heat the stud a third time with my torch, and the EZ Out will snatch it right out of there.
 
I will give your method a try! Interesting you mention Mapp Gas, I don't know why but that stuff had escaped me until a few months ago when I borrowed a blow torch off a mate when mine ran out! its fantastic!


Looks like the guy that does my blasting is still poorly, so I have turned to working on the next project until I get all the Guzzi cases back... something I don't normally do as I like to do one project a time... There are a few things I can get on without getting seriously into it, one of which was to make some tapered inlet manifolds. This is another 1000DS Ducati build and I am exploring the Idea of using a small supercharger off a VW 1.4 TSFI... we will see once I get properly into it, but for now here is how I made the manifolds.

 
All the parts are back from the blasters, so its cleaning time… nothing scraps an engine like leaving glass media in there so its important to get it all out. I have a process I use for this. First I wash it all off in petrol… paying attention to all nooks and crannies, holes and oilways with a long thin bottle brush. then I jet wash it off, and blow it all off, including all holes. (you need goggles for this!) then its into a stainless steel tray and another wash off with petrol, and then I use carb cleaner with a long spout into all the holes and oil ways… if there is ANY single bit of media in the tray, its back to jet washing and blowing off again. Its easy to see any media in the stainless tray. Here is the gearbox in the stages of being built up.

gearbox-1-copy.jpg
 
FWIW - If there is a next time for you, or for those contemplating this, glass blasting is not the way to go. In fact, it is a terrible choice for engine and fine detail parts like carburetors, calipers, etc. Look how many time you washed with petrol! What a dangerous risk that is but it makes a damn mess on everything.

Vapour blasting is the gold standard.

No residue. No solids left. No loss of substrate material from the harsh abrasive.

The surface is perfect from vapour blasting.

Find a shop with this machinery. It’s worth every penny.

I am saving to buy a vapour blasting cabinet for my shop this next year.

E2528DE1 C10B 4277 9137 839A1D756D9F
 
I agree! I have all my cases vapour blasted... but you still have media in with the water? or are you saying yours is a different process with no glass media?
 
Vapor blasting can be accomplished with many media choices. My prefered choice is soda saturated water. This is much better for carburetor and detail work than glass bead. As I said, soda will not remove any of the substrate material from what you are working on whereas glass bead does. Also, the glass fragment will get into and block tiny internal passageways where the soda will not, and if it does get in there, hot water will dissolve all of it instantly.

It's just a much better option in my opinion but it does take twice the amount of soda media to saturate the water slurry as the soda will dissolve into the water until such point as the slurry is completely saturated.
 
that's interesting... there is a local company I use that does soda blasting (well they did they closed last week due to the hike in energy costs here in the UK) and they have done some parts for me in the past... all the alloy parts that came back were no where near as nice as glass bead blasted parts though... I think the soda blast leaves the surface "open" where as the beads peen the surface.

I take your point on the soda solubility though... I have not seen it done with a saturated solution either, that's new to me, I will have to look that up. removing bead is a pain, but in all the years I have only been defeated once, and that was on some Ducati Monster cylinders... no mate how many time I cleaned them, there was some bead in the tray. In the end I admitted defeat and removed the core plugs and cleaned again.

I do have a home blasting cabinet (with a centrifugal extraction unit which works fantastic! it can be seen underneath ) and I use this for dry glass bead and it works really well. At first I was getting good results for a while, then a dull finish. I went to the bead supplier and told them, and he asked what presure I was blasting at... when i told him, he said that's your problem! its too high and you are shattering the beads and turning them to sharp dust! he said turn the presure right down and then slowly up until you get a finish... he also said a test is to mark the surface with a grubby finger, if the mark wont rub completely off, the surface is poor... he also said to wipe it with a microfiber cloth, if it drags at all, no good, if it glides across, its good!

below is a before and after, good Vs poor

bead-blaster-copy.jpg


bead-blast-comparrison.jpg


head-and-barrel-colarge.jpg
 
Back
Top