It certainly is one of those inventions that you just scratch your head and wonder what life without it would be like. It’s really inconceivable to not have it.The guy who invented zip ties is my hero
Navigation
Install the app
How to install the app on iOS
Follow along with the video below to see how to install our site as a web app on your home screen.
Note: This feature may not be available in some browsers.
More options
-
Ciao Guest - You’ve landed at the ultimate Guzzi site. NEW FORUM REGISTRATIONS REQUIRE EMAIL ACTIVATION - CHECK YOUR SPAM FOLDER - Use the CONTACT above if you need help. New to the forum? For all new members, we require ONE post in the Introductions section at the bottom, in order to post in most of the other sections. ALWAYS TRY A SEARCH BEFORE STARTING A NEW TOPIC - Most questions you may have, have likely been already answered. DON'T BE A DRIVE-BY POSTER: As a common courtesy, check back in and reply within 24 hours, or your post will be deleted. Note there's decades of heavily experienced Guzzi professionals on this site, all whom happily give endless amounts of their VALUABLE time for free; BE COURTEOUS AND RESPECTFUL!
-
There is ZERO tolerance on personal attacks and ANY HYPERLINKS to PRODUCT(S) or other competing website(s), including personal pages, social media or other Forums. This ALSO INCLUDES ECU DIAGnostic software, questions and mapping. We work very hard to offer commercially supported products and to keep info relevant here. First offense is a note, second is a warning, third time will get you banned from the site. We don't have the time to chase repeat (and ignorant) offenders. This is NOT a social media platform; It's an ad-free, privately funded website, in small help with user donations. Be sure to see the GTM STORE link above; ALL product purchases help support the site, or you can upgrade your Forum profile or DONATE via the link above.
-
Be sure to see the GTM STORE link also above for our 700+ product inventory, including OEM parts and many of our 100% Made-in-SoCal-USA GTM products and engine kits. In SoCal? Click the SERVICE tab above for the best in service, tires, tuning and installation of our products or custom work, and don't miss our GT MotoCycles® (not) art on the BUILDS tab above. WE'RE HERE ONLINE ONLY - NO PHONE CALLS MADE OR RECEIVED - DO NOT EMAIL AND ASK QUESTIONS OR ASK TO CALL YOU.
-
Like the new V100, GuzziTech is full throttle into the future! We're now running on an all-new server and we've updated our Forum software. The visual differences are obvious, but hopefully you'll notice the super-fast speed. If you notice any glitches or have any issues, please post on the Site Support section at the bottom. If you haven't yet, please upgrade your account which is covered in the Site Support section or via the DONATE tab above, which gives you full site access including the DOWNLOADS section. We really appreciate every $ and your support to keep this site ad-free. Create an account, sign in, upgrade your account, and enjoy. See you on the road in 2024.
You are using an out of date browser. It may not display this or other websites correctly.
You should upgrade or use an alternative browser.
You should upgrade or use an alternative browser.
Mindis V7-850 Mods
- Thread starter Mindis
- Start date
If you decide you want to make a short production run of some carbon part, maybe we can make some aluminum molds on my little mill:The good news is that my covers will look awesome, or at least I think so LOL I got my diamond flakes in the mail and spread out to visualize the pattern. That carbon sparkle will tone down once I have satin finish and the size of them flakes is exactly what I was hoping for
The bad news is that I won't have enough flakes for both wheel covers. I've barely barely enough for one... That is because I've never made anything with them flakes so I had no clue what's the coverage would be and just shot from the hip when ordering them. To guess a single layer coverage by flake's weight is very tricky... I knew I was gonna be short and was ready to fill gaps in pattern with forged carbon chopped strands, but I'm waAAAy too short for that, so I ordered more and have to wait for few weeks now. I have enough for one cover anyway so no stalling, I've negative molds to make first anyway. Let's make sm mess with smooth tile leveling grout:
That was a test for me for my patience... I can spend countless hours refining a part but watching paint dry is my kryptonite... I put extra water in the mix so when it fully dries, it shrinks a tiny bit and it makes it easier to de-mold without chiseling MDF. So I had to wait for 2 days for it to cure completely not to take a chance of it cracking when de-molding. Geez... If a granny in a shopping line counts her pennies for too long, I feel the need to shank her in the carpark later, that's how much patience I have.... LOL
Well, taking extra time to wax my molds few more times paid off as well, negative molds popped out effortless!

not sure what's going on with the photo here...
kildareman
Cruisin' Guzzisti
When I think of the time I spent hand lacing aircraft looms. But you also need a tie wrap gun for consistent tension and no sharp ends.It certainly is one of those inventions that you just scratch your head and wonder what life without it would be like. It’s really inconceivable to not have it.
Last edited:
Damn, just merry me and we go live in your shop happily ever aftermaybe we can make some aluminum molds on my little mill

On a serious note, there's no market to them parts... time and effort will not pay off... If I'd be in a job like yours with all that fancy gear, I'd definitely milk it! I'd find a way to produce some parts cheap and efficiently, but... I have no time and no will for this. Whatever I build and create is my vision and not everyone's cup of tea, and even if it would be, I'm not very keen on replicating it. That's my bragging rights of "absolutely no one has it" LOL
I managed to make more slack on my throttle cables so I don't have to shorten them. Now they hug my speedo at the front and I can get back at my headlight bucket. After cutting out it doesn't look bulky anymore. Front of it will be an inch'ish shorter but I'll find that out when attaching new headlight. I'll do fine trimming later, for now it's just an rough cut so I don't waste carbon chops:


Inside I'll fit a bigger horn, just above bottom triple:

From top view, it covers half the speedo. Picture view is where my eye level is, it's what I'll see. Speedo is nearly flat and I'm looking at it at an angle. To see everything better I'll have to stick my nose forward a bit. It's slightly inconvenient but I'm fine with that, I don't need much info from it anyway. I can tell what gear I'm in by revs, time is irrelevant when I'm on my bike, and "km/h" sign is just some random flashing numbers for no reason... LOL

Here's what it looks like all cut out, ready for carbon chops:

Last test to see if it would be better as a hat:

Dunno... kinda doesn't suit with my beautiful eyes... I think I'll keep it a headlight bucket...
Inside I'll fit a bigger horn, just above bottom triple:
From top view, it covers half the speedo. Picture view is where my eye level is, it's what I'll see. Speedo is nearly flat and I'm looking at it at an angle. To see everything better I'll have to stick my nose forward a bit. It's slightly inconvenient but I'm fine with that, I don't need much info from it anyway. I can tell what gear I'm in by revs, time is irrelevant when I'm on my bike, and "km/h" sign is just some random flashing numbers for no reason... LOL
Here's what it looks like all cut out, ready for carbon chops:
Last test to see if it would be better as a hat:
Dunno... kinda doesn't suit with my beautiful eyes... I think I'll keep it a headlight bucket...
Time for more updates")
Got new rubber:

I'm still waiting for 90deg valve stem with extension so not that much in a rush to get wheel covers finished. That was a lie. I'm procrastinating... LOL I need a full day for one wheel cover from early morning till late night so I can monitor vacuum while resin curing to a point where vacuum is not needed anymore. I accidently wasted half of my Sunday on sleeping so it'll be a job for next weekend...
Since my intake is mounted for good I can brew injector covers. I started shaping some thin alOOOOminum but kinda don't "feel" it atm... lines kinda doesn't suit the flow... LOL Ima gonna leave it for now and address that another day from another point of view


Got new rubber:
I'm still waiting for 90deg valve stem with extension so not that much in a rush to get wheel covers finished. That was a lie. I'm procrastinating... LOL I need a full day for one wheel cover from early morning till late night so I can monitor vacuum while resin curing to a point where vacuum is not needed anymore. I accidently wasted half of my Sunday on sleeping so it'll be a job for next weekend...
Since my intake is mounted for good I can brew injector covers. I started shaping some thin alOOOOminum but kinda don't "feel" it atm... lines kinda doesn't suit the flow... LOL Ima gonna leave it for now and address that another day from another point of view
Rear brake upgrade.
Rear brakes on V7 sucks... Since 0 miles on the bike rear brakes were too soft for my liking. I could never lock rear brakes without ABS or trigger ABS no matter how hard I step on them. I've change brake fluid 3 times in a span of nearly 2 years, bled them 4 times thinking that maybe I screwed up somewhere. Bled them with calipers hanging above ABS unit, with vacuum, without vacuum traditional way etc. I ride my bike sporty, and sometimes when downshifting fast I use only rear brake so I can perfect my rev matching, so I want my rear brakes to be solid. So I'm upgrading to sintered brake pads and I'm upgrading rear master cylinder. I believe OEM is 13mm rear cylinder, I'm upgrading to 11mm. It sure didn't make sense to me on that at the start so it took some long hours of search to make up my mind that it's what I want LOL If it's good on liter sport bikes, it'll do for the Goose
So I got Brembo PS11 master cylinder. Mounting holes are 40mm like OEM but it's not a direct fit elsewhere:

OEM's cylinder pusher bolt that goes to pedal's lever (dunno what's it called) has a mushroom cap and locks inside with a retaining clip. PS11 has just a hole and bolt doesn't lock in. I took mushroom cap off on my lathe to fit inside PS11:

Other than mushroom cap, everything else works perfect! Pedal's rod stayed the same length, pedal's position the same. When pedal is fully up, there's no slack between pusher bolt and cylinder itself, so there's no worries about that bolt not be lockable inside the cylinder. Brake line needed to go back nearly an inch to reach PS11 but no probs, plenty of play to make some slack in the line. In other words, all went much smoother than I thought it would be
A sketch for a reservoir mount bracket:

I can just cut some tin, powdercoat it, and call it done. ...but... I wonder is there any type of material exist that would make that bracket look much nicer? Oh yeah!!! It's KaRboUn FaYbeR!!!
  Well, I still need to make a solid part as a mold for carbon:

And I got few layers of cloth on for now. The socket I hot-glued on is to make sure I have one continuous piece as bracket + clamp. It looks a mess now but it's only a caterpillar, butterflies don't emerge in a day")

Also in last pic there's my valve cover protectors after final satin finish. That'll be in next episode, once I install valve covers for good. Follow me for more recipes LOL
Rear brakes on V7 sucks... Since 0 miles on the bike rear brakes were too soft for my liking. I could never lock rear brakes without ABS or trigger ABS no matter how hard I step on them. I've change brake fluid 3 times in a span of nearly 2 years, bled them 4 times thinking that maybe I screwed up somewhere. Bled them with calipers hanging above ABS unit, with vacuum, without vacuum traditional way etc. I ride my bike sporty, and sometimes when downshifting fast I use only rear brake so I can perfect my rev matching, so I want my rear brakes to be solid. So I'm upgrading to sintered brake pads and I'm upgrading rear master cylinder. I believe OEM is 13mm rear cylinder, I'm upgrading to 11mm. It sure didn't make sense to me on that at the start so it took some long hours of search to make up my mind that it's what I want LOL If it's good on liter sport bikes, it'll do for the Goose
So I got Brembo PS11 master cylinder. Mounting holes are 40mm like OEM but it's not a direct fit elsewhere:
OEM's cylinder pusher bolt that goes to pedal's lever (dunno what's it called) has a mushroom cap and locks inside with a retaining clip. PS11 has just a hole and bolt doesn't lock in. I took mushroom cap off on my lathe to fit inside PS11:
Other than mushroom cap, everything else works perfect! Pedal's rod stayed the same length, pedal's position the same. When pedal is fully up, there's no slack between pusher bolt and cylinder itself, so there's no worries about that bolt not be lockable inside the cylinder. Brake line needed to go back nearly an inch to reach PS11 but no probs, plenty of play to make some slack in the line. In other words, all went much smoother than I thought it would be
A sketch for a reservoir mount bracket:
I can just cut some tin, powdercoat it, and call it done. ...but... I wonder is there any type of material exist that would make that bracket look much nicer?
Oh yeah!!! It's KaRboUn FaYbeR!!! Well, I still need to make a solid part as a mold for carbon:And I got few layers of cloth on for now. The socket I hot-glued on is to make sure I have one continuous piece as bracket + clamp. It looks a mess now but it's only a caterpillar, butterflies don't emerge in a day
Also in last pic there's my valve cover protectors after final satin finish. That'll be in next episode, once I install valve covers for good. Follow me for more recipes LOL
Headlight bucket coming along. I got one layer of carbon chops and roughly pre-sanded. That'll hold the shape for next steps. I decided not to have mounting bolts on the bucket on the outside for a smoother look. I glued bolts on the inside and later will reinforce with carbon cloth. My fork covers can spin on the forks, that's how I can take my bucket off. It'll be inconvenient to unbolt it from inside the bucket but I'm OK with that

And my brake reservoir bracket is coming along as well:

And my brake reservoir bracket is coming along as well:
I had a busy and productive weekend in my shop, make sm popcorn, new episode is out now
Headlight bucket's bolts were reinforced with carbon cloth. There will be more reinforcement later once I have headlight's holding ring glued in. But before I do that I have to make sure bolts will hold for now:

Rear brake reservoir bracket is done. I glued brass M5 nut to clamping part not to me messing with small nuts later:

That brass threaded nut was a cut-off from my rubber Y intake LOL Bracket mounted:


Injector covers got a final coat of resin. I still "don't feel" them... I went ahead hoping that they'll look better in black, and after final shaping, maybe they'll grow on me once on the bike. They look like a pair of swamp leeches with arthritis....

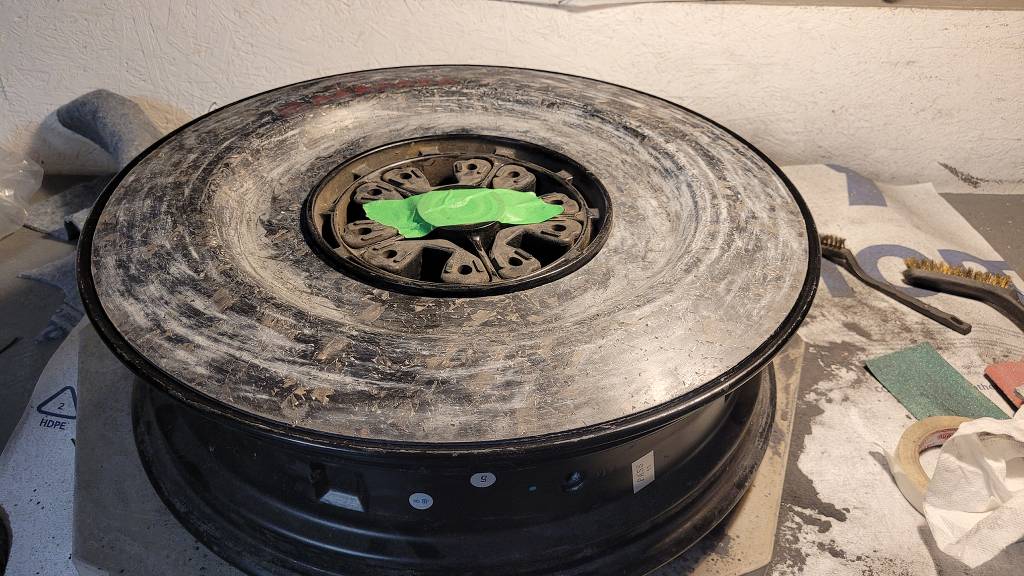
Now on to my wheel covers. Because I'm a goof and a dork, I have to have some letters on them. The idea is the same as was my rear fender- red brushed chaotic'ish writing. Not visually striking, barely visible, a conversation starter to get a smile on someone's face Only this time I won't fail on it. I think so... LOL So following earlier suggestion I premade separate letters and after mold was generously waxed few times, glued them on. This way all the letters will hold together and won't move while I'm working with carbon chops and cloth on top. Raised thickness of letters should give some depth of writing on a finished piece, sort of floating inside. Theoretically, we'll see tomorrow...

I did not take pics of diamond flake pattern during process coz I was racing against time. By the time I got 2nd last layer of cloth on, first batch of resin for flakes was starting to cure and I had to vacuum bag it asap.

I can't watch paint dry but I can watch excess resin seeping through breather cloth:

While monitoring vacuum all Sunday, I'm addressing another thing- bar end weights to reduce vibrations to my hands. I have carbon tubes on my clip-ons and there's ~4in lead rods glued inside them as weights. It did reduce vibrations quite a bit when I made them but no miracles. Apparently that is not most efficient way to reduce vibrations, therefore I believe I can do better There was company that's no longer in business that was making bar end weights called Vibrinator. Some say it does miracles... Clamping point has to be as far out as possible, through rubber, weight rod goes inside clip-on tube without touching the tube, bar end weight on the outside end. Allegedly it disrupts resonating frequency and technology was taken from a helicopter manufacturer. I'm no theoretical scientist so I ain't gonna do any calculations, I'll just take the idea and wing it
The only steel rod I had in my scrap bin was a threaded rod, that'll do. Made one piece and broke my lathe, second one is still in the lathe. I have to weld center slide's nut on the lathe now... My small hobby lathe is cheap, and it shows. I'm keep on dialing it in and it gets loose again. Oh well...

Next episode airs Monday before midnight, Canadian time. Stay tuned for exciting de-molding of first wheel cover!
Headlight bucket's bolts were reinforced with carbon cloth. There will be more reinforcement later once I have headlight's holding ring glued in. But before I do that I have to make sure bolts will hold for now:
Rear brake reservoir bracket is done. I glued brass M5 nut to clamping part not to me messing with small nuts later:
That brass threaded nut was a cut-off from my rubber Y intake LOL Bracket mounted:
Injector covers got a final coat of resin. I still "don't feel" them... I went ahead hoping that they'll look better in black, and after final shaping, maybe they'll grow on me once on the bike. They look like a pair of swamp leeches with arthritis....
Now on to my wheel covers. Because I'm a goof and a dork, I have to have some letters on them. The idea is the same as was my rear fender- red brushed chaotic'ish writing. Not visually striking, barely visible, a conversation starter to get a smile on someone's face
Only this time I won't fail on it. I think so... LOL So following earlier suggestion I premade separate letters and after mold was generously waxed few times, glued them on. This way all the letters will hold together and won't move while I'm working with carbon chops and cloth on top. Raised thickness of letters should give some depth of writing on a finished piece, sort of floating inside. Theoretically, we'll see tomorrow...I did not take pics of diamond flake pattern during process coz I was racing against time. By the time I got 2nd last layer of cloth on, first batch of resin for flakes was starting to cure and I had to vacuum bag it asap.
I can't watch paint dry but I can watch excess resin seeping through breather cloth:
While monitoring vacuum all Sunday, I'm addressing another thing- bar end weights to reduce vibrations to my hands. I have carbon tubes on my clip-ons and there's ~4in lead rods glued inside them as weights. It did reduce vibrations quite a bit when I made them but no miracles. Apparently that is not most efficient way to reduce vibrations, therefore I believe I can do better
There was company that's no longer in business that was making bar end weights called Vibrinator. Some say it does miracles... Clamping point has to be as far out as possible, through rubber, weight rod goes inside clip-on tube without touching the tube, bar end weight on the outside end. Allegedly it disrupts resonating frequency and technology was taken from a helicopter manufacturer. I'm no theoretical scientist so I ain't gonna do any calculations, I'll just take the idea and wing itThe only steel rod I had in my scrap bin was a threaded rod, that'll do. Made one piece and broke my lathe, second one is still in the lathe. I have to weld center slide's nut on the lathe now... My small hobby lathe is cheap, and it shows. I'm keep on dialing it in and it gets loose again. Oh well...
Next episode airs Monday before midnight, Canadian time. Stay tuned for exciting de-molding of first wheel cover!
I was so excited about my wheel cover that it was all I was thinking about all day LOL
Here's the back side:

Front looks hazy because there's wax stuck from the mold:

Letters turned good as well:

Once finished, pattern will look like this:

I have to leave it for another day or two in the mold to fully cure before I can start sanding, do final coats and glue retaining ring. But before all this, I have a lot of scrubbing to do with wire brush and gasoline to get remaining wax out of them little air pockets that formed. I believe I left heating matts on for too long and wax melted into those tiny air pockets. That's why it looks like it's like cracked stone atm, no big deal, just a bit extra work. Overall I'm very happy how this one turned out. Next one will be a bit more tricky coz it's caliper side and deeper dish...
Here's the back side:
Front looks hazy because there's wax stuck from the mold:
Letters turned good as well:
Once finished, pattern will look like this:
I have to leave it for another day or two in the mold to fully cure before I can start sanding, do final coats and glue retaining ring. But before all this, I have a lot of scrubbing to do with wire brush and gasoline to get remaining wax out of them little air pockets that formed. I believe I left heating matts on for too long and wax melted into those tiny air pockets. That's why it looks like it's like cracked stone atm, no big deal, just a bit extra work. Overall I'm very happy how this one turned out. Next one will be a bit more tricky coz it's caliper side and deeper dish...
kildareman
Cruisin' Guzzisti
How about a nice rear caliper guard, 'cause you can
I think "Because I Can" is his motto.How about a nice rear caliper guard, 'cause you can
I think "Because I Can" is his motto.
For his WHOLE LIFE I would think!
Hold my Guinness...How about a nice rear caliper guard, 'cause you can
That's actually a good idea! Rear caliper gets lots of dirt indeed. I'm trying to keep my bike minimalistic and don't want to dress up with unnecessary stuff but if I can make it look invisible, why not?
Bingo! Some say just because you can, doesn't mean you should. But I think that's not the case here LOLI think "Because I Can" is his motto.
Back to my headlight. Once bucket was reinforced, I can mount it and glue headlight's retaining ring on. Since I'll have only little room to adjust my lights when it's done, I have to set my lights as precise as possible. So I leveled my bike to riding stance, paralleled it to my shop's wall, straightened and braced handlebars, powered on headlight with retaining ring on.


Only then I could glue retaining ring. So I tacked it with hot glue, took out the bucket, took out the headlight out of it, and made passage for grub screws that secures the headlight inside retaining ring:

Then I could fill the gap with epoxy mixed with cabosil powder:

Previously I asked on this forum about light switches. Canadian V7 doesn't have just DRL + lights + high beam, the lights comes on as soon as you start the bike. Theoretically you can change handlebar switches to Euro to have an option of just DRL but it was never tested or confirmed so I didn't want to spend money to be a test rabbit. And I didn't want to start hacking original wiring at the time... So my X is gonna be my DRL that'll be connected as low beam, and when I'll need lights it'll be lights+high beam together. There's quite few guys in my area are riding with high beams on constantly, claiming to be more visible. I don't entirely agree with that but it's not being frown upon so I'll go with that and see...


DRL's X is plenty bright and well visible in a daylight, I had to dim camera's lighting to take a pic.
Now I could finish the bucket around headlight, last carbon chop session. This way retaining ring will be imbedded in carbon fiber

kildareman
Cruisin' Guzzisti
With the DRL euro setup the dipped beam doesn't come on with the ignition only when the engine starts. Also dipped beam shuts off the drl.
Tell the main beam guys that makes them less visible as mains destroys the depth of field of anyone looking
Tell the main beam guys that makes them less visible as mains destroys the depth of field of anyone looking
Hmmm....With the DRL euro setup the dipped beam doesn't come on with the ignition only when the engine starts. Also dipped beam shuts off the drl.
Tell the main beam guys that makes them less visible as mains destroys the depth of field of anyone looking
 I'll think again about my lighting options... I barely ride at night so I might as well just keep low beam and skip high beam. In the pic above on my garage door, that big dot of light in the center is the high beam. It kinda doesn't look too evasive to me... Well, once all is done then I'll bring it out on the street at night and I'll see more.
Before scrubbing wax of wheel cover I decided to glue it's retaining ring on first. That'll give me a rigidity and it'll be easier to work with. I trimmed retaining ring, sanded both parts:

Here's how it will cover. There will be ~5mm strip of the rim showing between cover and tire that I will paint it red later.
Mixed some resin and glued together

Retaining ring is glued, pics to see profile. I trimmed the ring a bit more, all I need is 5mm lip there. Now it feels very solid


Scrubbing wax off wasn't as painful as I though it would be. Small wire brush with acetone and some elbow grease did the trick. Now those little air pockets can be sealed before final coats. If I just do resin coats with brush then those tine air pockets still stays, so I mix some resin and rubbing in hard with my fingers. That seals everything for final finishing. I'm sure my future girlfriend will appreciate my muscly fingers...
I believe those covers will be the show piece on my bike, so less then perfect finish is absolutely not acceptable. I'm really glad that I went for diamond flake carbon chops, the pattern is turning out super! ...or at least I think so... LOL
Beautiful!
Once seal coat is on and final shape cut, I can put it on weighing scales to check:

That's what I roughly predicted. Finished piece should be close to 200gr, caliper side cover should be ~230-250gr, and standoffs around 50gr. And that'll be around 500gr for all. Not a super win but not bad either. I don't think I could make it any lighter... I mean I can, but I'd rather have extra rigidity than mere 100gr less weight
Sealing coat haven't cured, yet I started sanding and wrecking my sandpaper LOL Geez, I really have to work on my patience....
Truly the ideas that simply pour out of you and your ability to fabricate it into reality, is just remarkable.
Watching this unfold is really enjoyable. Scary, but enjoyable!

Watching this unfold is really enjoyable. Scary, but enjoyable!