• Ciao Guest - You’ve landed at the ultimate Guzzi site. NEW FORUM REGISTRATIONS REQUIRE EMAIL ACTIVATION - CHECK YOUR SPAM FOLDER - Use the CONTACT above if you need help. New to the forum? For all new members, we require ONE post in the Introductions section at the bottom, in order to post in most of the other sections. ALWAYS TRY A SEARCH BEFORE STARTING A NEW TOPIC - Most questions you may have, have likely been already answered. DON'T BE A DRIVE-BY POSTER: As a common courtesy, check back in and reply within 24 hours, or your post will be deleted. Note there's decades of heavily experienced Guzzi professionals on this site, all whom happily give endless amounts of their VALUABLE time for free; BE COURTEOUS AND RESPECTFUL!
  • There is ZERO tolerance on personal attacks and ANY HYPERLINKS to PRODUCT(S) or other competing website(s), including personal pages, social media or other Forums. This ALSO INCLUDES ECU DIAGnostic software, questions and mapping. We work very hard to offer commercially supported products and to keep info relevant here. First offense is a note, second is a warning, third time will get you banned from the site. We don't have the time to chase repeat (and ignorant) offenders. This is NOT a social media platform; It's an ad-free, privately funded website, in small help with user donations. Be sure to see the GTM STORE link above; ALL product purchases help support the site, or you can upgrade your Forum profile or DONATE via the link above.
  • Be sure to see the GTM STORE link also above for our 700+ product inventory, including OEM parts and many of our 100% Made-in-SoCal-USA GTM products and engine kits. In SoCal? Click the SERVICE tab above for the best in service, tires, tuning and installation of our products or custom work, and don't miss our GT MotoCycles® (not) art on the BUILDS tab above. WE'RE HERE ONLINE ONLY - NO PHONE CALLS MADE OR RECEIVED - DO NOT EMAIL AND ASK QUESTIONS OR ASK TO CALL YOU.
  • Like the new V100, GuzziTech is full throttle into the future! We're now running on an all-new server and we've updated our Forum software. The visual differences are obvious, but hopefully you'll notice the super-fast speed. If you notice any glitches or have any issues, please post on the Site Support section at the bottom. If you haven't yet, please upgrade your account which is covered in the Site Support section or via the DONATE tab above, which gives you full site access including the DOWNLOADS section. We really appreciate every $ and your support to keep this site ad-free. Create an account, sign in, upgrade your account, and enjoy. See you on the road in 2024.

Screen spacers adjustment

Alfromoz

Just got it firing!
Joined
Jan 18, 2013
Messages
6
Location
Narangba, Queensland
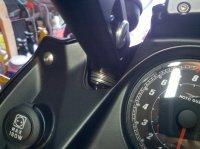
Hi all. :idea: Yesterday I put 6mm worth of spacers between the frame and screen supports on the top bolts only.
Well I must say it has made a huge difference to the height (pushed it forward at the top) of the screen. I already have the NTX screen on my standard stelvio but I'm tall and have Tinnitus so I need the quiet. It's not as good as the adv screen on my old 1200gs but close.
A cheap fix for the moment.
You can also put 4-5mm of spacers between the mount and the screen on the top bolts on the screen and it will further push the top forward.
Worth a try.
I just used plastic and fibre washers.
 
I also put spacers between the frame and mount. I put about 1/2 inch of fender washers on both bolts. It definitely made a difference. There is a lot more air flowing between the screen and fairing. So far the wind hitting my helmet is less intense and I no longer feel then need to buy an air foil or new windscreen. Well worth $5.00 and about an hour of work.
 
Hi, can one of you post a pic? I'm pretty sure I understand what you've done but it would be nice to see it. Thanks.

windy
 
I followed the instructions for the canisterectomy to remove re fairing. took about an hour. I had been looking at the brackets and wondering why there was such a large opening, and why put a whole in your screen. So I thought more air under could be accomplished with spacers. I did get longer screws too.
 
Here is the left bracket and visible washers.
 

Attachments

  • 2013-04-02_10-02-06_257.jpg
    2013-04-02_10-02-06_257.jpg
    522.4 KB · Views: 279
alxpwl said:
Here is the left bracket and visible washers.

Thank you, I'm pleased I saw the pic now, I thought you had placed the washers in between the screen and the screen arm on the top mounting points to push the screen out.

Cheers

windy
 
Back
Top