• Ciao Guest - You’ve landed at the ultimate Guzzi site. NEW FORUM REGISTRATIONS REQUIRE EMAIL ACTIVATION - CHECK YOUR SPAM FOLDER - Use the CONTACT above if you need help. New to the forum? For all new members, we require ONE post in the Introductions section at the bottom, in order to post in most of the other sections. ALWAYS TRY A SEARCH BEFORE STARTING A NEW TOPIC - Most questions you may have, have likely been already answered. DON'T BE A DRIVE-BY POSTER: As a common courtesy, check back in and reply within 24 hours, or your post will be deleted. Note there's decades of heavily experienced Guzzi professionals on this site, all whom happily give endless amounts of their VALUABLE time for free; BE COURTEOUS AND RESPECTFUL!
  • There is ZERO tolerance on personal attacks and ANY HYPERLINKS to PRODUCT(S) or other competing website(s), including personal pages, social media or other Forums. This ALSO INCLUDES ECU DIAGnostic software, questions and mapping. We work very hard to offer commercially supported products and to keep info relevant here. First offense is a note, second is a warning, third time will get you banned from the site. We don't have the time to chase repeat (and ignorant) offenders. This is NOT a social media platform; It's an ad-free, privately funded website, in small help with user donations. Be sure to see the GTM STORE link above; ALL product purchases help support the site, or you can upgrade your Forum profile or DONATE via the link above.
  • Be sure to see the GTM STORE link also above for our 700+ product inventory, including OEM parts and many of our 100% Made-in-SoCal-USA GTM products and engine kits. In SoCal? Click the SERVICE tab above for the best in service, tires, tuning and installation of our products or custom work, and don't miss our GT MotoCycles® (not) art on the BUILDS tab above. WE'RE HERE ONLINE ONLY - NO PHONE CALLS MADE OR RECEIVED - DO NOT EMAIL AND ASK QUESTIONS OR ASK TO CALL YOU.
  • Like the new V100, GuzziTech is full throttle into the future! We're now running on an all-new server and we've updated our Forum software. The visual differences are obvious, but hopefully you'll notice the super-fast speed. If you notice any glitches or have any issues, please post on the Site Support section at the bottom. If you haven't yet, please upgrade your account which is covered in the Site Support section or via the DONATE tab above, which gives you full site access including the DOWNLOADS section. We really appreciate every $ and your support to keep this site ad-free. Create an account, sign in, upgrade your account, and enjoy. See you on the road in 2024.

Tool to adjust air-/by pass screw

diedel

Tuned and Synch'ed
Joined
Apr 26, 2011
Messages
28
Hi folks!

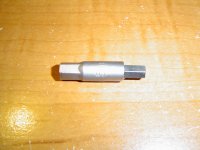
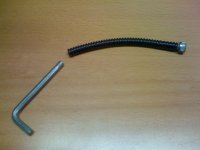
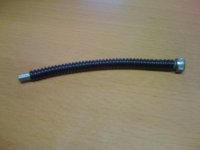
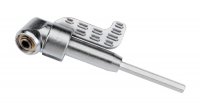
Does anybody has a hint which (special-) tool should be used to adjust the air-/by pass screws on the throttle body?
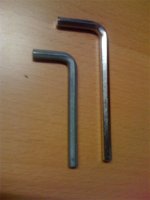
I know that there are hex socket screws but they are hardly to reach with standard tools. I yet shortened a redundant IKEA key but handling is still more than inconvenient… something like a gooseneck screwdriver?
 
pete roper said:
While a trifle inconvenient it is hardly difficult? I just use a standard 5mm key. :blink:

Pete

… i grab back in my household tool box and have at least 2 "standards" – both 5mm ;-)
The other 4 standards in my garage equally won't give me the right feeling since it is not about an on/off action.
I'll keep you posted if i find something more convenient :)

Dietrich
 

Attachments

  • standard.jpg
    standard.jpg
    29.3 KB · Views: 711
Rafael said:
A ball tip hex key makes it easier.

Yes, but unfortunately my key has the ball tip on the long side shaft :-(
 
Pete,

do you know what special tool is this (#6)? May be it's simply a rubber hose…


btw: i forgot to mention that i've Stucchi crashbars mounted, therefore room to work on the screws is additionally limited.

Dietrich
 

Attachments

  • specialtools.pdf
    158.9 KB · Views: 63
Buggered if I know but those are the ludicrously priced fork rebuild tools for the Showa front end. Nothing to do with TB balancing. Why would you need a single piece of tube to balance the TB's anyway?

Pete
 
I think that is a tool for bleeding the air out of the fork cartridges before you set the oil height. Not a required tool and you can do it with out that.
But I do not think that has anything to do with the TB's.
 
Okay, Deidel.

I managed with with the ball tip on a long key on a Stelvio with factory crash bars - guess the Griso with the Stucchi crash bars is a tighter fit.

Try a short ball tip to fit a 1/4" socket to fit a 1/4" drive ratchet with a u-joint and extension. http://www.amazon.com/5mm-Ball-Tip-...54651463&sr=8-25&keywords=ball+tip+allen+keys

This set up might be a bit awkward, so a better option might be to weld a ball tip to the short leg of standard allen key - or weld it to a 5mm box wrench/spanner. If welding isn't an option for you, then cut through a 5mm deep socket so that you have a tube, insert some epoxy the the ball tip on one end and the short leg on the other. Take measurements as you go. You have your own custom made tool. Post a picture when your done. ;)

I have a small collection of home made tools myself the simplest being a strip of cloth (tonti u-joint prop) and the best a output shaft wrench for a 5 spd.
 
1. Obtain small 5mm hex nut bit from Sears, mine was a Black and Decker < $5
2. Obtain a 5mm hex allen wrench < $5
3. Cut hex allen with Dremel Cutoff wheel until it is just slightly protruding from nut bit and then trim hex bit down to size.
4. Using dab of any available epoxy or gasket making material, glue cut allen wrench into bit.
4. The lower hex flutes and larger thicker round area of the bit holder can easily be rotated within the fingertips to adjust the bleed screw very precisely.
5. Total cost, less than $10.

Simple.
 

Attachments

  • sync tool 001.JPG
    sync tool 001.JPG
    1.4 MB · Views: 546
scottmastrocinque said:
1. Obtain small 5mm hex nut bit from Sears, mine was a Black and Decker < $5
2. Obtain a 5mm hex allen wrench < $5
3. Cut hex allen with Dremel Cutoff wheel until it is just slightly protruding from nut bit and then trim hex bit down to size.
4. Using dab of any available epoxy or gasket making material, glue cut allen wrench into bit.
4. The lower hex flutes and larger thicker round area of the bit holder can easily be rotated within the fingertips to adjust the bleed screw very precisely.
5. Total cost, less than $10.

Simple.

Yes, that has also been on my mind.
Regarding "tubes" i had another idea of something like that:


A bendable screwdriver… unfortunately this tube (you'd never guess where i found it :lol: ) isn't stiff enough.
OK finally I have the whole winter time to work on that issue ;-)

Dietrich
 

Attachments

  • IMG_0354.jpg
    IMG_0354.jpg
    242.3 KB · Views: 336
  • IMG_0356.jpg
    IMG_0356.jpg
    215 KB · Views: 336
scottmastrocinque said:
1. Obtain small 5mm hex nut bit from Sears, mine was a Black and Decker < $5
2. Obtain a 5mm hex allen wrench < $5
3. Cut hex allen with Dremel Cutoff wheel until it is just slightly protruding from nut bit and then trim hex bit down to size.
4. Using dab of any available epoxy or gasket making material, glue cut allen wrench into bit.
4. The lower hex flutes and larger thicker round area of the bit holder can easily be rotated within the fingertips to adjust the bleed screw very precisely.
5. Total cost, less than $10.

Simple.

download.html


To me a Quality 5mm ball end wrench would serve better in your tool, with yours you still would have to be at the exact angle the bleed screw is to insert it. The ball end would give you a lot of leeway
 
draidt said:
To me a Quality 5mm ball end wrench would serve better in your tool, with yours you still would have to be at the exact angle the bleed screw is to insert it. The ball end would give you a lot of leeway


Well, to each his own, I find my tool works very precisely, is easy to use, and in fact, will stay within the adjustment screw without me holding it in. Plus it is inexpensive! Ball end allen wrenches are very poor feeling to me as the surface area being used to apply the rotational forces is very very small. Again, to each his own. I offered my tool as an idea of what I have fabricated and what WORKS FOR ME. Not to get into a debate. :roll:
 
scottmastrocinque said:
draidt said:
To me a Quality 5mm ball end wrench would serve better in your tool, with yours you still would have to be at the exact angle the bleed screw is to insert it. The ball end would give you a lot of leeway


Well, to each his own, I find my tool works very precisely, is easy to use, and in fact, will stay within the adjustment screw without me holding it in. Plus it is inexpensive! Ball end allen wrenches are very poor feeling to me as the surface area being used to apply the rotational forces is very very small. Again, to each his own. I offered my tool as an idea of what I have fabricated and what WORKS FOR ME. Not to get into a debate. :roll:


That is what a forum should be an exchange of idea's, I am not or do not mean to castigate your tool and applaud anyone with ingenuity.
 
Guys (+ girls), found yesterday another tricky tool… while strolling through a local DIY store i saw this:


Primary for use with battery drills it possibly will help in our case, too. It's dirt cheap (about 5,- EUR) but also a little bit wobbly made, maybe to much clearance by using with fingertips…? Either way with the proper hex bit it will neatly fit under TB. The laterally out-sticking grip paddle is rotatable/removable.

Dietrich
 

Attachments

  • Winkelaufsatz.jpg
    Winkelaufsatz.jpg
    39.2 KB · Views: 294
hugzy said:
Is this a 1200 thing or so 'cos my 1100 just uses a flat screw drive for the bypass screws.

Apparently a 1200 thing: it has allen hex screws.
 
Back
Top