NOW AVAILABLE here;
 gtmotocycles.com
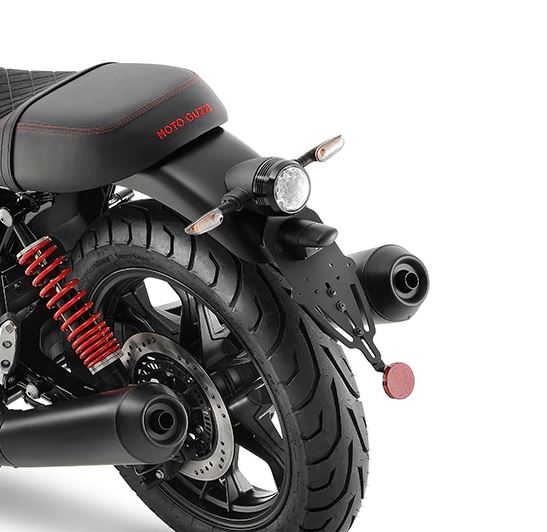
Our bracket replaces the stock bracket (#15 below), and fits both the World (Euro - shown below) and LARGE N.A. LED brake light. See our How-to instructions towards the bottom.
Above link is for the plate mount only, which would raise the plate upwards ~4", and you can leave the stock brake light and turns, or we have the smaller Euro brake light assy (+$239) linked below, along with the LED turns shown below if desired.
 gtmotocycles.com


R&R instructions:
1. Remove seat, left and right side covers. On the left cover, remove the seat latch cable from it’s holder.

2. On the right side unplug the fender light harness.

3. Remove the front torx fender bolts.

4. Remove the rearward fender bolt, and one bolt on each side (not shown), then carefully remove fender. Not shown, there is a fender liner that covers the wiring harness. Remove the two bolts and remove to access the taillight.

5. The two bolts below secure the tail light assembly to the fender.

6. Remove the top bolt, and pinch the wires to unplug the light connector.

7. Remove the two screws that hold the LED light cup and light to the stock bracket. These will be re-used. Support/hold/protect when removing.

8. Remove the plastic tongue.

9. These are the wires to power any plate light(s). Yellow is power, blue is ground.

10. Reverse above, and we recommend using blue loctite on all hardware outside of plastic screws of course. Enjoy.
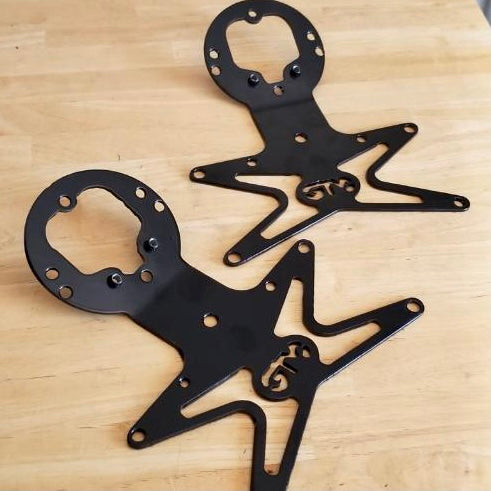
GT MotoCycles V7 III LED Tail Tidy Kit
GT MOTOCYCLES® V7 III LED Tail Tidy Kit (TTK) Designed for the V7 III Night Pack and newer models with the LED brake light. Moves the plate up ~4", and gets rid of all of the ugly plastic below, by replacing the entire stock bracket with this black steel bracket. This is for the bracket only...
gtmotocycles.com
Our bracket replaces the stock bracket (#15 below), and fits both the World (Euro - shown below) and LARGE N.A. LED brake light. See our How-to instructions towards the bottom.
Above link is for the plate mount only, which would raise the plate upwards ~4", and you can leave the stock brake light and turns, or we have the smaller Euro brake light assy (+$239) linked below, along with the LED turns shown below if desired.
OEM V7 III Euro LED Brake Light - Turns
OEM Euro LED Brake Light and LED Turns Replace your LARGE LED N.A. Brake light with the SMALL Euro LED V7 III LED brake light as shown. You MUST HAVE A NIGHT PACK OR MODEL WITH THE LARGE LED BRAKE LIGHT TO USE THIS CONVERSION. Comes with the aluminum cup surround (Option: V7IIILED-BRKLT)...
gtmotocycles.com
R&R instructions:
1. Remove seat, left and right side covers. On the left cover, remove the seat latch cable from it’s holder.
2. On the right side unplug the fender light harness.
3. Remove the front torx fender bolts.
4. Remove the rearward fender bolt, and one bolt on each side (not shown), then carefully remove fender. Not shown, there is a fender liner that covers the wiring harness. Remove the two bolts and remove to access the taillight.
5. The two bolts below secure the tail light assembly to the fender.
6. Remove the top bolt, and pinch the wires to unplug the light connector.
7. Remove the two screws that hold the LED light cup and light to the stock bracket. These will be re-used. Support/hold/protect when removing.
8. Remove the plastic tongue.
9. These are the wires to power any plate light(s). Yellow is power, blue is ground.
10. Reverse above, and we recommend using blue loctite on all hardware outside of plastic screws of course. Enjoy.


