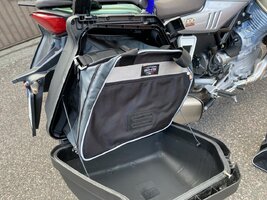
My bags were already keyed to the two ignition keys, the dealer tech must have re-pinned them. I received in a plastic bag from the techr six extra cylinders and two additional ignition keys and was told if I get the top box that they are for changing all out so they can match. You can change the bag locks yourself, they are a disc type cylinder, there is a youtube video (look for: unificazione serrature valigie urban moto guzzi v85tt) its in Italian I think but it can be followed if you want one key for everything. Just be aware there are tiny coil springs loading the discs when you take the cylinder out.I just put the factory bags on and I can see that you might be able to put the third point brackets on the wrong side, they bend in when looking top down. I didn't do it but it could be possible. The bags slide in firmly but it seems that the passenger seat "spikes" hold the front mounts firmly as well. I like that the mounts are almost invisible with the bags off. I noted that the bag mounting assembly is held in place by nine small screws (the front lower bracket by four of the same) so that explains the limited weight capacity. I don't think these are really designed to take on and off frequently, I'm going to leave them on, I have some liner bags from a previous BMW. Having another key is also a bit of a pain but I've been spoiled by the bags on my K1600GT. All in all, they look good, fit well and should be just fine (I'll let you know if they fall off today!). Also put on the medium screen, the bottom engine case protector (doesn't come up as high as I thought it would) and the center stand. It is much easier to put the stand on with some help.View attachment 30858
-
Ciao Guest - You’ve landed at the ultimate Guzzi site. NEW FORUM REGISTRATIONS REQUIRE EMAIL ACTIVATION - CHECK YOUR SPAM FOLDER - Use the CONTACT above if you need help. New to the forum? For all new members, we require ONE post in the Introductions section at the bottom, in order to post in most of the other sections. ALWAYS TRY A SEARCH BEFORE STARTING A NEW TOPIC - Most questions you may have, have likely been already answered. DON'T BE A DRIVE-BY POSTER: As a common courtesy, check back in and reply within 24 hours, or your post will be deleted. Note there's decades of heavily experienced Guzzi professionals on this site, all whom happily give endless amounts of their VALUABLE time for free; BE COURTEOUS AND RESPECTFUL!
-
There is ZERO tolerance on personal attacks and ANY HYPERLINKS to PRODUCT(S) or other competing website(s), including personal pages, social media or other Forums. This ALSO INCLUDES ECU DIAGnostic software, questions and mapping. We work very hard to offer commercially supported products and to keep info relevant here. First offense is a note, second is a warning, third time will get you banned from the site. We don't have the time to chase repeat (and ignorant) offenders. This is NOT a social media platform; It's an ad-free, privately funded website, in small help with user donations. Be sure to see the GTM STORE link above; ALL product purchases help support the site, or you can upgrade your Forum profile or DONATE via the link above.
-
Be sure to see the GTM STORE link also above for our 700+ product inventory, including OEM parts and many of our 100% Made-in-SoCal-USA GTM products and engine kits. In SoCal? Click the SERVICE tab above for the best in service, tires, tuning and installation of our products or custom work, and don't miss our GT MotoCycles® (not) art on the BUILDS tab above. WE'RE HERE ONLINE ONLY - NO PHONE CALLS MADE OR RECEIVED - DO NOT EMAIL AND ASK QUESTIONS OR ASK TO CALL YOU.
-
Like the new V100, GuzziTech is full throttle into the future! We're now running on an all-new server and we've updated our Forum software. The visual differences are obvious, but hopefully you'll notice the super-fast speed. If you notice any glitches or have any issues, please post on the Site Support section at the bottom. If you haven't yet, please upgrade your account which is covered in the Site Support section or via the DONATE tab above, which gives you full site access including the DOWNLOADS section. We really appreciate every $ and your support to keep this site ad-free. Create an account, sign in, upgrade your account, and enjoy. See you on the road in 2024.
V100 saddlebags note and warning!
- Thread starter Glen72
- Start date


 ) - just carry the liners. I’ve not removed my panniers since they were installed, so yes, you’re right
 . Heading out for a two day ride this morning in fact!
 . Might be a winter project for me.