Clifton
Cruisin' Guzzisti
I'm in the process of doing this now on my 2021 but could use some help/guidance.
Tank is off, tipover valve guts removed, and snapped back together so I'm at paragraph 5 in Todd's original post.
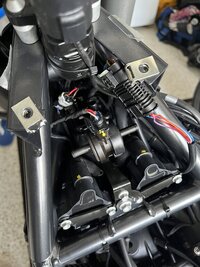
"5. With the tank removed looking forward, the tip valve shown apart and gutted (use heat from a hair dryer or eq, and a small screwdriver to pop apart, then can be snapped back together), and red arrow is the evap can. You can snip and plug the line partially hidden (arrowed) line to resolve the intake leak."
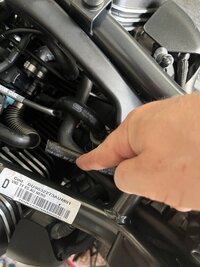
I see the line referenced, when I cut that line do I plug both ends, the stub going to the evap can and the other end that'll lead to and through an electric in-line valve? The valve is not pictured in Todd's image so I'm attaching what I'm referring to. (I put a piece of blue tape on the hose at the evap can that I understand is to be cut.)

(I deleted my question and images regarding the rubber plug laying there, it goes on the seat pan.)
Tank is off, tipover valve guts removed, and snapped back together so I'm at paragraph 5 in Todd's original post.
"5. With the tank removed looking forward, the tip valve shown apart and gutted (use heat from a hair dryer or eq, and a small screwdriver to pop apart, then can be snapped back together), and red arrow is the evap can. You can snip and plug the line partially hidden (arrowed) line to resolve the intake leak."
I see the line referenced, when I cut that line do I plug both ends, the stub going to the evap can and the other end that'll lead to and through an electric in-line valve? The valve is not pictured in Todd's image so I'm attaching what I'm referring to. (I put a piece of blue tape on the hose at the evap can that I understand is to be cut.)
(I deleted my question and images regarding the rubber plug laying there, it goes on the seat pan.)
Last edited:


 a M6 Allen head bolt fitted perfectly, but when I used a zip tie to hold it in, it looks like a did a bit tight and without realizing made the bolt slightly cocked which would of allowed a vacuum leak. All sorted now and I let idle for about 5mins and no “national disaster” alerts came up so think we solved it
 always feel like a
  when these things happen, but, there’s no such thing as mistakes, just a learning experience. But would love to know if the tip valve line (gutted) can still go to the LHS of the cannister?
 , and ofcoarse plug the TB line....may I ask has anyone without issues just used a vacuum cap for the TB line pole on the TB? ofcoarse anywhere snipped and plugged on this line will work but for neatness it would look better
") Thanks for putting up with me thus far and look forward to your replies.
Thanks for putting up with me thus far and look forward to your replies.