• Ciao Guest - You’ve landed at the ultimate Guzzi site. NEW FORUM REGISTRATIONS REQUIRE EMAIL ACTIVATION - CHECK YOUR SPAM FOLDER - Use the CONTACT above if you need help. New to the forum? For all new members, we require ONE post in the Introductions section at the bottom, in order to post in most of the other sections. ALWAYS TRY A SEARCH BEFORE STARTING A NEW TOPIC - Most questions you may have, have likely been already answered. DON'T BE A DRIVE-BY POSTER: As a common courtesy, check back in and reply within 24 hours, or your post will be deleted. Note there's decades of heavily experienced Guzzi professionals on this site, all whom happily give endless amounts of their VALUABLE time for free; BE COURTEOUS AND RESPECTFUL!
  • There is ZERO tolerance on personal attacks and ANY HYPERLINKS to PRODUCT(S) or other competing website(s), including personal pages, social media or other Forums. This ALSO INCLUDES ECU DIAGnostic software, questions and mapping. We work very hard to offer commercially supported products and to keep info relevant here. First offense is a note, second is a warning, third time will get you banned from the site. We don't have the time to chase repeat (and ignorant) offenders. This is NOT a social media platform; It's an ad-free, privately funded website, in small help with user donations. Be sure to see the GTM STORE link above; ALL product purchases help support the site, or you can upgrade your Forum profile or DONATE via the link above.
  • Be sure to see the GTM STORE link also above for our 700+ product inventory, including OEM parts and many of our 100% Made-in-SoCal-USA GTM products and engine kits. In SoCal? Click the SERVICE tab above for the best in service, tires, tuning and installation of our products or custom work, and don't miss our GT MotoCycles® (not) art on the BUILDS tab above. WE'RE HERE ONLINE ONLY - NO PHONE CALLS MADE OR RECEIVED - DO NOT EMAIL AND ASK QUESTIONS OR ASK TO CALL YOU.
  • Like the new V100, GuzziTech is full throttle into the future! We're now running on an all-new server and we've updated our Forum software. The visual differences are obvious, but hopefully you'll notice the super-fast speed. If you notice any glitches or have any issues, please post on the Site Support section at the bottom. If you haven't yet, please upgrade your account which is covered in the Site Support section or via the DONATE tab above, which gives you full site access including the DOWNLOADS section. We really appreciate every $ and your support to keep this site ad-free. Create an account, sign in, upgrade your account, and enjoy. See you on the road in 2024.

Centre stand removal.

iainw

Cruisin' Guzzisti
Joined
Nov 15, 2009
Messages
276
Location
Bad Preston
05 Breva 1100
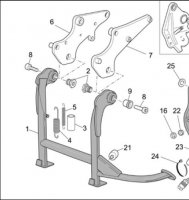
My centre stand, lower pannier brackets, and one or two other bits are starting to look a bit tatty so they're going off to be powder coated. I'd like to remove the centre stand without taking the whole lot apart but the cat is a bit close on the r/h side to get a spanner in where it pivots on (2), so the job looks a bit bigger than I originally thought. The whole lot is going to have to come off so that I can get a good grip and remove items (2).

I've undone the hex screw (8) at the r/h side and it comes out, (2) seems to be screwed into the stand mounting plate (6) but I can't get a spanner on it as the cat is too close.

On the l/h side I can't remove (8) from (2) they're just turning with the bush (9). I haven't yet put a spanner on (2) to hold it. I'm just weighing the job up at the moment.

Before I start taking the whole bike apart, grazing knuckles and damaging bits :oops: my question is, do items (2) thread into (6) & (7) or do they rotate in there? On the r/h it's not rotating and appears to be threaded in and on the l/h side it turns with (8) & (9) and appears not to be threaded in. How does all this lot fit together?

Ta very much.
Iain
 

Attachments

  • stand bits.JPG
    stand bits.JPG
    27.9 KB · Views: 799
I take mine off regularly to grease the bushes and repaint. It is as you describe an spanner on the nut 2 helps. One side is locked as I recall.I took my cat off and replaced it with a mistral x-over which gives you more space. The only hard bit is getting the double stand tenstion sping back on. I left one of the 2 springs off.
 
nel said:
I take mine off regularly to grease the bushes and repaint. It is as you describe an spanner on the nut 2 helps. One side is locked as I recall.I took my cat off and replaced it with a mistral x-over which gives you more space. The only hard bit is getting the double stand tenstion sping back on. I left one of the 2 springs off.


To get both springs on, go to an autoparts house and get a set of brake spring pliers. One of the handles has a groove at one end. Place that handle through the hooks of the spring. Set the groove on the spring mount, then just use the handle as a lever to install the spring.
 
I took the whole lot off, the footpeg plates on both sides had to come off to get access at it. Mine seems a bit different to the parts diagram around item 2 on the r/h side, it's the other side of the plate and the hole in 6 is theaded.

Any how, it's all off and there's a bag of bits being powder coated this week.

nel.
Thanks for the information, it helped.
I have a spring hook for pulling them on and off. They're a plenty on ebay!
 

Attachments

  • spring hook.jpg
    spring hook.jpg
    34.5 KB · Views: 713
iainw said:
I have a spring hook for pulling them on and off. They're a plenty on ebay!

The problem with the hook is you have to pull directly on the spring. With the brake spring pliers, you have a lever for mechanical advantage. Remember Archemedies?
 
john zibell said:
iainw said:
I have a spring hook for pulling them on and off. They're a plenty on ebay!

The problem with the hook is you have to pull directly on the spring. With the brake spring pliers, you have a lever for mechanical advantage. Remember Archemedies?

Did he have limp wrists too? ;)
 
john zibell said:
iainw said:
I have a spring hook for pulling them on and off. They're a plenty on ebay!

The problem with the hook is you have to pull directly on the spring. With the brake spring pliers, you have a lever for mechanical advantage. Remember Archemedies?

Special tools for stretching a kickstand spring? Phooey!

Use a shoelace. Tie one end around one of the spokes on the rear wheel, thread the shoelace through the hook on the end of the spring and then pull the free end of the lace toward the back of the bike. The spring acts like a pulley reducing the effort to stretch it greatly.
 
I use a home-made spring puller to stretch springs. Looks a bit like a hay-bale hook, only smaller and longer. have the bike on the sidestand when dealing with the springs because then they are in a less stretched state.

Powder coating parts is the easy route but not necessarily the best because when chipped it tends to flake back from the wound. For a centrestand I'd definitely use a hand-painted alkyd enamel system which can then be touched up easily.
 
The pedal broke off of my ‘08 Norge centerstand, so I’m trying to remove it to repair or replace. Thank you for this info!

(If I do have to replace it, I’m wondering if the Caponord centerstand would fit?)
 
The pedal broke off of my ‘08 Norge centerstand, so I’m trying to remove it to repair or replace. Thank you for this info!

(If I do have to replace it, I’m wondering if the Caponord centerstand would fit?)

The centerstand is held in by 10mm hex head allen bolts that go through the centerstand and thread into bushings on the inbound side of the centerstand. You will need a hex allen wrench 10mm, and an adjustable or open end wrench for the inside threaded bushing.

When you reassemble this, be sure to use blue (medium strength) locktite on the threaded bolt, otherwise it will back out and fly off someplace on the roadway, taking your spring set with it.

These parts are expensive so you don't want to lose them.

Good luck!


Screen Shot 2022 06 09 at 22841 PM

Screen Shot 2022 06 09 at 22851 PM
 
The centerstand is held in by 10mm hex head allen bolts that go through the centerstand and thread into bushings on the inbound side of the centerstand. You will need a hex allen wrench 10mm, and an adjustable or open end wrench for the inside threaded bushing.

When you reassemble this, be sure to use blue (medium strength) locktite on the threaded bolt, otherwise it will back out and fly off someplace on the roadway, taking your spring set with it.

These parts are expensive so you don't want to lose them.

Good luck!


View attachment 25313

View attachment 25314
Thank you! I think that may have happened with mine, because the screws are M8 on mine, not M10, for some reason.
 
I’ll double check, but at least the heads are 8mm on mine. I don’t have a metric thread gauge handy, tho’!
The brake side stacked up nylon washers without the bushing (no. 9 in the diagram), and it looks like the nut was spot welded in. Hard to tell if the screw was peened, but it sure felt like it was!

Shift side was only slightly easier.
 
A common thing actually.

I’m new to my Norge but several people have told me that early Norge were notoriously famous for jettisoning their center stands! 😆😆😆

The replacement pieces are $$$ so lots of people improvised I guess.

I bought a package of bolts that only came in a minimum quantity of 10, so if you need or would like a set to fix yours, let me know and I’ll send you a pair to MI. I’m in Ohio. You will need the proper bushings/nuts (#9 & #2) though to make it work correctly.

I put mine back together to stock condition with RED Permanent Strength Locktite on the bolt threads. Problem solved.

I love center stands too much not to properly fix it.
 
Last edited:
A common thing actually.

I’m new to my Norge but several people have told me that early Norge were notoriously famous for jettisoning their center stands! 😆😆😆

The replacement pieces are $$$ so lots of people improvised I guess.

I bought a package of bolts that only came in a minimum quantity of 10, so if you need or would like a set to fix yours, let me know and I’ll send you a pair to MI. I’m in Ohio. You will need the proper bushings/nuts (#9 & #2) though to make it work correctly.

I put mine back together to stock condition with Medium Strength Locktite on the bolt threads. Problem solved.

I love center stands too much not to properly fix it.
I'm actually somewhat familiar with your area - I have an aunt that lives there that I haven't seen in quite a while! If you're going to Mid-Ohio this year, I'll be there camping...without a center stand! :rofl:

You're not kidding about replacement prices (if you can find one) - ebay is beaucoup bucks, even for the European kickstand! I also need to find or fab a bushing. I have some bronze bar and a friend with a lathe, so I could fab one up myself, since I'm not seeing the bushing anywhere yet. I'll have to source some tubing and bar stock to improve the center stand, as well, or at least gusset the weaker areas!
 
I am waiting for the proper bushings/nuts (#9 & #2) to come from AF1 to me. They are supposed to ship out today or tomorrow. I will take some photos and measurements for you and post them.

I said, I have 10 bolts, so if you need 2, then let me know.

TempImageMX3WDx
 
Back
Top