• Ciao Guest - You’ve landed at the ultimate Guzzi site. NEW FORUM REGISTRATIONS REQUIRE EMAIL ACTIVATION - CHECK YOUR SPAM FOLDER - Use the CONTACT above if you need help. New to the forum? For all new members, we require ONE post in the Introductions section at the bottom, in order to post in most of the other sections. ALWAYS TRY A SEARCH BEFORE STARTING A NEW TOPIC - Most questions you may have, have likely been already answered. DON'T BE A DRIVE-BY POSTER: As a common courtesy, check back in and reply within 24 hours, or your post will be deleted. Note there's decades of heavily experienced Guzzi professionals on this site, all whom happily give endless amounts of their VALUABLE time for free; BE COURTEOUS AND RESPECTFUL!
  • There is ZERO tolerance on personal attacks and ANY HYPERLINKS to PRODUCT(S) or other competing website(s), including personal pages, social media or other Forums. This ALSO INCLUDES ECU DIAGnostic software, questions and mapping. We work very hard to offer commercially supported products and to keep info relevant here. First offense is a note, second is a warning, third time will get you banned from the site. We don't have the time to chase repeat (and ignorant) offenders. This is NOT a social media platform; It's an ad-free, privately funded website, in small help with user donations. Be sure to see the GTM STORE link above; ALL product purchases help support the site, or you can upgrade your Forum profile or DONATE via the link above.
  • Be sure to see the GTM STORE link also above for our 700+ product inventory, including OEM parts and many of our 100% Made-in-SoCal-USA GTM products and engine kits. In SoCal? Click the SERVICE tab above for the best in service, tires, tuning and installation of our products or custom work, and don't miss our GT MotoCycles® (not) art on the BUILDS tab above. WE'RE HERE ONLINE ONLY - NO PHONE CALLS MADE OR RECEIVED - DO NOT EMAIL AND ASK QUESTIONS OR ASK TO CALL YOU.
  • Like the new V100, GuzziTech is full throttle into the future! We're now running on an all-new server and we've updated our Forum software. The visual differences are obvious, but hopefully you'll notice the super-fast speed. If you notice any glitches or have any issues, please post on the Site Support section at the bottom. If you haven't yet, please upgrade your account which is covered in the Site Support section or via the DONATE tab above, which gives you full site access including the DOWNLOADS section. We really appreciate every $ and your support to keep this site ad-free. Create an account, sign in, upgrade your account, and enjoy. See you on the road in 2024.

03 Stone Touring - Driveline Vibration?

ian-jowsey

Just got it firing!
Joined
May 26, 2013
Messages
16
Location
Auckland
Hi All,
I'm getting a harmonic vibration through the drive-line of this bike that is apparent on over-run and very light load.
The bike has always had this idiosyncrasy during my tenure with it but it used to be only just noticeable in 2nd and 3rd gear. It has recently become noticeable in all gears.
The sound is far more apparent than the vibration associated with it. Both the sound and vibration disappear under load but it is possible that the inlet and exhaust noise buries it when the throttle is open. It definitely does NOT get worse with load, it is quite the opposite. At worst the vibration is a high frequency thrumming I can feel through both foot-pegs (it's the same on both sides).
There are no leaks or harshness in the rear end bevel-drive so I'm assuming this is a tired gearbox bearing.
I'm after advice on diagnosis and a heads up on any typical problems. The bike is a 2013 California Stone Touring (yes that's the model with Hydraulic lifters) with 44,000 km on the clock.
I don't mind delving into the gearbox if required but would like to have the guidance and opinions of an experienced Guzzi tech before tinkering.

Any advice is appreciated.

Regards Ian
Auckland, New Zealand
 
they have a little lash in the drive line that is at its worst when lightly loaded or unloaded at lower rpms.... which seems to get a little worse if the u joint is going out or just getting stiff, that is easy to check and in the grand scheme of things cheap to fix
 
Appreciated!

I thought that might be the case and it's the obvious place to start considering the age and mileage.

Thanks
 
Hi All

Ive been through the drive-line from the rear spline to the clutch and cant find the source of the vibration that's been annoying me. What I've learned is that this thing isn't call an old tractor for nothing, the size of the pinions, shafts and bearings put many a modern car to shame. As expected there is nothing out of order inside the gearbox, the Universals are perfect and the bearing supporting them is fine too. I'll reassemble with a couple of new bearings for good measure but if the vibration continues to annoy me at least I'll be confident that it's not disintegrating.

I haven't disassembled the final drive unit but I cant see any reason to do so at the moment. I'll keep you posted on what I find.

If you've had a similar experience with a California I'd like to hear about it.

Cheers

Ian
 
Ian,

One of the first indicators of a bearing going bad in the rear drive is an oil leak. If it isn't leaking, the bearings are probably fine.
 
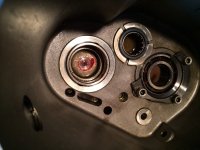
I found the source of the problem. The end of the secondary shaft is bottoming on the front end of the gearbox casing when the throttle is closed, obviously load sends it in the other direction. When it's cold there is no contact but once it's hot it's grinding on the casing. It doesn't cause any problems in operation but I don't want the noise, I want it how it should be!

In theory this should be a simple case of juggling shims and putting it back together. This bike likes throwing idiosyncratic problems at me to puzzle over!

Has anyone else struck this problem before?

Ian
 
Only one shaft in the gearbox is not fixed. The shaft you are talking about should have a Torrington bearing at the front end between two thick washers. This bearing is there to handle forward thrust from that shaft. Check the condition of that bearing. Here is a parts manual http://guzzitek.org/parts_list/gb/1100/ ... 001_PL.pdf look at item 16 in drawing 12.
 
Hi John
I thought that too but its not the case. It's definitely the secondary or output shaft. The thrust bearing you refer to is fine and that's not the shaft I'm referring to.
I've attached a photo looking down into the gearbox casing. I put a blob of red grease where the contact mark is.
I've not had time to work through it yet but I'm assuming that the position of this shaft is controlled by the shim between the output shaft bearing (which is fixed) in the end cover and the speedo drive
The gearbox hasn't been apart before and it doesn't have any other faults.
 

Attachments

  • image.jpg
    image.jpg
    856.9 KB · Views: 317
That shaft position is controlled by the output bearing, not shims. Once you tighten the nut that holds the speedometer drive, that shaft will have no end movement except for what the bearing allows.. Suggest you replace the input and output bearings with steel cage bearings, the plastic cage ones can be an issue. The bearing number is 3205. Dimensions are 25X52X20.6 Was the washer that belongs between the bearing and speedometer drive in place? That would be item 16 on drawing 13.
 
Hi John

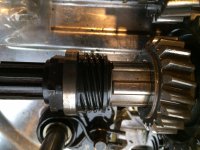
In the attachment you can see the layout as it came apart. The nut is finger tight in this shot and all components are as removed. There is no play at all in the double-row output shaft bearing but its probably prudent to replace it as it's working hard.
The washer (I referred to it as a shim) is in place and so is a very light retaining washer and o'ring. These appear to exist to prevent oil traveling down the shaft splines. The o'ring must crush down significantly when the nut is tightened.
Can you tell me if there are any shims under the output shaft bearing. It seems that the location of the bearing is what sets the height of the shaft and that the bearing shoulders up against the 5th speed gear (do I have that correct).
The options seem to be as follows:
1/ Move the bearing - if there's no shims behind it then this isn't viable
2/ Move the 5th speed gear - is this shimmed?
3/ Relieve the casing by 1mm where contact occurs and leave the rest how the factory assembled it.

The first option will alter all gears in relation to their partners on the primary shaft but only by a tiny amount, option 2 could do it if 5th gear can be shifted and option 3 falls into the "Bodged" category but is also an entirely practical solution.

Thanks for your input, as I explain it I'm thinking through what needs to be done. Hopefully all will become clear soon.

Cheers - Ian
 

Attachments

  • IMG_1953.JPG
    IMG_1953.JPG
    861.6 KB · Views: 288
Option 3 would be my choice. Probably don't even need to take a whole mm. I can see how the casting can be off a little. You don't want to move gear positions. I would double check the condition of the bearing on the front of the shaft. If that shaft can "wiggle" it is a problem. This is a good time to follow Pete Ropers procedure for shimming the shift drum. When you tighten the nut on the output shaft it does need to be very tight, then staked. I use the factory tools to tighten this nut.
 
Thanks for the sound advice John. It'll be a few weeks before I reassemble the gearbox. I'll let you know the outcome. I haven't decided how I'm going to tighten the nut on the output shaft yet. If I sacrifice a socket and the drive shaft sleeve joint I could weld a handle to the socket and machine a hole large enough for the sleeve joint to pass through it, then weld a 1/2 drive socket to the sleeve joint which would mean I could hold the nut and apply a torque wrench to the output shaft to get it tight. The nut was secure and peened over from the factory but I had no trouble popping it loose with a pin punch so it wasn't super tight. I don't want to sacrifice the sleeve joint if I don't have too so I'm still thinking this through.

Regards - Ian
 
If you don't want to invest in the factory tools, or make your own, you could try a deep impact socket (27mm I think) and impact wrench to tighten. I grind the lip off the impact socket to get better contact with the nut. I disassemble with an impact wrench, but prefer hand tools to tighten. The factory tools are part number 14 90 54 00 for the layshaft nut and 12 90 71 00 to hold the layshaft and rear drive bevel. You might want to price these for your use.
 
Hi John

Thanks for your assistance, this is back together and working as it's supposed to again without the noise or vibration it had before. I removed about 1 mm from the inner face of the casing and that's given it the clearance it needs. Nothing else was required. The shift drum was correctly shimmed from the factory. It's an easy machine to work on but this was labour intensive task that's for sure. I'm a lot more familiar with the bike and now understand fully the need for very positive gear changes to shift those big pinions about inside the gearbox. In the info you sent, which was perfect I must add, the photos of the LeMans box they're working on it shows the same wear pattern on the case but not as heavy. Apparently it's reasonably common and in worst case scenario the friction will undo the nut on the end of the shaft which will in turn wear a hole right through to the bell housing and the whole gear set on that shaft will be let loose to destroy the gearbox. I'm pleased to have avoided that happening.

Once again thanks for your help and the information.

Cheers

Ian Jowsey
 
Back
Top