• Ciao Guest - You’ve landed at the ultimate Guzzi site. NEW FORUM REGISTRATIONS REQUIRE EMAIL ACTIVATION - CHECK YOUR SPAM FOLDER - Use the CONTACT above if you need help. New to the forum? For all new members, we require ONE post in the Introductions section at the bottom, in order to post in most of the other sections. ALWAYS TRY A SEARCH BEFORE STARTING A NEW TOPIC - Most questions you may have, have likely been already answered. DON'T BE A DRIVE-BY POSTER: As a common courtesy, check back in and reply within 24 hours, or your post will be deleted. Note there's decades of heavily experienced Guzzi professionals on this site, all whom happily give endless amounts of their VALUABLE time for free; BE COURTEOUS AND RESPECTFUL!
  • There is ZERO tolerance on personal attacks and ANY HYPERLINKS to PRODUCT(S) or other competing website(s), including personal pages, social media or other Forums. This ALSO INCLUDES ECU DIAGnostic software, questions and mapping. We work very hard to offer commercially supported products and to keep info relevant here. First offense is a note, second is a warning, third time will get you banned from the site. We don't have the time to chase repeat (and ignorant) offenders. This is NOT a social media platform; It's an ad-free, privately funded website, in small help with user donations. Be sure to see the GTM STORE link above; ALL product purchases help support the site, or you can upgrade your Forum profile or DONATE via the link above.
  • Be sure to see the GTM STORE link also above for our 700+ product inventory, including OEM parts and many of our 100% Made-in-SoCal-USA GTM products and engine kits. In SoCal? Click the SERVICE tab above for the best in service, tires, tuning and installation of our products or custom work, and don't miss our GT MotoCycles® (not) art on the BUILDS tab above. WE'RE HERE ONLINE ONLY - NO PHONE CALLS MADE OR RECEIVED - DO NOT EMAIL AND ASK QUESTIONS OR ASK TO CALL YOU.
  • Like the new V100, GuzziTech is full throttle into the future! We're now running on an all-new server and we've updated our Forum software. The visual differences are obvious, but hopefully you'll notice the super-fast speed. If you notice any glitches or have any issues, please post on the Site Support section at the bottom. If you haven't yet, please upgrade your account which is covered in the Site Support section or via the DONATE tab above, which gives you full site access including the DOWNLOADS section. We really appreciate every $ and your support to keep this site ad-free. Create an account, sign in, upgrade your account, and enjoy. See you on the road in 2024.

1400 Rear tire removal/service

Mrmerlin

Tuned and Synch'ed
Joined
Apr 7, 2017
Messages
68
Location
Philly PA
I took off the rear tire to inspect the splines and do a oil flush of the rear drive
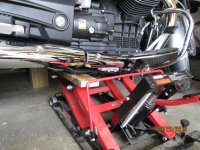
I used a jack placed under the left frame rail and two Esco jack stands set at 16 inches places under the rear peg mounts removal of the chrome heat shields is suggested so they dont get scratched.
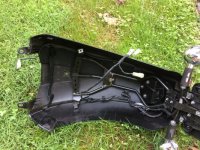
then rear fender removal this is pretty easy as well about 12 bolts in all and the fender pulls free to offer up easy access to the rear tire.

NOTE lock the front brake before jacking so the bike will not roll place the jackstand under the passenger peg mount then slowly jack the left side of the bike up fit the second stand then lower the bike it is now stable to work on it takes about 15 mins to remove the rear fender it has 4 harnesses three are near the fender attachment to the center and one runs down the inside of the fender .
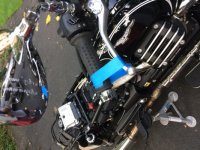
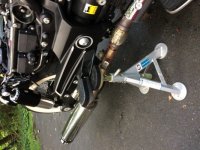
I used a 1 1/4 inch socket to loosen the nut and a 14 MM allen to hold the axle.
The splined area is also sealed with an O ring and my splines had grease on them.
My diff oil was silver so the indications of the rear running warm could spell issues later ,
after running at an hour at 70MPH the rear is running at 175F


IMG 0645
 

Attachments

  • IMG_0647.JPG
    IMG_0647.JPG
    49.7 KB · Views: 85
  • IMG_0643.JPG
    IMG_0643.JPG
    67.3 KB · Views: 80
  • IMG_0646.JPG
    IMG_0646.JPG
    45.3 KB · Views: 83
wow - that looks scary - raising the bike on a trolley jack on one side with it perched on side stands. I tried something similar originally when I wanted to check my splines, but the thing just felt like it was about to fall over so I gave up on that real quick and bought an ATV stand for about $100 (cheaper than a new cylinder head). This jacks both sides at the same time and you can raise the bike high enough so you don't need to remove the rear fender (or the heat shields) - Just the licence plate in my case. This is a photo that someone else posted (sorry can't remember who). It also helps with minutely raising and lowering the height to get the axle bolt to line up when putting the wheel back on.
 

Attachments

  • IMG_0958.JPG
    IMG_0958.JPG
    171.4 KB · Views: 75
I prefer to lock the front wheel in a wheel stand and then tie the handlebars to some forward anchor point to prevent the front wheel from slipping out.

Then it is a simple matter of using the stand the Paul has recommended to lift the rear wheel as high as you like. Removing and replacing the rear fender is a lot of work and not necessary.

I also endorse what Paul says about raising and lowering the rear to facilitate the removal of the axle. I think I might have posted this procedure as the wheel is so heavy it is impossible to lift it off the splines without a disaster happening.
 
I have never done this before.

I did try a jack similar to the one posted but the bike wouldnt balance comfortably on that trolley jack.
My Brother has a HD and this jack lifts his bike perfectly it was just not happy trying to lift the MG so we stopped
So i tried to get it off the ground another way.
I was using Esco jack stands these are European made and very sturdy and they also have rubber pads mounted to the loading surfaces.
at 16 inches extended place the right side stand under the peg mount,
Make sure to lock the front brake or it can fall off the stand, and the two aft heat shields are removed
jack the bike via the left frame rail with the floor jack till the mount rides onto the right stand keep lifting till the left stand can be placed under the mount then lower the jack its very sturdy no chance its coming off the mounts if you used the Esco stands.
The rear fender is made to be be quickly removed 12 bolts and 4 connectors and you have free access to the brakes and rear drive and wheel.
This worked for me so I thought i would pass this on
 
I use a Black Widow Motorcycle Jack. The two posts rotate and slide so you can cradle the bike's frame. or you can remove them altogether. You can find one at discountramps.com for $74.99 but I think they are having a sale right now which gives you 10% off of that.

Black Widow Motorcycle Jack
 
I've had a similar bike lifter to PaulDavies for 20 odd years now. Different bikes often need different pieces of wood to get a good sturdy fit. Can't see much of the one in the pic above, but mine also allows me to wheel the bike around (it lifts the whole bike) if I need to move it whilst still in bits. Wouldn't be without one.
 
Back
Top