• Ciao Guest - You’ve landed at the ultimate Guzzi site. NEW FORUM REGISTRATIONS REQUIRE EMAIL ACTIVATION - CHECK YOUR SPAM FOLDER - Use the CONTACT above if you need help. New to the forum? For all new members, we require ONE post in the Introductions section at the bottom, in order to post in most of the other sections. ALWAYS TRY A SEARCH BEFORE STARTING A NEW TOPIC - Most questions you may have, have likely been already answered. DON'T BE A DRIVE-BY POSTER: As a common courtesy, check back in and reply within 24 hours, or your post will be deleted. Note there's decades of heavily experienced Guzzi professionals on this site, all whom happily give endless amounts of their VALUABLE time for free; BE COURTEOUS AND RESPECTFUL!
  • There is ZERO tolerance on personal attacks and ANY HYPERLINKS to PRODUCT(S) or other competing website(s), including personal pages, social media or other Forums. This ALSO INCLUDES ECU DIAGnostic software, questions and mapping. We work very hard to offer commercially supported products and to keep info relevant here. First offense is a note, second is a warning, third time will get you banned from the site. We don't have the time to chase repeat (and ignorant) offenders. This is NOT a social media platform; It's an ad-free, privately funded website, in small help with user donations. Be sure to see the GTM STORE link above; ALL product purchases help support the site, or you can upgrade your Forum profile or DONATE via the link above.
  • Be sure to see the GTM STORE link also above for our 700+ product inventory, including OEM parts and many of our 100% Made-in-SoCal-USA GTM products and engine kits. In SoCal? Click the SERVICE tab above for the best in service, tires, tuning and installation of our products or custom work, and don't miss our GT MotoCycles® (not) art on the BUILDS tab above. WE'RE HERE ONLINE ONLY - NO PHONE CALLS MADE OR RECEIVED - DO NOT EMAIL AND ASK QUESTIONS OR ASK TO CALL YOU.
  • Like the new V100, GuzziTech is full throttle into the future! We're now running on an all-new server and we've updated our Forum software. The visual differences are obvious, but hopefully you'll notice the super-fast speed. If you notice any glitches or have any issues, please post on the Site Support section at the bottom. If you haven't yet, please upgrade your account which is covered in the Site Support section or via the DONATE tab above, which gives you full site access including the DOWNLOADS section. We really appreciate every $ and your support to keep this site ad-free. Create an account, sign in, upgrade your account, and enjoy. See you on the road in 2024.

1996 California runs for 5 - 10 minutes then shuts off

68bitsa

Just got it firing!
Joined
May 10, 2013
Messages
14
Location
Rice Lake, WI
I have a 1996 California fuel injected. It runs for about 5 to 10 minutes then shuts down. All dash lights still on. Fuel pump runs but no spark. I let it sit for 30 minutes or so and it starts right up and repeats the process. I have tried new relays, new battery, cleaning timing sensor in flywheel area, took oil temp sensor out of left valve cover into ambient air and still does the same thing over and over. More ideas ?
 
Hi. I tried that. I evan ran the bike with the fuel cap off on the centerstand. Same result. I was wondering this morning if the cam position sensor in the front of the engine near the timing chain could be heating up as the motor warms up and dropping out somehow?
 
The only heat related item that leads to no spark would be the coils. Bike runs, coils get hot, stop working. Coils cool then work again. It could also be a bad component (the piece that triggers the coil) in the P8 ECU, but the coil failure is more likely.
 
Hi. In the case of the coils does each coil fire one cylinder individually so if I am not getting spark on either cylinder then both coils are failing at the same time correct ? These coils are not connected in series in any way like some other makes of motorcyclesI have owned where if one coil fails the other has insufficient power to maintain spark ?
 
68bitsa said:
Hi. In the case of the coils does each coil fire one cylinder individually so if I am not getting spark on either cylinder then both coils are failing at the same time correct ? These coils are not connected in series in any way like some other makes of motorcyclesI have owned where if one coil fails the other has insufficient power to maintain spark ?

It is rare that both fail at the same time. One coils is dedicated to it's cylinder. Also there are coil control modules triggered by the ECU (under the left side cover) that trigger the discharge from the coils. Looking at Carl's schematic, https://www.guzzitech.com/attachments/ ... _1100i.gif there is one relay (item 27) and one fuse that is common to both coils. I'd start by looking there.
 
I have replaced the relay with new and fuse as well. I will trace all wiring using the colored schematic you provided to the modules and onto the coils as you suggest. I will post any findings. Thanks.
 
Update on my bike that runs for five minutes at a time. After sitting for a dsy it fired right up as usual. I rode it round and round the block at around 20 mph most times then it stopped as before. I pushed it home and removed the left side cover and began looking at the ignition parts bolted to the heat sink. I pulled everything apart. Checked for clean connections. Looked at the heat transfer paste between the heat sink and the modules. Traced all wires i could get at back toward the battery and the relay/ fuse block. Every wire seem properly wired and connected. No rubs, breaks or loose connections in my book. I put the ignition components back together and left the sidecover off for the next test ride so I could feel how hot the heat sink was getting while I was riding. The bike fired right up, as it sat for an hour or so while I performed the above inspections. I ran it around and around the bock again feeling the heat sink from time to time. It did warm a bit but never got hot by any means. The bike shut down after a few minutes again as per normal now and I pushed it home. I am beginning to think perhaps the internal trigger now in the ecu may be defective as suggested or still wonder if the front cam wheel magnetic sensor is heating u
p as the engine worms and dropping out somehow ?
 
The front cam sensor is just an inductive pickup much like the flywheel sensor. The P8 injection manual shows the resistance value for this sensor. If a circuit does open when hot you should see very high resistance when the bike stops running.
 

Attachments

  • P8_injection_manual.pdf
    2.4 MB · Views: 14
Yesterday I took my electronic ignition modules off the heat sink. I cleaned the contact surfaces off and put a thin layer of conductive anti oxident on each and reinstalled. I checked the resistance of each timing sensors both font and rear while cold. The temp was about 60 degrees F. I got a reading of 672 ohms for the rear one and 698 ohms for the front one. I have a new sensor oem part number 01721600. The new sensor tested 675 ohms on the shelf. Based on these numbers I believe the sensors to be in working order compared with the specs given. One question I have is that the new sensor has a third prong labeled "s" that I don't have in my two prong sensors I have in my bike now. How would I connect this sensor if I were to need to instsll it ? I test rode the bike and indeed it shut down tonite. Tonite I am going to examine the fuel situation more in detail as it seemed the fuel pump sounded different this time in the past after I tried restarting it.
 
I've not seen a sensor with three wires. Is it the correct part number for your bike?

An easy test, when it fails to start when hot, pull a plug, plug it into the cap, ground the plug, try to start and see if you get spark. If you have spark, it is a fuel problem. If you don't have spark it is an electrical problem. This probably should have been the first test.
 
I ran the bike for over 30 miles late last night which is the most it has run at one time all season. I shut it off and it sat overnight. I went to take it into work today and it shut down three times in 15 miles of riding. it restarted after 20 minutes or so each time and would go about another 4 miles and we repeated the shutdown and restart process. When This problem first happed to me a couple weeks back and it was still not starting I gounded the plugs to the heads and saw no spark when cranking. This has been my initial and current theory is that something electrical is heating or shorting out after a short period of time. It then cools somehow or resets and you repeat the cycle. This does not expain the 30 mile or so ride I got in last night after messing with both electrical and fuel components, mainly the vent hose on the gas tnak and the tests and greasing I mentioned in my last post.
 
The next time it cuts out, take a DVM and see if you have voltage where you should at the coil triggers. It still points to a single component opening when hot. I've seen fuses do that. They cool and then conduct again. Intermittent faults are the hardest to find. Good luck.
 
I have determined after numerous tests that the front cam timing sensor is tripping out from time to time, mainly when the engine warms, then it resets when the engine cools. I have determined this using the reference manual as provided by Mr. Zibell ( thank you :) ) and the ohm readings go sky high on that sensor when the bike stops and return to normal readings when it cools. Turns out the sensor I have in my spare parts stash is the 3 wire sensor used in newer bikes than mine so I will order the correct 2 wire sensor and shim it to specs provided with gasket (s) to the end gap shown in the guzzi manual. Thanks for all your help. I can't wait to get back on the road. :cheer:
 
Guzzi sells metal shims of different thicknesses for shimming the sensor. Do not use gasket material as it will compress over time and give you the wrong gap. The only sealing device should be the 0-ring. A little RTV on the o-ring seems to prevent leaks.
 
I took the sensor out yesterday. There were no spacer shims of any kind. The o- ring was present along with a light strip of hard gasket sealing material round the outer edges of the sensor mounting flage. I measured 30 mm from the bottom of the mounting flange to the bottom of the sensor. This is the distance of the sensor the protudes into the engine case. The oring looks reusable with a light smear of rtv as suggested. The timing piece was located by rolling the motor over slowly and I saw only the one sticking up towards the sensor and it too measures about 30 mm down from the flange surface from the case. My thoughts are to measure the protusion of the new sensor I get and compare it to the original and shim accordingly if needed.
 
68bitsa said:
I took the sensor out yesterday. There were no spacer shims of any kind. The o- ring was present along with a light strip of hard gasket sealing material round the outer edges of the sensor mounting flage. I measured 30 mm from the bottom of the mounting flange to the bottom of the sensor. This is the distance of the sensor the protudes into the engine case. The oring looks reusable with a light smear of rtv as suggested. The timing piece was located by rolling the motor over slowly and I saw only the one sticking up towards the sensor and it too measures about 30 mm down from the flange surface from the case. My thoughts are to measure the protrusion of the new sensor I get and compare it to the original and shim accordingly if needed.

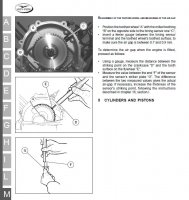
Don't go by how the original sensor was installed. Measure the depth to the pickup on the cam wheel. Them measure the length of the sensor to the very tip (the tip sticks out a little from the sensor body) then shim to get the 0.6 to 0.9mm gap.

This was the best reference I could find.
 

Attachments

  • cam-sensor.jpg
    cam-sensor.jpg
    119.9 KB · Views: 191
everything looks like I can do it except I don't have toothed notches in the cam wheel but a metal spade that extends up towards the pickup sensor. I will measure the distance from the tip of the metal spade
to the mounting point for the sensor and compare the measurements. does the o-ring seat fully in the recess once compresses
d I would guess and would not impact the measurement when installed ?
 
68bitsa said:
does the o-ring seat fully in the recess once compressesd I would guess and would not impact the measurement when installed ?

Correct, do not count the O-ring in measurements. BTW, the shims are exactly the same shape as the base of the sending unit, just available in different thicknesses. If necessary, you could make shims out of steel shim stock, brass might compress on you.
 
Back
Top