• Ciao Guest - You’ve landed at the ultimate Guzzi site. NEW FORUM REGISTRATIONS REQUIRE EMAIL ACTIVATION - CHECK YOUR SPAM FOLDER - Use the CONTACT above if you need help. New to the forum? For all new members, we require ONE post in the Introductions section at the bottom, in order to post in most of the other sections. ALWAYS TRY A SEARCH BEFORE STARTING A NEW TOPIC - Most questions you may have, have likely been already answered. DON'T BE A DRIVE-BY POSTER: As a common courtesy, check back in and reply within 24 hours, or your post will be deleted. Note there's decades of heavily experienced Guzzi professionals on this site, all whom happily give endless amounts of their VALUABLE time for free; BE COURTEOUS AND RESPECTFUL!
  • There is ZERO tolerance on personal attacks and ANY HYPERLINKS to PRODUCT(S) or other competing website(s), including personal pages, social media or other Forums. This ALSO INCLUDES ECU DIAGnostic software, questions and mapping. We work very hard to offer commercially supported products and to keep info relevant here. First offense is a note, second is a warning, third time will get you banned from the site. We don't have the time to chase repeat (and ignorant) offenders. This is NOT a social media platform; It's an ad-free, privately funded website, in small help with user donations. Be sure to see the GTM STORE link above; ALL product purchases help support the site, or you can upgrade your Forum profile or DONATE via the link above.
  • Be sure to see the GTM STORE link also above for our 700+ product inventory, including OEM parts and many of our 100% Made-in-SoCal-USA GTM products and engine kits. In SoCal? Click the SERVICE tab above for the best in service, tires, tuning and installation of our products or custom work, and don't miss our GT MotoCycles® (not) art on the BUILDS tab above. WE'RE HERE ONLINE ONLY - NO PHONE CALLS MADE OR RECEIVED - DO NOT EMAIL AND ASK QUESTIONS OR ASK TO CALL YOU.
  • Like the new V100, GuzziTech is full throttle into the future! We're now running on an all-new server and we've updated our Forum software. The visual differences are obvious, but hopefully you'll notice the super-fast speed. If you notice any glitches or have any issues, please post on the Site Support section at the bottom. If you haven't yet, please upgrade your account which is covered in the Site Support section or via the DONATE tab above, which gives you full site access including the DOWNLOADS section. We really appreciate every $ and your support to keep this site ad-free. Create an account, sign in, upgrade your account, and enjoy. See you on the road in 2024.

2001 MG California Special

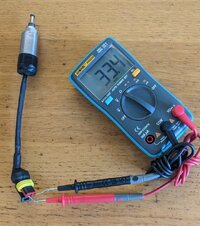
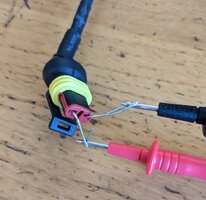
I forgot to ask: IF there is anyone out there (still) with an electric petcock, can you please, if you have the time, remove it from the harness and measure its internal resistance as shown in the picture. Mine reads 33.4 Ω. I'd be interested to know if mine is still within spec or not. All you need is a modified paper clip to insert in the leads. Thanks!

* Btw, the petcock (lower part) looks different because I realized the wires leading to the coil were frayed and held by very little solder. So I had to fix that; this was caused by the fact that the solder points were prone to failure because they had no other mechanical support. So, after I cut, stipped, reattached/soldered, double insulated with heat shrink tube, etc., I poured some epoxy around it and painted it to make look ...better. Petcock will still work as expected; directly connected to a 12Vdc source, the plunger will retract but not when connected to the harness. But if connected to the harness, I read a ...dismal 2.29 Vdc. Strange eh! :rolleyes:
 

Attachments

  • Petcock; measuring resistance (1).jpg
    Petcock; measuring resistance (1).jpg
    109.1 KB · Views: 2
  • Petcock; measuring resistance (2).jpg
    Petcock; measuring resistance (2).jpg
    143.1 KB · Views: 2
  • petcock connected; voltage drop.jpg
    petcock connected; voltage drop.jpg
    91.9 KB · Views: 2
Automotive weather strip adhesive would work well to hold that trim rubber to the fuel tank. Be very sparing with the adhesive, as they say it sticks like glue!
 
Automotive weather strip adhesive would work well to hold that trim rubber to the fuel tank. Be very sparing with the adhesive, as they say it sticks like glue!
Thank you John, I suppose this will do, correct?!
 

Attachments

  • image_2023-08-16_002846202.png
    image_2023-08-16_002846202.png
    441.5 KB · Views: 2
That should do it. Like I said it doesn't take much. I'd just use a very small amount and spread it into the molding with something like a chop stick, or small plastic tool.
 
Back
Top