jdelv
Tuned and Synch'ed
After consulting the forums, YouTube and even a local Guzzi owner, I adjusted the valves on my 2007 Griso 1100. 6300 miles on the odometer.
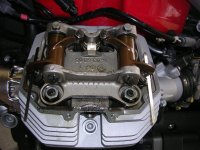
Getting the covers off was fairly straight forward, my gaskets were destroyed in removal. I used a razor blade to clean the surfaces. Be delicate to prevent scraped off gasket from getting into the motor.
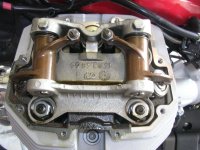
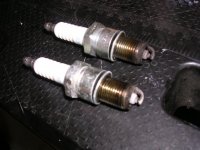
After removing the plugs (one was whiter/crustier (running hotter?) than the other, but I lost track of which cylinder! I think it was the right though). It was fairly simple to find top dead center on the compression stroke. With the plugs pulled, in top gear I could move the rear tire. Using a head lamp I could look into the cylinder to see the piston movement, then I checked the marks on the flywheel. S=left D=right, however, the stamping machine must have been messed up in Mandello del Lario the day they stamped mine because it was only two lines that didn't look like a D. But the S was clear as could be. I knew I was at TDC on compression because both valves were closed (I knew this because both rockers rattled a bit due to the clearances).
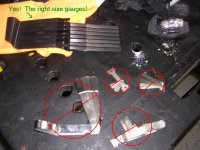
So when I went to get out my gauges, I was thrilled to find that I didn't have one that could measure the intakes at .10 mm! I had to go to the local motorcycle shop to get me a new set of $20 gauges. Set me back about 40 minutes total.
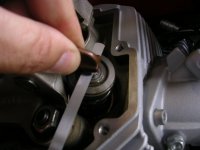
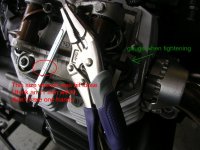
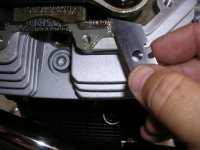
Once I got going, it was pretty straight forward. I needed to adjust 3 of the 4 valves. When I had the right gauge in the gap and was working the screw, I tried to rattle the rocker. I made sure there was some drag, but not too much. No rattle with gauge in place, then I tightened. After tightening, I checked again and again to make sure I had the right spec for the right valve. You don't want to over tighten things, and I only used my human strength to tighten adjuster screws and covers.
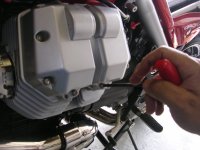
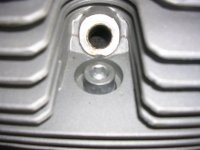
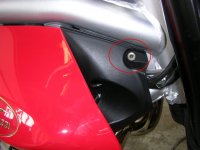
New spark plugs too. Hopefully, I tightened everything up. This was my first valve job ever. These well nuts on the side cover front can be a pain when they fall through the frame--I sprayed a little lube on the screw so it didn't bind and just turn the well nut instead of ride the threads.
No leaks and it ran beautifully on the test ride. So I think I'm good. Next, suspension set up and new tires...then I'm ready for the MGNOC Rally in Virginia... :woohoo:
Getting the covers off was fairly straight forward, my gaskets were destroyed in removal. I used a razor blade to clean the surfaces. Be delicate to prevent scraped off gasket from getting into the motor.
After removing the plugs (one was whiter/crustier (running hotter?) than the other, but I lost track of which cylinder! I think it was the right though). It was fairly simple to find top dead center on the compression stroke. With the plugs pulled, in top gear I could move the rear tire. Using a head lamp I could look into the cylinder to see the piston movement, then I checked the marks on the flywheel. S=left D=right, however, the stamping machine must have been messed up in Mandello del Lario the day they stamped mine because it was only two lines that didn't look like a D. But the S was clear as could be. I knew I was at TDC on compression because both valves were closed (I knew this because both rockers rattled a bit due to the clearances).
So when I went to get out my gauges, I was thrilled to find that I didn't have one that could measure the intakes at .10 mm! I had to go to the local motorcycle shop to get me a new set of $20 gauges. Set me back about 40 minutes total.
Once I got going, it was pretty straight forward. I needed to adjust 3 of the 4 valves. When I had the right gauge in the gap and was working the screw, I tried to rattle the rocker. I made sure there was some drag, but not too much. No rattle with gauge in place, then I tightened. After tightening, I checked again and again to make sure I had the right spec for the right valve. You don't want to over tighten things, and I only used my human strength to tighten adjuster screws and covers.
New spark plugs too. Hopefully, I tightened everything up. This was my first valve job ever. These well nuts on the side cover front can be a pain when they fall through the frame--I sprayed a little lube on the screw so it didn't bind and just turn the well nut instead of ride the threads.
No leaks and it ran beautifully on the test ride. So I think I'm good. Next, suspension set up and new tires...then I'm ready for the MGNOC Rally in Virginia... :woohoo:
Attachments
-
 closed.jpg163.1 KB · Views: 1,351
 -
 adjustandrattle.jpg76.6 KB · Views: 1,343
 -
 feelers.jpg136.2 KB · Views: 1,338
 -
 handtighten.jpg100.1 KB · Views: 1,334
 -
 howadjusted.jpg136 KB · Views: 1,341
 -
 leftadjusted.jpg176.8 KB · Views: 1,340
 -
 peekatplug.jpg84 KB · Views: 1,334
 -
 plugs.jpg119.5 KB · Views: 1,334
 -
 scrapegasket.jpg123 KB · Views: 1,334
 -
 wellnut.jpg105.7 KB · Views: 1,338
")
