• Ciao Guest - You’ve landed at the ultimate Guzzi site. NEW FORUM REGISTRATIONS REQUIRE EMAIL ACTIVATION - CHECK YOUR SPAM FOLDER - Use the CONTACT above if you need help. New to the forum? For all new members, we require ONE post in the Introductions section at the bottom, in order to post in most of the other sections. ALWAYS TRY A SEARCH BEFORE STARTING A NEW TOPIC - Most questions you may have, have likely been already answered. DON'T BE A DRIVE-BY POSTER: As a common courtesy, check back in and reply within 24 hours, or your post will be deleted. Note there's decades of heavily experienced Guzzi professionals on this site, all whom happily give endless amounts of their VALUABLE time for free; BE COURTEOUS AND RESPECTFUL!
  • There is ZERO tolerance on personal attacks and ANY HYPERLINKS to PRODUCT(S) or other competing website(s), including personal pages, social media or other Forums. This ALSO INCLUDES ECU DIAGnostic software, questions and mapping. We work very hard to offer commercially supported products and to keep info relevant here. First offense is a note, second is a warning, third time will get you banned from the site. We don't have the time to chase repeat (and ignorant) offenders. This is NOT a social media platform; It's an ad-free, privately funded website, in small help with user donations. Be sure to see the GTM STORE link above; ALL product purchases help support the site, or you can upgrade your Forum profile or DONATE via the link above.
  • Be sure to see the GTM STORE link also above for our 700+ product inventory, including OEM parts and many of our 100% Made-in-SoCal-USA GTM products and engine kits. In SoCal? Click the SERVICE tab above for the best in service, tires, tuning and installation of our products or custom work, and don't miss our GT MotoCycles® (not) art on the BUILDS tab above. WE'RE HERE ONLINE ONLY - NO PHONE CALLS MADE OR RECEIVED - DO NOT EMAIL AND ASK QUESTIONS OR ASK TO CALL YOU.
  • Like the new V100, GuzziTech is full throttle into the future! We're now running on an all-new server and we've updated our Forum software. The visual differences are obvious, but hopefully you'll notice the super-fast speed. If you notice any glitches or have any issues, please post on the Site Support section at the bottom. If you haven't yet, please upgrade your account which is covered in the Site Support section or via the DONATE tab above, which gives you full site access including the DOWNLOADS section. We really appreciate every $ and your support to keep this site ad-free. Create an account, sign in, upgrade your account, and enjoy. See you on the road in 2024.

2009 Stelvio Rear Brake Pad Change

gbund71ambassador

Just got it firing!
Joined
Nov 27, 2011
Messages
7
Location
Los Angeles
This forum has been incredibly helpful for my newly purchased 2009 Stelvio.
I have been looking up and down for a video or tutorial on how to change the rear brake pads and I haven't been able to come up with anything. I'm assuming that because there's no material on Guzzitech about it that it must be really simple and easy and I'm being a huge n00b.
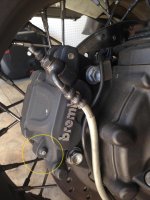
However, can anyone tell me how to do this? I'm caught up on one step, which is removing this "caliper split pin" (circled in yellow below). How does it come out? It seems to rotate but I spent about 15 minutes playing with it and couldn't get it out. Didn't want to whack it with a drift or keep messing with it for fear of breaking the pin or the pistons. Couldn't find the circular clip that is pictured in the service manual. Did I miss something?
Any help would be appreciated.
-Geoff Bund

2009 Stelvio
1971 Ambassador
1991 Honda CB750
 

Attachments

  • stelvio_rear_brake.jpg
    stelvio_rear_brake.jpg
    333.8 KB · Views: 265
There should be a small cir-clip. Remove the caliper and drive out with the drift or punch.
 
As Todd states there should be a tiny circlip on the outer end of the retaining pin which just pulls off with a pair of rat nosed pliers. Then gently drift the pin out towards the wheel.

Did my pads last weekend, easy with the wheel off, just push the pistons back in, slot in the pads and refit. I was down to about 1.5mm as a result of off road riding in October (lost of back brake)

I swapped the fixed half of the caliper as the upper thread for the retaining bolt has stripped itself over time, it think the metal is a bit soft. Anyway I found a second hand full calliper and the swap was easy, bit of grease on the pins and the bolts.
 
Back
Top