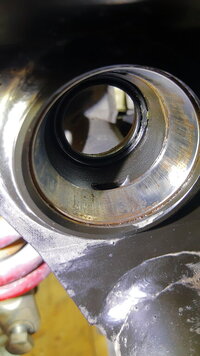
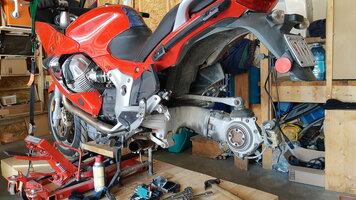
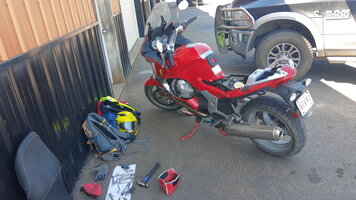
• Ciao Guest - You’ve landed at the ultimate Guzzi site. NEW FORUM REGISTRATIONS REQUIRE EMAIL ACTIVATION - CHECK YOUR SPAM FOLDER - Use the CONTACT above if you need help. New to the forum? For all new members, we require ONE post in the Introductions section at the bottom, in order to post in most of the other sections. ALWAYS TRY A SEARCH BEFORE STARTING A NEW TOPIC - Most questions you may have, have likely been already answered. DON'T BE A DRIVE-BY POSTER: As a common courtesy, check back in and reply within 24 hours, or your post will be deleted. Note there's decades of heavily experienced Guzzi professionals on this site, all whom happily give endless amounts of their VALUABLE time for free; BE COURTEOUS AND RESPECTFUL!
  • There is ZERO tolerance on personal attacks and ANY HYPERLINKS to PRODUCT(S) or other competing website(s), including personal pages, social media or other Forums. This ALSO INCLUDES ECU DIAGnostic software, questions and mapping. We work very hard to offer commercially supported products and to keep info relevant here. First offense is a note, second is a warning, third time will get you banned from the site. We don't have the time to chase repeat (and ignorant) offenders. This is NOT a social media platform; It's an ad-free, privately funded website, in small help with user donations. Be sure to see the GTM STORE link above; ALL product purchases help support the site, or you can upgrade your Forum profile or DONATE via the link above.
  • Be sure to see the GTM STORE link also above for our 700+ product inventory, including OEM parts and many of our 100% Made-in-SoCal-USA GTM products and engine kits. In SoCal? Click the SERVICE tab above for the best in service, tires, tuning and installation of our products or custom work, and don't miss our GT MotoCycles® (not) art on the BUILDS tab above. WE'RE HERE ONLINE ONLY - NO PHONE CALLS MADE OR RECEIVED - DO NOT EMAIL AND ASK QUESTIONS OR ASK TO CALL YOU.
  • Like the new V100, GuzziTech is full throttle into the future! We're now running on an all-new server and we've updated our Forum software. The visual differences are obvious, but hopefully you'll notice the super-fast speed. If you notice any glitches or have any issues, please post on the Site Support section at the bottom. If you haven't yet, please upgrade your account which is covered in the Site Support section or via the DONATE tab above, which gives you full site access including the DOWNLOADS section. We really appreciate every $ and your support to keep this site ad-free. Create an account, sign in, upgrade your account, and enjoy. See you on the road in 2024.

A few questions about pulling CARC swingarm

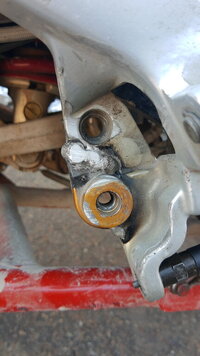
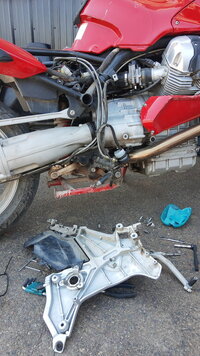
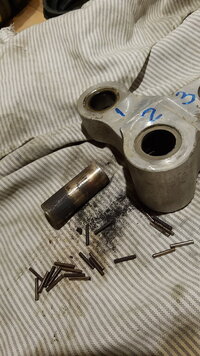
Bill, I have been known in good riding weather, to call in on a Saturday with a severe case of the screwits. ;) I may have to sometime soon so we can get the Silver Streak completely road ready. Oh, don't forget your high dollar, high tech tool for the castle nuts when you come up. :)
 
this is my fall project. i got the castle nut tool from gb cycles in the uk
type in(ebay) moto guzzi norge 1200 swinging arm socket tool
 
There is a good thread in the Stelvio section on servicing the swing arm bearings and shock linkage. You will need to support the engine/gearbox when you remove the pork chops/side plates.
 
In November I pulled the swingarms on both my Griso and Breva. I have "Todd's Tool". It took this amateur about 3 1/2 hrs each to remove, inspect and reassemble. Things were "passable" for the time being, and with fresh grease, good enough for the summer, but I have now ordered two full sets of replacement bearings and seals for the fall.
If you can not source the castle nut tool, be aware that the castle nut is used to pre-load the bearings to only 10Nm, then clamped securely with two clamping screws to keep it from turning. Because there is little torque involved, it could be possible to make up something like KevinNZ did (grinding down an old socket). Two pins on opposite sides would make it simple to make, and possibly be adequate.
Having said that, let's support the store if they are made available again.
 
Yeah - I didn't use anything on mine. Guess I'll do it next time I'm in there. My buddy's Stelvio is in my garage waiting for the same lube job and I can see the sealant that oozed out that was applied at the factory.

Make sure you read the other threads. Don't take off the peg side plates like I did - bike nearly fell over :S :pinch:
Hi Rafael, I know this an old thread, but preparing to pull the swingarm from my Norge to grease the bearings. For me a first.

Pulling the righthand side peg plate, with the brake pedal in place seems to be somewhat difficult.
Any tips?
 
Hi Rafael, I know this an old thread, but preparing to pull the swingarm from my Norge to grease the bearings. For me a first.

Pulling the righthand side peg plate, with the brake pedal in place seems to be somewhat difficult.
Any tips?
Before you can pull the side plates, be sure to support the engine. The RH plate isn't too bad, you just have to be patient and look at all the fasteners. Once unfastened you just hang it out of the way. I use a short bungee cord.
 
Hi Rafael, I know this an old thread, but preparing to pull the swingarm from my Norge to grease the bearings. For me a first.

Pulling the righthand side peg plate, with the brake pedal in place seems to be somewhat difficult.
Any tips?
I did that one service on my NORGE as well, first time I supported the engine disassembled the right plate with bungee cord, but second time removing the right plate, bike was on side kick and did it IN front of a welding shop. I broke the the "eye" for beak pedal. inside the plate is the brake cylinder, this is only one keep the plate attached to the frame. ones removed the master cylinder - DONE.
 
Here is my rusty experience as well, together with welded eye for the brake pedal.
 

Attachments

  • IMG_20230721_134752490.jpg
    IMG_20230721_134752490.jpg
    60 KB · Views: 15
  • IMG_20230721_125452381.jpg
    IMG_20230721_125452381.jpg
    106.3 KB · Views: 15
  • IMG_20230721_131029935.jpg
    IMG_20230721_131029935.jpg
    153.7 KB · Views: 15
  • IMG_20230618_212824799 (1).jpg
    IMG_20230618_212824799 (1).jpg
    107.6 KB · Views: 16
  • IMG_20230618_192548997.jpg
    IMG_20230618_192548997.jpg
    67.3 KB · Views: 15
  • IMG_20230616_104332947.jpg
    IMG_20230616_104332947.jpg
    183.2 KB · Views: 15
I hope you replaced the swing arm bearings. That race doesn't look good.
No, I did not, it was in the middle of this summer. I cleaned very well with diesel and wool rug, polished and clean the rust from the rollers same way with diesel, satisfied to the end of season. Now I have new roller bearings and needle bearings as well. Needle bearings I polished one by one needle with diesel the same way but used a drill to rotate them and did the business with 3000 glass paper soaked in diesel, just to save the season. Now new dog bone with new bearings, waiting for the winter maintenance, together with front fork oil change, oil temperature sensor, position sensor and oils at the beginning of ne season. I'm keeping the old oils till spring.
Picture, rusty vs cleaned needles. I will change everything this winter. I had rust on the drive shaft spline as well, but cleaned with tooth brush and diesel. DIESEL makes miracles. And the way I supported the swing arm, before disassembly. I need to find the right press for dog bone needle bearings and for the roller bearings as well.

IMG 20230625 185423457
IMG 20230624 162850267
IMG 20230618 165846837
IMG 20230618 165140691
 
Back
Top