• Ciao Guest - You’ve landed at the ultimate Guzzi site. NEW FORUM REGISTRATIONS REQUIRE EMAIL ACTIVATION - CHECK YOUR SPAM FOLDER - Use the CONTACT above if you need help. New to the forum? For all new members, we require ONE post in the Introductions section at the bottom, in order to post in most of the other sections. ALWAYS TRY A SEARCH BEFORE STARTING A NEW TOPIC - Most questions you may have, have likely been already answered. DON'T BE A DRIVE-BY POSTER: As a common courtesy, check back in and reply within 24 hours, or your post will be deleted. Note there's decades of heavily experienced Guzzi professionals on this site, all whom happily give endless amounts of their VALUABLE time for free; BE COURTEOUS AND RESPECTFUL!
  • There is ZERO tolerance on personal attacks and ANY HYPERLINKS to PRODUCT(S) or other competing website(s), including personal pages, social media or other Forums. This ALSO INCLUDES ECU DIAGnostic software, questions and mapping. We work very hard to offer commercially supported products and to keep info relevant here. First offense is a note, second is a warning, third time will get you banned from the site. We don't have the time to chase repeat (and ignorant) offenders. This is NOT a social media platform; It's an ad-free, privately funded website, in small help with user donations. Be sure to see the GTM STORE link above; ALL product purchases help support the site, or you can upgrade your Forum profile or DONATE via the link above.
  • Be sure to see the GTM STORE link also above for our 700+ product inventory, including OEM parts and many of our 100% Made-in-SoCal-USA GTM products and engine kits. In SoCal? Click the SERVICE tab above for the best in service, tires, tuning and installation of our products or custom work, and don't miss our GT MotoCycles® (not) art on the BUILDS tab above. WE'RE HERE ONLINE ONLY - NO PHONE CALLS MADE OR RECEIVED - DO NOT EMAIL AND ASK QUESTIONS OR ASK TO CALL YOU.
  • Like the new V100, GuzziTech is full throttle into the future! We're now running on an all-new server and we've updated our Forum software. The visual differences are obvious, but hopefully you'll notice the super-fast speed. If you notice any glitches or have any issues, please post on the Site Support section at the bottom. If you haven't yet, please upgrade your account which is covered in the Site Support section or via the DONATE tab above, which gives you full site access including the DOWNLOADS section. We really appreciate every $ and your support to keep this site ad-free. Create an account, sign in, upgrade your account, and enjoy. See you on the road in 2024.

Admore Handguard LED Lighting Kit

canuck1969

GT Reference
GT Contributor
Joined
May 31, 2012
Messages
1,242
Location
Burlington, Ontario
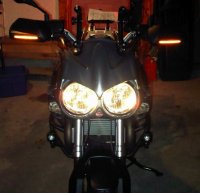
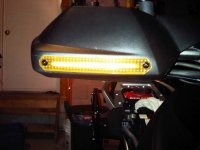
Just finished installing the first of the Christmas gifts for the Stelvio.

Installed a set of Admore Lighing light bars. Dremeled out a slot in the guards and retrofitted a lens from an automotive lens repair kit.

Set them up so they are running lights and then brighten for signals. Make a huge difference from the front especially when paired up with the Denali lights that I installed earlier to replace the stock Hella lights that were giving me grief. Now only if the snow would go away I could go play. :(

On to the next project to install my light kit for my top case.......
 

Attachments

  • AdmoreLED-1.jpg
    AdmoreLED-1.jpg
    86.5 KB · Views: 556
  • AdmoreLED-2.jpg
    AdmoreLED-2.jpg
    108.6 KB · Views: 555
Canuck,

Can you go into detail on how you wired your lights to the signals and the fog lamps? That looks like a good alternative to signals on the mirrors.

Great job, BTW and Thanks!
 
Mike1230 said:
Canuck,

Can you go into detail on how you wired your lights to the signals and the fog lamps? That looks like a good alternative to signals on the mirrors.

Great job, BTW and Thanks!

Mike,

The Admore led's come with a smaller controller that allow them to run as running lights and then brighten for signals. It requires a switched 12V supply and then the supply from the signal. I wired the 12V supply for running lights to the GPS plug on the left side of the bike and then tapped into each signal wire going to the bulb.

The fog lights were a separate project. I just wired them directly to the aux light plugs. Snipped off the old plug and spliced in a new plug to match my denali's. I had though about wiring in the running lights to the fog lights so they would switch on with the fogs but opted for gong with constant running light.
 
side note about the Denali's

canuck1969 said:
The fog lights were a separate project. I just wired them directly to the aux light plugs. Snipped off the old plug and spliced in a new plug to match my denali's.

Pretty much how I wired my Denali's up.

The original Denali brackets lasted about 7k miles before they fractured - $5buck a piece new from twisted throttle was a pleasant suprise - when I got the replacements I put a 3/8"tk x 5/8"dia spacer between the engine bar mounts and the bottom of the light bracket - over the spacer I found a thich rubber grommet with a 5/8"ID x 7/16"tk at the hardware store to act as a damper....we'll see if it works but it's been OK for 1k miles so far
 
Re: side note about the Denali's

Canuck, thanks for the information. Looks like a good rainy day project for me.

Boxermoose, I've yet to have a problem with the stock fog lights, mostly because I haven't used them much, but I did insert a rubber washer between the light bracket and the bracket on the crash bar to absorb some of the vibration. I hope it works although complete isolation is best.


boxermoose said:
canuck1969 said:
The fog lights were a separate project. I just wired them directly to the aux light plugs. Snipped off the old plug and spliced in a new plug to match my denali's.

Pretty much how I wired my Denali's up.

The original Denali brackets lasted about 7k miles before they fractured - $5buck a piece new from twisted throttle was a pleasant suprise - when I got the replacements I put a 3/8"tk x 5/8"dia spacer between the engine bar mounts and the bottom of the light bracket - over the spacer I found a thich rubber grommet with a 5/8"ID x 7/16"tk at the hardware store to act as a damper....we'll see if it works but it's been OK for 1k miles so far
 
canuck1969 said:
Just finished installing the first of the Christmas gifts for the Stelvio.

Installed a set of Admore Lighing light bars. Dremeled out a slot in the guards and retrofitted a lens from an automotive lens repair kit.

Set them up so they are running lights and then brighten for signals. Make a huge difference from the front especially when paired up with the Denali lights that I installed earlier to led bulb replace the stock Hella lights that were giving me grief. Now only if the snow would go away I could go play. :(

On to the next project to install my light kit for my top case.......


That looks fantastic you seems to have good knowledge about lights
 
Back
Top