• Ciao Guest - You’ve landed at the ultimate Guzzi site. NEW FORUM REGISTRATIONS REQUIRE EMAIL ACTIVATION - CHECK YOUR SPAM FOLDER - Use the CONTACT above if you need help. New to the forum? For all new members, we require ONE post in the Introductions section at the bottom, in order to post in most of the other sections. ALWAYS TRY A SEARCH BEFORE STARTING A NEW TOPIC - Most questions you may have, have likely been already answered. DON'T BE A DRIVE-BY POSTER: As a common courtesy, check back in and reply within 24 hours, or your post will be deleted. Note there's decades of heavily experienced Guzzi professionals on this site, all whom happily give endless amounts of their VALUABLE time for free; BE COURTEOUS AND RESPECTFUL!
  • There is ZERO tolerance on personal attacks and ANY HYPERLINKS to PRODUCT(S) or other competing website(s), including personal pages, social media or other Forums. This ALSO INCLUDES ECU DIAGnostic software, questions and mapping. We work very hard to offer commercially supported products and to keep info relevant here. First offense is a note, second is a warning, third time will get you banned from the site. We don't have the time to chase repeat (and ignorant) offenders. This is NOT a social media platform; It's an ad-free, privately funded website, in small help with user donations. Be sure to see the GTM STORE link above; ALL product purchases help support the site, or you can upgrade your Forum profile or DONATE via the link above.
  • Be sure to see the GTM STORE link also above for our 700+ product inventory, including OEM parts and many of our 100% Made-in-SoCal-USA GTM products and engine kits. In SoCal? Click the SERVICE tab above for the best in service, tires, tuning and installation of our products or custom work, and don't miss our GT MotoCycles® (not) art on the BUILDS tab above. WE'RE HERE ONLINE ONLY - NO PHONE CALLS MADE OR RECEIVED - DO NOT EMAIL AND ASK QUESTIONS OR ASK TO CALL YOU.
  • Like the new V100, GuzziTech is full throttle into the future! We're now running on an all-new server and we've updated our Forum software. The visual differences are obvious, but hopefully you'll notice the super-fast speed. If you notice any glitches or have any issues, please post on the Site Support section at the bottom. If you haven't yet, please upgrade your account which is covered in the Site Support section or via the DONATE tab above, which gives you full site access including the DOWNLOADS section. We really appreciate every $ and your support to keep this site ad-free. Create an account, sign in, upgrade your account, and enjoy. See you on the road in 2024.

Another Great Ride and Productive Griso Day

Chicago Mark

Cruisin' Guzzisti
Joined
Dec 25, 2008
Messages
159
Location
Chicago, IL
You may or may not know that today, May 7th, was the annual CMA Run for the Son ride. The CMA chapters across the country all held the event today. I rode the Run for the Son with the NW Indiana chapter of Bikers For Christ. It was an awesome 100 mile ride with a police escort. Ignoring stop signs, traffic lights and just about every other road sign due to the police escort was awesome. It's also great to spend the day with the various christian motorcycle clubs all supporting the CMA and this ride. I had the only Valkyrie Interstate among the 150 or so bikes. Had I brought the Griso, I would have had the only Moto Guzzi too. It's about 100 miles for me to meet up with the Bikers For Christ group so I had a wonderful 300 mile day.

Tonight when I got back home I finished working on the Griso. The front fender as well as the rear bodywork were off the bike. The front fender was off so I could mount the Pyramid Fenda Extenda. It's a great piece that fits well, looks great and should keep the front of the bike/engine cleaner. The rear body work was off so I could mount the Guzzi tail rack. The most difficult part about mounting this excellent rack is the mental anguish of having to drill two holes in the back of the bodywork. Jim Barron at Rose Farm Classics told me how to do it and it worked great, just like he said it would. The rack really does fit great and has that 'designed in' look. The Guzzi tail bag fits on it perfectly and looks like it belongs there as well.

I also mounted the Skidmarx rear hugger and again, it looks great and should do a good job of keeping the bike a bit cleaner. Frankly, it just looks like it should have been there all along. These items plus the Pazzo levers, Rizoma mirrors and the Guzzi flyscreen and well, all I need now is the Throttlemeister bar end throttle lock and more time to ride.

I really like this bike,

Mark
 
Moto Guzzi Griso 8v 2009, Mine

With this link you can see the whole album so the earlier to the later pictures show the things I've added.

MobileMe Gallery.


If you are unable to access this page, please copy and paste the URL below into your browser.
http://gallery.me.com/mpintar/100016


Enjoy,

Mark
 
I was hoping the factory rack would be a no drill install. Where exactly did you have to drill?
 
:D I have modified my Griso in much the same way. Whilst on the lookout for a suitable throttle lock, I came across the Go Cruise device. It looked very promising, so I got one. Verdict? It works every bit as well as the Kaoko device that I had on my 1050 Tiger, and, at $20, was a fraction of the cost. Highly recommended.
 
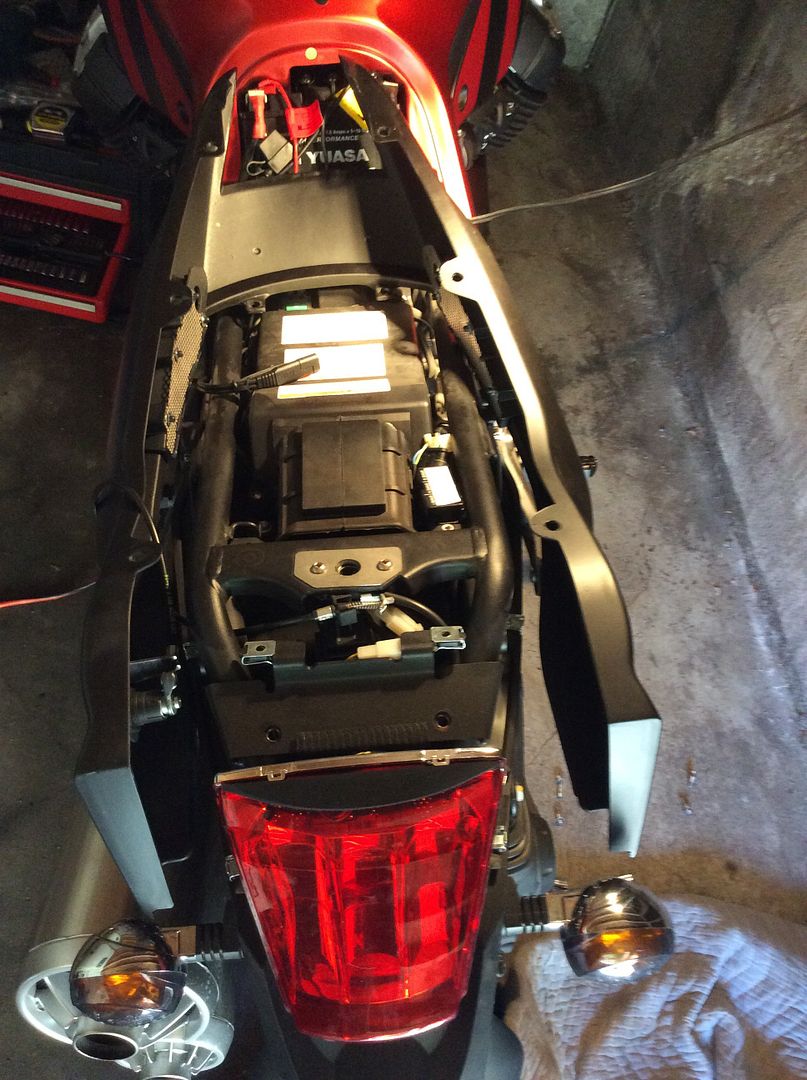
First thing is to remove the seat, seat lock cover and the rear bodywork. If you look on the sides of the rear bodywork air intakes, you'll see a round knockout. Once you cut them out (very easy) you'll see where they match the mounts welded to the frame. Once I cut out the plugs, I used a rotary tool to sand away some of the stainless mesh that was partially blocking the side holes. I also had to run a M8 x1.25 tap through all four mounting holes as they must have had some paint in them. On the underside of the rear bodywork, you'll see two dimples where the other two mount holes must be drilled. The instructions say to drill the holes 21mm. A 7/8" wood bit works great as the outer edge of the bit has a piece that makes a nice clean cut. First poke the tip of the wood bore bit through from the underside to properly locate the holes. Put some painters tape over the top side of the rear bodywork and use those pilot holes to cut out the second two mounting holes. The trick is to go slow and carefully. It's easier than it sounds. Once the rack is mounted, you really can't see where you drilled the holkes in the bodywork behind the seat.

The kit comes with four plugs that can be placed into the four mount holes if you choose to remove the rack. The plugs are the same as the transmission hole plug you remove to see the flywheel marks.

All the best,

Mark
 
:D I have modified my Griso in much the same way. Whilst on the lookout for a suitable throttle lock, I came across the Go Cruise device. It looked very promising, so I got one. Verdict? It works every bit as well as the Kaoko device that I had on my 1050 Tiger, and, at $20, was a fraction of the cost. Highly recommended.

Thanks for the tip, I just ordered one. I have a throttle lock on my Eldo and I needed one for the Griso.

The plugs are the same as the transmission hole plug you remove to see the flywheel marks.

That's the good Guzzi stuff right there!
 
Would you mind giving a bit more detail on removing the rear tail piece. I tried as I thought the 6 allen head bolts were all that were needed.

Looks like some (or all) of the bolts direcly under the tail light area need to come off as well.

I have a rack to fit also.

Thanks for any help.
 
I had to loosen and/or remove more of the screws that secure the tail light and rear fender assembly than it originally looks like. If you have a helper to hold the tail lighjt/rear fender pieces it will be much easier. The end result is a very nicely designed and useful rear rack.

All the best,

Mark
 
You have to remove the four Allen head bolts near the rear of the tail section too. I tried just loosening them and it wasn't enough. So 10 total bolts to remove the tail piece.

I found the manufacturer suggested 21mm drill bit to be a bit over optimistic. At my hardware store, I had a choice of 20.6 or 22.2 mm (they only had standard 13/16" or 7/8" respectively). I could have saved $5 and used the 5/8" bit I already had (converts to 15.9 mm). Even using painters tape and going slowly, it's not a beautiful hole by any means. In any event, I can conclusively say that a 13/16" (20.6 mm) drill bit makes a big enough hole and then some.
 
Last edited:
Here's the tail piece removed and inverted. I just left the seat lock in place, and I lifted the tail a bit -- didn't want to drill through and catch a wire or the battery.
 
Last edited:
Back
Top