Question was asked about relining brake shoes on a '58 Lodola.
A: Most brake re-lining shops can do it.
Mike P wrote:
Patrick H replied:
A: Most brake re-lining shops can do it.
Mike P wrote:
Phoenix Friction , I spoke with them this morning and my shoes are headed there for relining as we speak. They sounded helpful and competent. I also have a friend/machinist standing by with the lathe for arcing when they return.
Patrick H replied:
On a traditional automotive drum brake, BOTH ends of the shoe are motile. One end is repeatedly pushed outward by the hydraulic or mechanical lever action. The other end of the shoe is occasionally pushed outward by the brake adjuster system. So, you can easily arc a shoe to match the drum arc and you're all done. As the moving end of the shoe gets worn, you adjust out the the other end to keep the wear even through the shoe.
Not so with a vintage Guzzi. One end of the shoe is pushed outward by the brake cam rotation. But, the opposite end of the shoe never moves outward. It only pivots on an anchored pivot point. Arcing the shoe separate from the drum can't give you a mating arc match. The majority of wear always occurs to the working end of the shoe and it is impossible to fully wear the pivot end of the shoe. No adjustability provided.
To be done properly, the shoes must be arced AFTER they are mounted in the brake backing plate. The whole system has to be turned in a lathe, or pivoted adjacent to a vertical milling cutter. In this way, you get an arc IN SITU which matches the drum. You have to create some temporary lever adjustment system so that the mobile end of the shoes can be pushed outward to mimic their working contact with the drum.
An alternative method is to use sticky back coarse sandpaper and stick that to the inside of the drum. Use a chalk stick to run a line down the center of the shoe before assembly. Assemble. Again create a mechanical temporary adjuster to gradually apply the brakes as you rotate the wheel by hand. The sandpaper will abrade away any high spots of the shoes while it simultaneously creates a matching arc to the drum. Disassemble and inspect. I deally, you' d like to stop the abrasion work when perhaps 90% of the linear chalk mark has been abraded away. If you need to remove a LOT of material from one end of the shoe, it is easier if you do MOST of the work on a lathe or mill and then finish for precision with the sandpaper and assembled wheel. Since the maximum amount of wear will occur at the moving end of the shoe, you don't want to remove so much material that your brakes are essentially gone in a few thousand miles. It is going to be a comprimise. The more material you remove in order to mate the arcs, the better your stopping will be, and the shorter the residual life of your shoes. You decide which is more important. Tricky work, but it can be done.
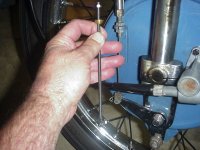
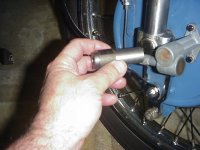
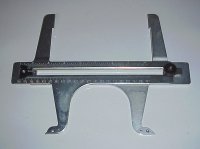
You'll need to be able to adjust the shoes during the arcing. Pictures below of the temporary adjuster that I created.