• Ciao Guest - You’ve landed at the ultimate Guzzi site. NEW FORUM REGISTRATIONS REQUIRE EMAIL ACTIVATION - CHECK YOUR SPAM FOLDER - Use the CONTACT above if you need help. New to the forum? For all new members, we require ONE post in the Introductions section at the bottom, in order to post in most of the other sections. ALWAYS TRY A SEARCH BEFORE STARTING A NEW TOPIC - Most questions you may have, have likely been already answered. DON'T BE A DRIVE-BY POSTER: As a common courtesy, check back in and reply within 24 hours, or your post will be deleted. Note there's decades of heavily experienced Guzzi professionals on this site, all whom happily give endless amounts of their VALUABLE time for free; BE COURTEOUS AND RESPECTFUL!
  • There is ZERO tolerance on personal attacks and ANY HYPERLINKS to PRODUCT(S) or other competing website(s), including personal pages, social media or other Forums. This ALSO INCLUDES ECU DIAGnostic software, questions and mapping. We work very hard to offer commercially supported products and to keep info relevant here. First offense is a note, second is a warning, third time will get you banned from the site. We don't have the time to chase repeat (and ignorant) offenders. This is NOT a social media platform; It's an ad-free, privately funded website, in small help with user donations. Be sure to see the GTM STORE link above; ALL product purchases help support the site, or you can upgrade your Forum profile or DONATE via the link above.
  • Be sure to see the GTM STORE link also above for our 700+ product inventory, including OEM parts and many of our 100% Made-in-SoCal-USA GTM products and engine kits. In SoCal? Click the SERVICE tab above for the best in service, tires, tuning and installation of our products or custom work, and don't miss our GT MotoCycles® (not) art on the BUILDS tab above. WE'RE HERE ONLINE ONLY - NO PHONE CALLS MADE OR RECEIVED - DO NOT EMAIL AND ASK QUESTIONS OR ASK TO CALL YOU.
  • Like the new V100, GuzziTech is full throttle into the future! We're now running on an all-new server and we've updated our Forum software. The visual differences are obvious, but hopefully you'll notice the super-fast speed. If you notice any glitches or have any issues, please post on the Site Support section at the bottom. If you haven't yet, please upgrade your account which is covered in the Site Support section or via the DONATE tab above, which gives you full site access including the DOWNLOADS section. We really appreciate every $ and your support to keep this site ad-free. Create an account, sign in, upgrade your account, and enjoy. See you on the road in 2024.

Cali' 3 brake woes

Eliminator

Tuned and Synch'ed
GT Contributor
Joined
Feb 27, 2017
Messages
78
Location
Hampshire, UK
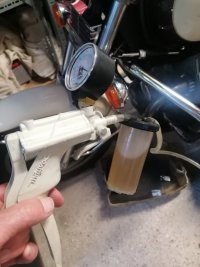
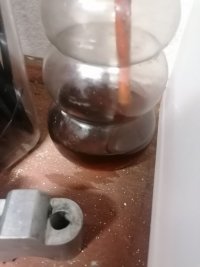
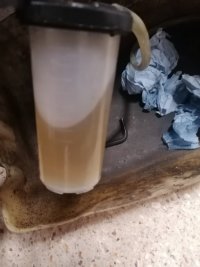
Thought I’d give the bike a treat and change the brake fluid.

Now the left hand linked disc won’t seal on the nipple.

Removed the caliper, now suspended on the handlebars.

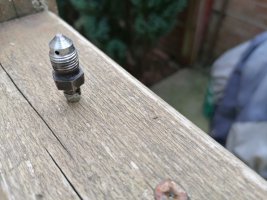
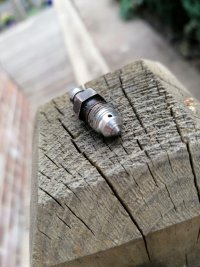
Sealing face on nipple looks a bit rough. I work in QC, in a company that makes prosthetic legs. The sealing faces on some of our components mimics that of the caliper / nipple sealing surfaces, so I know what I’m looking for.

But, the sealing face in the caliper has a slight nick in it
:unamused:


The angles between the two , are I’m “fairly” sure are not the same angle.

I could take the caliper to work and “Plastiform” the thread and sealing face to make sure.
Plastiform is a twin pack fluid that flows easily and takes the form of the component that it is used on. Once it’s set, it is extracted. It’s flexible enough to remove without damaging the form which needs to be inspected. Then measure the angle on our Starret VMM. ( visual measuring machine)

Then attempt to recut the seat by hand, this has successfully been done at work.
I like a challenge

UPDATE Ebay lots of repair kits available, beats faffing about. £7.99
 

Attachments

  • Guzzi nipple.jpg
    Guzzi nipple.jpg
    127.8 KB · Views: 9
  • Guzzi 2.jpg
    Guzzi 2.jpg
    89.1 KB · Views: 9
Last edited:
Hi!

Where are you leaking from?

Out the top of the tube passageway in the bleed screw or past the threads?

The bleed screw seats down in the caliper port where the little holes are pressed up against the sidewalks of the sidewalks.

I’ve seen the bleed screws and even the caliper port itself, damaged from over-torquing the hell out of the bleed screw.

This unfortunately, is one of those items that people just love to try to set at 100 ft/lb when in reality is it just “Snug + 2-3mm additional rotation”.

If it is leaking out the threads, you can use a little plumbing Teflon tape wrapped on the drain plug threads only. Please do not cover those tiny bleed holes.

Either way, this will stop the leak until you can get new bleed screws which I’m pretty sure will totally fix your issue here.
 
Last edited:
Leaking past the threads Scott. Looking at the sealing face inside the caliper, there is a score. Only nipped it up in the first instance, Honest Guv. :)
 
PTFE tape worked. Had problems this time getting the brake pedal to feel hard, despite using this. However the brake pedal does make the rear brake light work, so there is pressure.

If it ain't broke, don't "2 fix it" :think:
 

Attachments

  • Mityvac.jpg
    Mityvac.jpg
    63.2 KB · Views: 3
Last edited:
As you removed the bleed screw, you will need to completely bleed the brake line again. You will have air right down at the caliper which will make it spongy feeling.

If you bleed out 1 full reservoir worth of fluid, your full functionality should return. Remember to loosen the bleed screw only enough to allow fluid to more through it under pressure from the pedal or lever, whichever is appropriate for this particular location.

Glad you are getting it resolved easily and timely.

Well done Sir!
 
Have to do the linked back brake next. Last time I did this, I was unaware that there was a bleed nipple under the tool tray. Is this the distribution valve? I didn't touch this last time....... 9 years ago!!!! I'm hoping that as this is only a fluid change, that I don't have to touch this and I can just bleed the back caliper?

Regardless of my problems, that old fluid.:swear:
 

Attachments

  • old fluid.jpg
    old fluid.jpg
    43.5 KB · Views: 4
  • flushed through fluid.jpg
    flushed through fluid.jpg
    53.6 KB · Views: 4
Leaking past the threads Scott. Looking at the sealing face inside the caliper, there is a score. Only nipped it up in the first instance, Honest Guv. :)
If fluid is leaking past the bleeder and caliper tapered seal surfaces then it has two exit paths: the bore through the bleeder screw and the threads on the bleeder and caliper. Applying a sealant to the threads still leaves the bore as a leak path.

Jason
 
Bore didn't leak.

Back brake done, What a lovely place to have the bleed nipple.

Someone else suggested small ball bearing, hit with mallet, create new seat.
 
Last edited:
Back
Top