• Ciao Guest - You’ve landed at the ultimate Guzzi site. NEW FORUM REGISTRATIONS REQUIRE EMAIL ACTIVATION - CHECK YOUR SPAM FOLDER - Use the CONTACT above if you need help. New to the forum? For all new members, we require ONE post in the Introductions section at the bottom, in order to post in most of the other sections. ALWAYS TRY A SEARCH BEFORE STARTING A NEW TOPIC - Most questions you may have, have likely been already answered. DON'T BE A DRIVE-BY POSTER: As a common courtesy, check back in and reply within 24 hours, or your post will be deleted. Note there's decades of heavily experienced Guzzi professionals on this site, all whom happily give endless amounts of their VALUABLE time for free; BE COURTEOUS AND RESPECTFUL!
  • There is ZERO tolerance on personal attacks and ANY HYPERLINKS to PRODUCT(S) or other competing website(s), including personal pages, social media or other Forums. This ALSO INCLUDES ECU DIAGnostic software, questions and mapping. We work very hard to offer commercially supported products and to keep info relevant here. First offense is a note, second is a warning, third time will get you banned from the site. We don't have the time to chase repeat (and ignorant) offenders. This is NOT a social media platform; It's an ad-free, privately funded website, in small help with user donations. Be sure to see the GTM STORE link above; ALL product purchases help support the site, or you can upgrade your Forum profile or DONATE via the link above.
  • Be sure to see the GTM STORE link also above for our 700+ product inventory, including OEM parts and many of our 100% Made-in-SoCal-USA GTM products and engine kits. In SoCal? Click the SERVICE tab above for the best in service, tires, tuning and installation of our products or custom work, and don't miss our GT MotoCycles® (not) art on the BUILDS tab above. WE'RE HERE ONLINE ONLY - NO PHONE CALLS MADE OR RECEIVED - DO NOT EMAIL AND ASK QUESTIONS OR ASK TO CALL YOU.
  • Like the new V100, GuzziTech is full throttle into the future! We're now running on an all-new server and we've updated our Forum software. The visual differences are obvious, but hopefully you'll notice the super-fast speed. If you notice any glitches or have any issues, please post on the Site Support section at the bottom. If you haven't yet, please upgrade your account which is covered in the Site Support section or via the DONATE tab above, which gives you full site access including the DOWNLOADS section. We really appreciate every $ and your support to keep this site ad-free. Create an account, sign in, upgrade your account, and enjoy. See you on the road in 2024.

Canisterectomy on the 2012 Stelvio

canuck1969

GT Reference
GT Contributor
Joined
May 31, 2012
Messages
1,242
Location
Burlington, Ontario
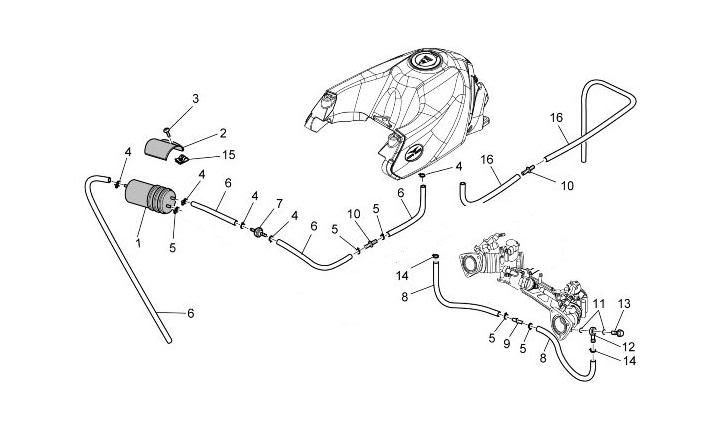
Need someone to confirm my assumptions on removing the canister on a 2012 Stelvio. Don't see any specific instructions for the Stelvio but assuming they are the same.

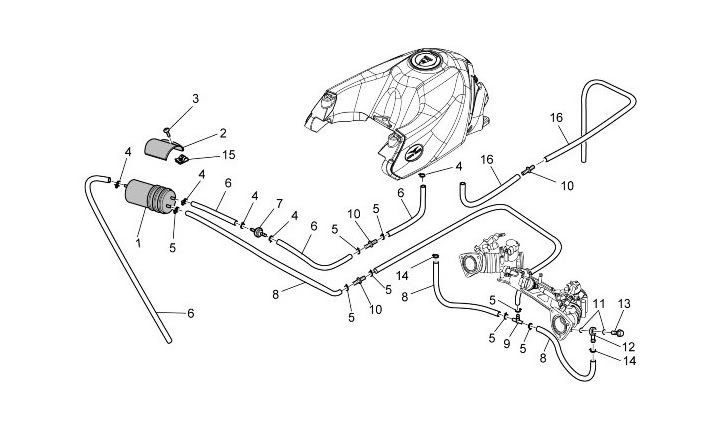
In the picture below, in order to remove the canister I need to do the following:

1. Remove hoses from both TB's all the way to the canister (hose #8) and plug ports in TB with M6 bolt. Actually have the capped connections for my Carbmate so this should work.

2. Remove the tip over valve (item 7), or check valve, and reconnect hoses with a splice. Or, just leave in place

3. Remove canister and connect both hose #6's on both side of canister.

Does that about cover it or did I miss something???

Thanks

Cnister.jpg
 
If you can, leave the banjo fittings at the manifolds and just cap them. They are good to have when you want to sync the throttle bodies.
 
john zibell said:
If you can, leave the banjo fittings at the manifolds and just cap them. They are good to have when you want to sync the throttle bodies.

I was going to replace them with capped connectors for my Carbmate and leave them in place.

Does the procedure sound right??
 
canuck1969 said:
john zibell said:
If you can, leave the banjo fittings at the manifolds and just cap them. They are good to have when you want to sync the throttle bodies.

I was going to replace them with capped connectors for my Carbmate and leave them in place.

Does the procedure sound right??

As far as I can tell it sounds about right.
 
All sounds correct, but what I recommend is taking a long piece of #8, and connecting them between both throttle bodies using the stock banjo fittings.
That charcoal canister is a bear to get to, so best to just leave it unless you end up pulling the fairing and speedo assembly at some point down the road.
 
GT-Rx said:
All sounds correct, but what I recommend is taking a long piece of #8, and connecting them between both throttle bodies using the stock banjo fittings.

Okay, I'll bite...Why do you suggest this? To what purpose? I'd really like to know. Thanks!
 
scottmastrocinque said:
Okay, I'll bite...Why do you suggest this? To what purpose? I'd really like to know. Thanks!
The engine seems to run slightly smoother, especially at idle, and it just makes life easier when the time comes to check/sync the throttle bodies.
 
GT-Rx said:
scottmastrocinque said:
Okay, I'll bite...Why do you suggest this? To what purpose? I'd really like to know. Thanks!
The engine seems to run slightly smoother, especially at idle, and it just makes life easier when the time comes to check/sync the throttle bodies.

So basically I am just plugging both banjo fittings by linking them together.......correct....

If I leave the canister in place, can I just leave the hoses to the tank connected to the canister (hose #6) with or without the check valve? Assuming the canister does not need vacumm to allow air to still enter the tank.

Like this....

CanisterMod.jpg
 
I am planing to do this job tomorrow. At the same time I want to do TB sync using my Carbtune by adjusting the bypass air screws. Do I have to reset the TPS (I do not have the tool) if I do not touch the TB butterflies adjustment/alignment?
 
canuck1969 said:
So basically I am just plugging both banjo fittings by linking them together.......correct...
Yes, correct.

Luma46 said:
At the same time I want to do TB sync using my Carbtune by adjusting the bypass air screws. Do I have to reset the TPS (I do not have the tool) if I do not touch the TB butterflies adjustment/alignment?
It is always recommended, but it isn't mandatory with just a bypass screw adjustment. If you touch the adjuster rod, yes it would be.
 
GT-Rx said:
canuck1969 said:
So basically I am just plugging both banjo fittings by linking them together.......correct...
Yes, correct.

Luma46 said:
At the same time I want to do TB sync using my Carbtune by adjusting the bypass air screws. Do I have to reset the TPS (I do not have the tool) if I do not touch the TB butterflies adjustment/alignment?
It is always recommended, but it isn't mandatory with just a bypass screw adjustment. If you touch the adjuster rod, yes it would be.

Very good...will give this ago. As soon as my Centurion from Todd shows up a Syncing we will go......

As an aside, will check my balance with my carbmate at idle just to see where it is. Think this is normal but at idle it is pretty vibey (if that is a word) to the point the bars shake back and forth. Not an issue as soon as the idle is brought up it completely goes away. Is this normal with the 8V and does removing the canister help this at all.

Also just ordered the Euro Kit from MPH. These mirrors are crap and can't see a single thing....well actually see a whole bunch of things as they vibrate....and that would be the problem. Just about nailed a car today. Pucker factor went way too high for my comfort level...thank God for shoulder checks....
 
Luma46 said:
I am planing to do this job tomorrow. At the same time I want to do TB sync using my Carbtune by adjusting the bypass air screws. Do I have to reset the TPS (I do not have the tool) if I do not touch the TB butterflies adjustment/alignment?

I know Todd says it's recommended but I just did my TB's and I cannot see for the life of me, how you could sync the TB's without it.

According to Pete Roper's post elsewhere in the site, https://www.guzzitech.com/forum/topic.html?f=163&t=7845&p=59167&hilit=allen#p59167, you reset TPS, turn on and get to operating temperature > 60 Celsius, turn off, close both bleed screws, turn on, raise the RPM's to between 3800-4000, adjust the high speed balance with the butterfly adjustment screw, NOT THE FACTORY ALIGNMENT SETTING SCREW (it's in Pete's photos), and once this is in alignment, turn off, reset TPS, turn back on again, at idle, open the bleed screw on the side which is high to reduce it in vacuum with the lower side. Done. As far as I can tell, as well as according to Pete, there is no way to bring the TB's into balance at higher RPM's without being able to reset the TPS. Adjusting the bleed screws is futile unless the upper RPM balance is set first.

I did my first adjustment with a MotionPro Mercury stick, but 2 days later, when my CarbMate came, it was off at the .5mm setting, so I readjusted it again and it was even better. I love the CarbMate. Worked beautiful, and so did Todd's VDSTS tool I bought from him.
 
scottmastrocinque said:
...adjust the high speed balance with the butterfly adjustment screw, NOT THE FACTORY ALIGNMENT SETTING SCREW...
He said he was only going to touch the bleed screws, if the high-speed balance is touched, then a TPS reset is mandatory.
 
GT-Rx said:
scottmastrocinque said:
...adjust the high speed balance with the butterfly adjustment screw, NOT THE FACTORY ALIGNMENT SETTING SCREW...
He said he was only going to touch the bleed screws, if the high-speed balance is touched, then a TPS reset is mandatory.

Yes Todd, I got that, but I guess what I was trying to convey was that it was not really syncing TB's if all you did was adjust the air bled screw which only controls idle balance. Sorry. Didn't mean to cause a ruckus.
 
scottmastrocinque said:
It, but I guess what I was trying to convey was that it was not really syncing TB's if all you did was adjust the air bled screw which only controls idle balance. Sorry. Didn't mean to cause a ruckus.
No worries, I agree with you, but I didn't want to read into what he wrote. I simply responded to what he said he was doing.
Input from the group is, more often then not, always good.
 
Here is my summary/review of the job.
Took out windshield and dashboard panel and disconnected the speedo.
Pried off the hose clamps on the canister and disconnected the hoses. Pulled the canister out towards right hand side of the bike. Wasted 1/2 hour trying to unscrew the canister bracket first, but gave up on it, no access to the screw, so removed the bracket after the canister was out.
Disconnected the banjo fittings on TBs and was trying to disconnect the T from the hose under the tank, but the access is so terrible that I eventually broke it off. I did not bother to remove the hose as I did not want to lift the tank and hose is stuck in there.
Used 8" of 3/8 copper tubing and hose clamps to connect the vent hose from tank to drain down hose. Secured everything including loose hose ends with plastic tie-downs.
Put 7 mm long M5 screws with Allen head in place of the banjo connections, put everything together and went for ride.
It seems that bike is little bit more smooth from idle to higher RPMs, but not much.
I did check the cylinders synchronization after with Carbtune. I had about 1 cm Hg difference at idle which I fixed, but I have about 2 cm Hg difference at 3 to 4k RPMs which I did not fix as I do not have the tool to reset the TPS after. This is 1 cm Hg over the spec, so I will have to do something about it.
 
To make this easier all around, can I not just disconnect hose 8 from the canister plug the hose and call it a day (assuming I can get to it)

Don't mind the canister and frankly not worth the work at this point to take it all apart just for that. My Carbmate hoses fit beautifully on the banjo connectors and removing the hoses ends from the connectors is a snap (no pun intended).


Cnister.jpg
 
canuck1969 said:
To make this easier all around, can I not just disconnect hose 8 from the canister plug the hose and call it a day (assuming I can get to it)

Don't mind the canister and frankly not worth the work at this point to take it all apart just for that. My Carbmate hoses fit beautifully on the banjo connectors and removing the hoses ends from the connectors is a snap (no pun intended).


Cnister.jpg

Not sure what you mean by disconnecting just hose 8 - and leaving banjo bolts connected? You need to plug those M5 threaded holes in TBs. As well, if the fuel vapors keep going into canister and nothing sucking them out "something" might sooner or later happen.
 
Per what is hinted above, if you only pull #8 at the canister, you have an air leak to the manifolds = no good. You can disconnect the tubes at the manifolds and run one piece between the two and leave everything else in place if you want. I highly recommend removing the tip-over valve (#7) though.
 
GT-Rx said:
Per what is hinted above, if you only pull #8 at the canister, you have an air leak to the manifolds = no good. You can disconnect the tubes at the manifolds and run one piece between the two and leave everything else in place if you want. I highly recommend removing the tip-over valve (#7) though.


What I meant was disconnect the tb vent hose from the canister (#8) and plug then end of the hose. You will still have the jumper between the TB's as we discussed earlier. There is no way for air to enter the TB's if the end of the hose is plugged.

Question is can you leave the Canister in place with the tank vent hose still attached. As Luma stated, would the gas vapours not eventually condense and fill the canister.

Think I am making this more complicated by trying to simplify it. Next time the tank comes off, will do it right without trying to cut corners..... :D
 
Back
Top