• Ciao Guest - You’ve landed at the ultimate Guzzi site. NEW FORUM REGISTRATIONS REQUIRE EMAIL ACTIVATION - CHECK YOUR SPAM FOLDER - Use the CONTACT above if you need help. New to the forum? For all new members, we require ONE post in the Introductions section at the bottom, in order to post in most of the other sections. ALWAYS TRY A SEARCH BEFORE STARTING A NEW TOPIC - Most questions you may have, have likely been already answered. DON'T BE A DRIVE-BY POSTER: As a common courtesy, check back in and reply within 24 hours, or your post will be deleted. Note there's decades of heavily experienced Guzzi professionals on this site, all whom happily give endless amounts of their VALUABLE time for free; BE COURTEOUS AND RESPECTFUL!
  • There is ZERO tolerance on personal attacks and ANY HYPERLINKS to PRODUCT(S) or other competing website(s), including personal pages, social media or other Forums. This ALSO INCLUDES ECU DIAGnostic software, questions and mapping. We work very hard to offer commercially supported products and to keep info relevant here. First offense is a note, second is a warning, third time will get you banned from the site. We don't have the time to chase repeat (and ignorant) offenders. This is NOT a social media platform; It's an ad-free, privately funded website, in small help with user donations. Be sure to see the GTM STORE link above; ALL product purchases help support the site, or you can upgrade your Forum profile or DONATE via the link above.
  • Be sure to see the GTM STORE link also above for our 700+ product inventory, including OEM parts and many of our 100% Made-in-SoCal-USA GTM products and engine kits. In SoCal? Click the SERVICE tab above for the best in service, tires, tuning and installation of our products or custom work, and don't miss our GT MotoCycles® (not) art on the BUILDS tab above. WE'RE HERE ONLINE ONLY - NO PHONE CALLS MADE OR RECEIVED - DO NOT EMAIL AND ASK QUESTIONS OR ASK TO CALL YOU.
  • Like the new V100, GuzziTech is full throttle into the future! We're now running on an all-new server and we've updated our Forum software. The visual differences are obvious, but hopefully you'll notice the super-fast speed. If you notice any glitches or have any issues, please post on the Site Support section at the bottom. If you haven't yet, please upgrade your account which is covered in the Site Support section or via the DONATE tab above, which gives you full site access including the DOWNLOADS section. We really appreciate every $ and your support to keep this site ad-free. Create an account, sign in, upgrade your account, and enjoy. See you on the road in 2024.

Clutch change on Cali 3

Drumnagorrach

Tuned and Synch'ed
Joined
May 9, 2011
Messages
79
Location
Keith
Hi Folks.
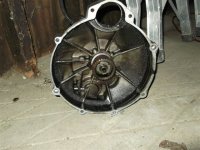
I'm dismantling my 1988 Cali 3 ,just got the swinging arm off and the rest of the stuff around it. The last time I did this job on a T3 and I took off the front wheel and mudguard to give me enough room to "open up the frame from the back to get the gearbox off.
I just wondered if There is enough room on my Cali ,without taking off the front wheel ? The last time , I had the engine and frame perched precariously on blocks with the frame tied up to roof supports,but it was all very "wobbly".
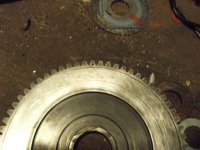
I was surprised when I took off the swinging arm to find the carden shaft stayed on the gearbox output shaft,looks like there is play between the bearing and the carden rear journal,but the front of the carded seems to have taken quite a hold on the gearbox splines,is it safe to drift it off the spines ?
Any other tips while I have it in bits ?
Cheers
Lee
 
Leave the front wheel on. If your bike is FI, remove the cam sensor and flywheel position sensor and just crab the frame. If you have a front wheel chock such as this http://www.discountramps.com/black-wido ... -chock.htm or lift table whit a wheel vice it is easier.

If you don't want to crab the frame, set the engine on blocks. You can then split the frame and walk the upper frame off the engine and have everything in the clear. I did them this way until I had a bike lift. BTW, this is the factory method and the book time is 6 hours. By crabbing the frame you can do it in 4.
 
Thanks for that John.
I wondered if ,given the pivot point ,the back would open enough to get the gearbox out with the wheel on.
I will weld a few bits of angle together to cradle the sump and stick telescopic legs on then use a trolley jack to lift and lock the legs. Shame the centre stand is located on a gearbox mount.
Cheers Mate
 
If you can get the front end stable and lift and block the rear of the frame, you can raise the center stand. Then lower the engine and you will have enough room to get the transmission out.
 
Heres the culprit ,leaking gearbox seal.Hardly any wear on the friction plates at 80,000 miles,but oily.
One of the spiders in the carden is stiff and notchy,Can you buy new spiders to fit, in the past I have made one good unit out of two which ,like this one, just had one bad journal.
Happy new year.
Lee
 

Attachments

  • Guzzi Gearbox 004.jpg
    Guzzi Gearbox 004.jpg
    61.2 KB · Views: 715
Be sure to check the seals on the clutch pushrod. Those are usually the ones that get the clutch plates oily. I've never see good results from trying to clean the plates so I recommend changing them. While the gearbox is out is a good time to change the input and output bearings to metal cage bearings if that hasn't already been done. The bearings are 25x52x20.6 (3205 bearing) The front bearing going out can cause the seal to fail. I think there is someone in the UK that rebuilds the cardan joints but I don't have his contact information. You may be able to search this form for his information.
 
Quite right John.
The oil had migrated along the clutch pushrod. I will be fitting o rings to the rod, from Moto International in Seattle. They did the job ( and still are) on the old T3 I had Over five years ago.
 
Having cleaned the oily gunk of the clutch components,I have noticed a dimple in one of the pressure plate teeth. Is there any significance ?
 
Drumnagorrach said:
Having cleaned the oily gunk of the clutch components,I have noticed a dimple in one of the pressure plate teeth. Is there any significance ?

Possibly. A picture would help. But in any case, considering the work involved, assemble with new friction and intermediate plates plus clutch hub gear is my recommendation. Don't forget the o-rings and seals while you are in there.
 
John.
Ordered up new deep splined hub and friction plates along with seals and clutch springs,takes so long to get the damn gearbox off I don't want to do it again. Here's the dimple in the pressure plate,any ideas ? havnae heard back from Moto International, do you chaps in the States take a long holiday this time of year ?
Lee
 

Attachments

  • Guzzi Gearbox 007.jpg
    Guzzi Gearbox 007.jpg
    48.9 KB · Views: 588
Lee, M.I. should be back and at it. Holidays can be 12.23 or so until 1.3 on occasion.

The dimple you are showing should align with the flywheel as a balance point/marker. You should see an arrow on the flywheel to match up on the stock assembly. Hope that helps.
 
The "dimple" also positions the plate correctly so the holes for clutch spring retaining line up with the flywheel spring retaining holes, if you get me.
 
GT and Guz5 are correct and know how to position the pressure plate but you need a little more information to be able to do this the first time without error.

On the rim of the flywheel you will find an arrow. Just so happens that arrow lines up with a paint mark on the end of the crankshaft. That is where the crank pin is oriented. That arrow needs to be in line with the paint mark for the timing marks on the flywheel to be correct.

Now for the clutch job, that dimple in the pressure plate, goes into the slot in the flywheel that alines with the arrow. That is so the springs go into the recesses in the flywheel and pressure plate. If that dimple is off, even if only one tooth, the clutch will not function, as in it won't disengage as the springs will be bound.

I'm hoping you can borrow or rent the tools needed to replace the hub gear and to assemble the clutch. Without the special tools, it is very difficult. With the tools relatively easy. If you need to purchase them, MG cycle has some that will work that are less pricy than the factory tools. When I started working on Guzzis, only the factory tools were available so I purchased those.

This tool is nice http://www.mgcycle.com/product_info.php?products_id=657 as you can use an impact to disassemble after you have moved the locking tab out of the way. Also good on assembly if you regulate your air pressure. This http://www.mgcycle.com/product_info.php?products_id=332 also helps to hold the flywheel so you can torque it to the crankshaft, then flip it over to hold the ring gear. Something like this http://www.mgcycle.com/product_info.php ... ts_id=2618 is an absolute must to aline the clutch plates and press in the pressure plate for assembly of the ring gear.

A tool I don't see on MG Cycles site is the factory holding tool for the hub gear. If you use an impact wrench, the holding tool isn't necessary.
 
Thanks for the comprehensive description, I understand the dimple relevance now.
I have bought a clutch alignment tool from U.K. co." Gutsibits" and made a clutch hub tool from a ground down 27mm impact socket.Perhaps I should mention that I have 43 years engineering experience,first as a toolmaker ,development engineer and latterly a distillery engineer( Glenfiddich), so I can make a lot of the tools I need .
Having said all that,I appreciate any advise to stop me making cock ups and I don't know the torque settings for the clutch hub nut or the clutch cover retaining bolts.
All my new parts have arrived except the o rings for the pushrod,so there is no hurry to get started.
Thanks
Lee
 
Lee,

I don't know if there is a torque requirement for the clutch hub gland nut. I just put in on as tight as I can get it with the factory hand tools and lock it with the tab washer. It sounds like you are experienced enough to tighten the gland nut by feel. As for the flywheel bolts, I use the standard torque for an M8 which is 25 lb-ft or 39 Nm. I've not had any come loose.

Interesting where you work. I've sampled the product from time to time. Just don't sample too much before you put your clutch together. Do employees get a bottle of the "recipe" on paydays like the guys at Jack Daniel's?
 
Yes John.
We get allocated points to spend on Company produce,4 points is a Glennfiddich 12 year old ,works out at 12 bottles of single malt a year,or more nasty grain whisky..In reality most of the engineering dept take Balvenie Double wood. Distilled on the same site but in a smaller way and with it's own maltings,I can recomend you try it ,very mellow and slightly peaty.
If you weren't so far away I would post a bottle to you.
Cheers
Lee
 
Lee,

This is degrading to a Whiskey discussion!! I've enjoyed both the Glenfiddich 12 and the Balvenie but lately I've become quite enamored by the Glenmorangie 18 year old. I think I need a trip to Scotland to so some tasting tours!!

Take care and good luck with your project.
 
Yup,
Got some really good motorcycle roads, not many tourists get to this side of the country,so it's not crowded ,and more importantly ,it's in the rain shadow of the Cairngorms so it's not raining all the time as in the west of Scotland. Glenmorangie is just up from Inverness at Tain,in fact most of the malt whisky distilleries are within 2 hours of home,apart from the Island Malts.
Maybe see you one day.
Cheers
Lee
 
That's it finished,all went back together quite easily------------------- except for the fairing,it's a C.I. and after 25 years the captive nut's on the lower mounts have rusted away.
Should be good for another 80,000 miles.
Thanks for the support.
Lee :D
 
Back
Top