• Ciao Guest - You’ve landed at the ultimate Guzzi site. NEW FORUM REGISTRATIONS REQUIRE EMAIL ACTIVATION - CHECK YOUR SPAM FOLDER - Use the CONTACT above if you need help. New to the forum? For all new members, we require ONE post in the Introductions section at the bottom, in order to post in most of the other sections. ALWAYS TRY A SEARCH BEFORE STARTING A NEW TOPIC - Most questions you may have, have likely been already answered. DON'T BE A DRIVE-BY POSTER: As a common courtesy, check back in and reply within 24 hours, or your post will be deleted. Note there's decades of heavily experienced Guzzi professionals on this site, all whom happily give endless amounts of their VALUABLE time for free; BE COURTEOUS AND RESPECTFUL!
  • There is ZERO tolerance on personal attacks and ANY HYPERLINKS to PRODUCT(S) or other competing website(s), including personal pages, social media or other Forums. This ALSO INCLUDES ECU DIAGnostic software, questions and mapping. We work very hard to offer commercially supported products and to keep info relevant here. First offense is a note, second is a warning, third time will get you banned from the site. We don't have the time to chase repeat (and ignorant) offenders. This is NOT a social media platform; It's an ad-free, privately funded website, in small help with user donations. Be sure to see the GTM STORE link above; ALL product purchases help support the site, or you can upgrade your Forum profile or DONATE via the link above.
  • Be sure to see the GTM STORE link also above for our 700+ product inventory, including OEM parts and many of our 100% Made-in-SoCal-USA GTM products and engine kits. In SoCal? Click the SERVICE tab above for the best in service, tires, tuning and installation of our products or custom work, and don't miss our GT MotoCycles® (not) art on the BUILDS tab above. WE'RE HERE ONLINE ONLY - NO PHONE CALLS MADE OR RECEIVED - DO NOT EMAIL AND ASK QUESTIONS OR ASK TO CALL YOU.
  • Like the new V100, GuzziTech is full throttle into the future! We're now running on an all-new server and we've updated our Forum software. The visual differences are obvious, but hopefully you'll notice the super-fast speed. If you notice any glitches or have any issues, please post on the Site Support section at the bottom. If you haven't yet, please upgrade your account which is covered in the Site Support section or via the DONATE tab above, which gives you full site access including the DOWNLOADS section. We really appreciate every $ and your support to keep this site ad-free. Create an account, sign in, upgrade your account, and enjoy. See you on the road in 2024.

Daytona Crank [w/chain replacement] need help, please.

Daniel Kalal

Cruisin' Guzzisti
Joined
Oct 28, 2008
Messages
301
Location
Kansas
A head-scratcher.

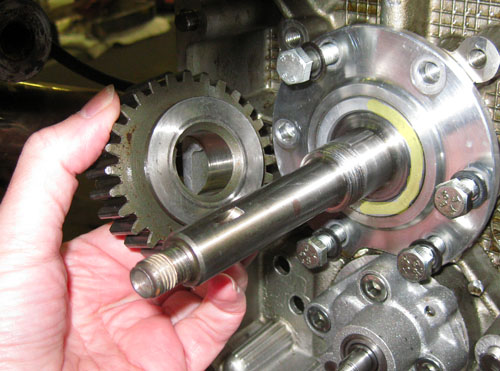
In the photograph, you can see the steel gear that was removed from the crank as part of the conversion from gears to chain. But, here's the deal: It was found that when the new sprocket was torqued, it pulled up against the bearing surface before it did the crank. So we tried the old steel gear. The tolerances are very slight, but even when the steel gear was put back, the same thing happened. The engine did turn before things were removed, although there is evidence on the face of the gear that things were always very, very close.

Note: I've shaded part of the bearing face yellow in the photograph (it's not really that color).
So, what is going on here? Why isn't it pulling up flush?

DayPump1.jpg


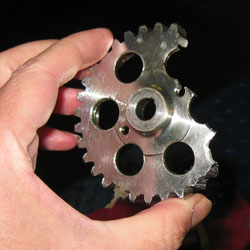
By the way; this is what the aluminum oil pump gear looked like:

DayPump3.jpg
 
This is the point that aligns the crank to the connecting rods and pistons. That said it is a critical point in assembly. Either the front main carrier is too wide, or the front of the crank section is too short. I'd remove the front main carrier and measure the width. I would compare that to a new carrier, or one that allows the crank to rotate. Unfortunately I can only locate ID dimensions for the mains and no width dimension. That width dimension would be on the assembly drawing, but I don't have access to those. The same problem exists with the crank shaft, I can only find diameter measurements, no length dimensions.
 
Thanks John.
Your points are certainly well taken, and for those reasons I am baffled. All the parts are the same.

Has anybody seen such a level of "relaxation" when the crank bolt is removed, that the crank seemingly shrinks? I can imagine that if you were to over-torque the bolt that eventually draw the gear (or sprocket) flush to the crank (by squeezing the aluminum flange and everything else), but that's not a reasonable solution. By the same token, I could add a thin shim/washer between the sproket and the crank, but that seems goofy, and I don't want to risk the sprockets no longer being in plane.
 
Daniel, the crank is never going to shrink! :D

First thing I'd ask is how long did it run before you noticed the oil light. Any time at all may of been way too much!

Pull the front main bearing. While the crank may turn it may of damaged the thrust face at the back of the bearing. Jut an idea.

Also have you tried taking the timing inspection bung out and levering the crank forward with a screwdriver? It's been a while since the old girl shat her pants, perhaps there is not enough residual oil to make things easy to spin and with the mucking about at the front the crank may of moved back and now simply be being obstinate and unwilling to move.

In MY EXPERIENCE, which probably counts for not a lot when the crank id pushed fully forward there should be between about 6 thou minimim and 18 thou maximum clearance between the back of the crank sprocket/gear and the front face of the main. This should be determined by pushing the crank FORWARD as far as possible.

As John has said, the end float is determined by the depth of the front journal and the thickness of the bearing, front to rear, they ARE generally well made.

If lubrication has ceased, as you are well aware, damage will start pretty much immediately.

Check the front main and, I'd suggest, the big ends. Any damage? engine out and do it right from the ground up,

Pete
 
pete roper said:
Daniel, the crank is never going to shrink! :D

Well, it's a theory... [agreed]

We pulled the front bearing (you can see in the photograph that the bolts have been pulled), and all look just fine. But, clearly, something isn't right, and the only way to tell is to start digging.
 
<shrug> I'd be pulling the bearing carrier and getting out my depth mics. It will surely be obvious when you start checking all the dimensions.
 
pauldaytona said:
Daniel, did you solve it? What if you pull the clutch, that should move the crank forward.

Yes; all is well. Thanks. Turned out to be something as simple as interference with the new crank sprokets and the bolts of the oil pump not allowing things to pull up fully. Easily handled.

I've been meaning to post the entire list of part numbers to make that swap. I'll do it with a separate post.
 
Back
Top