• Ciao Guest - You’ve landed at the ultimate Guzzi site. NEW FORUM REGISTRATIONS REQUIRE EMAIL ACTIVATION - CHECK YOUR SPAM FOLDER - Use the CONTACT above if you need help. New to the forum? For all new members, we require ONE post in the Introductions section at the bottom, in order to post in most of the other sections. ALWAYS TRY A SEARCH BEFORE STARTING A NEW TOPIC - Most questions you may have, have likely been already answered. DON'T BE A DRIVE-BY POSTER: As a common courtesy, check back in and reply within 24 hours, or your post will be deleted. Note there's decades of heavily experienced Guzzi professionals on this site, all whom happily give endless amounts of their VALUABLE time for free; BE COURTEOUS AND RESPECTFUL!
  • There is ZERO tolerance on personal attacks and ANY HYPERLINKS to PRODUCT(S) or other competing website(s), including personal pages, social media or other Forums. This ALSO INCLUDES ECU DIAGnostic software, questions and mapping. We work very hard to offer commercially supported products and to keep info relevant here. First offense is a note, second is a warning, third time will get you banned from the site. We don't have the time to chase repeat (and ignorant) offenders. This is NOT a social media platform; It's an ad-free, privately funded website, in small help with user donations. Be sure to see the GTM STORE link above; ALL product purchases help support the site, or you can upgrade your Forum profile or DONATE via the link above.
  • Be sure to see the GTM STORE link also above for our 700+ product inventory, including OEM parts and many of our 100% Made-in-SoCal-USA GTM products and engine kits. In SoCal? Click the SERVICE tab above for the best in service, tires, tuning and installation of our products or custom work, and don't miss our GT MotoCycles® (not) art on the BUILDS tab above. WE'RE HERE ONLINE ONLY - NO PHONE CALLS MADE OR RECEIVED - DO NOT EMAIL AND ASK QUESTIONS OR ASK TO CALL YOU.
  • Like the new V100, GuzziTech is full throttle into the future! We're now running on an all-new server and we've updated our Forum software. The visual differences are obvious, but hopefully you'll notice the super-fast speed. If you notice any glitches or have any issues, please post on the Site Support section at the bottom. If you haven't yet, please upgrade your account which is covered in the Site Support section or via the DONATE tab above, which gives you full site access including the DOWNLOADS section. We really appreciate every $ and your support to keep this site ad-free. Create an account, sign in, upgrade your account, and enjoy. See you on the road in 2024.

DIY O2 manipulator

Hagaik

Just got it firing!
Joined
Jul 14, 2015
Messages
16
Location
Israel
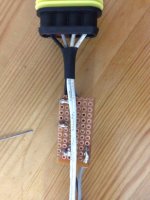
I just finished building and installing 2 O2 manipulators on my V7II. They're basically "fatduc" style - a simple voltage divider circuit.
Did around 200Km since installing them - the engine feels "rounder", less prone to hesitation in opening the throttle and smoother deceleration. Also feels like it's running a little cooler, but I have no way to measure this. No "check engine" light.
All in all - a very nice upgrade for very little money - bought enough components for building 4 of these puppies for about 30$ US.
Cheers
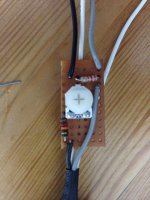
Image Image
 
Are you going to let is into the secret of the resistance ratio? I was told that a particular type of diode in the line would work, but it brought up the service light.
 
Early on I put a schottky diode in my Breva , it bought up the service light but it went out as soon as the bike warmed up. It seemed to fix the popping on decel and the weak mixture. I had it in for about a year, its all back to original now. I've got about 60,000Kms on the bike and it runs sweet as.
 
Are you going to let is into the secret of the resistance ratio? I was told that a particular type of diode in the line would work, but it brought up the service light.
I used a diagram I found online - I can find the link later this evening and post it.
 
this is the diagram I used - found it here:
apriliaforum.com/forums/attachment.php?attachmentid=204446&d=1349343861&thumb=1

attachment.php
 
The older 15RC (sign216 link above) and the MIU used on the newer V7 are not the same, and won't work correctly. I would be sure what you built in for the newer ECU.
02-sensor foolers are band-aids, and while occasionally can work, most feel the step from closed to open loop more pronounced.
I offer a version that is more then a simple resistor; https://www.guzzitech.com/store/product/gt-02-optimizers/
 
Actually I did see your tutorial - very nice and helpful, thank you!
I had the resistors laying around so only had to get the trimmers - but your solution with the diode looks very simple and certainly easier to do.

Fatduc uses a trimmer like yours, so it's all just different ways for the same goal; lower the signal voltage.
 
Fatduc uses a trimmer like yours
FatDuc uses a simple variable resistor. Mine uses an actual powered circuit board. FatDuc does not work on the 5AM or MIU.
 
I can see why an O2 spoofer is a "band-aid" solution, compared to a properly mapped ECU.
But all things considered - I can't see how one voltage-regulator circuit is fundamentally better than another (e.g Fatduc vs Schottky diode vs LM317). There are different practical advantages to each (diode is dead simple, Fatduc is continuously adjustable, LM317+DIP switches has stepped voltage control) - but they all eventually fulfil a very simple role: lower the signal voltage coming from the lambda sensor.
Am I missing something here?
 
Am I missing something here?
It's never as simple as one may think, because the newer ECUs are more intuitive than the older 15RC; The FatDuc delivered off the scale rich conditions at low speed throttle, and never returned for several minutes (while being tested on the dyno) on both the 5AM (Big block Guzzi) and the MIU (V7). I would highly recommend having your air/fuel data checked on an A/F dyno if you tinker with home built devices.
 
can somebody explain how to install the Fat Duc on the v7ii? thanks
i can't find instructions online!
 
Mate I haven't used one but it looks fairly simple to install.
You will have to find the two 02 leads (plugs) the one on the left gear lever side is behind the side cover and the one on the right is behind or just in front of the right hand side cover rear brake side.
Unplug the 02 leads and plug the fat duc in.
 
can somebody explain how to install the Fat Duc on the v7ii? thanks
i can't find instructions online!
Does anyone ever read anything I write? I really wonder how much of a waste of time I spend posting these days. See below or above. Good luck.

It's never as simple as one may think, because the newer ECUs are more intuitive than the older 15RC; The FatDuc delivered off the scale rich conditions at low speed throttle, and never returned for several minutes (while being tested on the dyno) on both the 5AM (Big block Guzzi) and the MIU (V7). I would highly recommend having your air/fuel data checked on an A/F dyno if you tinker with home built devices.
 
Back
Top