Conversion of US to Euro front turn signals
This is a nice conversion but is much more involved than I had expected. The below is my method, and makes for a quality job that looks professional and makes me happy. There are many ways this could be done. MPH Cycles in Houston keeps a stock of the Euro Mirrors and turn signals for the Stelvio. It was $120 or so, and I received the kit in two days. The mirrors are very straightforward. Unplug the existing, unscrew and put in the new. No problem. The plug is down behind the side cover in the area where the signal should have been. This is where the new kit plugs into. No wiring needed.
As a necessary precaution this is a project for those with delicate fingers. If you lack the tactile response to know when fairing screws are tight – please don’t do this! There are lots of small soft fasteners in soft materials. Music choices should be more like Moby and less like Rage Against the Machine…
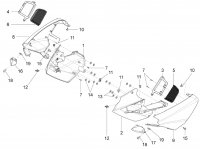
The signal conversion is a little more tricky, as the lens is trapped between the inner and outer fairing pieces. See below for a pic taken from the parts manual, p.30/31 available in downloads.
Items 13 & 14 are a rubber washer and a toothy stainless little one-time fastener, pressed onto the plastic posts. Luckily the posts are all hollow, and take a #6 screw perfectly.
Supplies needed –
• Euro signal kit
• (16) #6x3/8 stainless sheet metal screws
• (16) #6 washers
Directions
Remove the clear wing deflectors. Two screws.
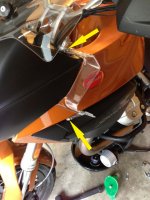
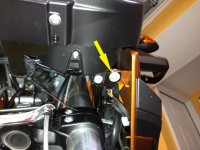
Remove the side fairings. There are three attachment points, Shown above as Items 10, 15 & the screw not shown that connects to clip 12. They are shown here:
Item 15
Item 10
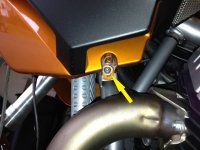
The screw into Item 12
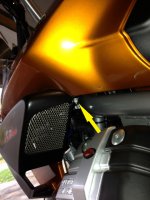
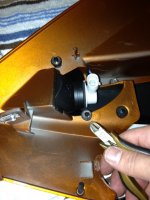
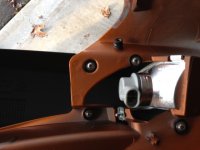
Reach in and unplug the mirror cable if you haven’t done it already – the cover comes off and looks like this. All the little toothy washers need to come off in order to change the lens. I pointed to a couple of them.
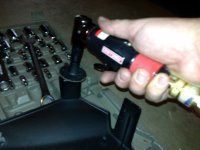
I used a little diagonal cutter to snip the washers. They come off without destroying the posts that way. There is a rubber washer between the toothy washer and the plastic. Save this; it is perfect for re-assembly.
Once all the horrid little washers are removed take off the screen and separate the two halves of the fairing. Finally now you can get the little holding screw (Item 18) for the lens and swap it out.
The toothy washers leave a nice ring on the plastic posts showing where they were clamped down to. A quick pass with a small sander will bring the posts down to this level. It is helpful to go slightly below this so you can use the screw to compress the rubber washer, but go easy. If you dust them off slowly you will have less flash to clean up off the top of the posts.
Clean the flash out of the center of the posts with a small drill or an X-acto knife.
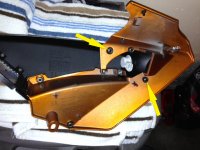
Re-assemble the two halves with the new signal lens in place. Add the rubber washers you saved, then a little stainless washer and secure GENTLY with the #6 screws. You just want enough compression to slightly squeeze the rubber washer. Here’s what it looks like back together again:
Put the bike back together and ride!
This is a nice conversion but is much more involved than I had expected. The below is my method, and makes for a quality job that looks professional and makes me happy. There are many ways this could be done. MPH Cycles in Houston keeps a stock of the Euro Mirrors and turn signals for the Stelvio. It was $120 or so, and I received the kit in two days. The mirrors are very straightforward. Unplug the existing, unscrew and put in the new. No problem. The plug is down behind the side cover in the area where the signal should have been. This is where the new kit plugs into. No wiring needed.
As a necessary precaution this is a project for those with delicate fingers. If you lack the tactile response to know when fairing screws are tight – please don’t do this! There are lots of small soft fasteners in soft materials. Music choices should be more like Moby and less like Rage Against the Machine…
The signal conversion is a little more tricky, as the lens is trapped between the inner and outer fairing pieces. See below for a pic taken from the parts manual, p.30/31 available in downloads.
Items 13 & 14 are a rubber washer and a toothy stainless little one-time fastener, pressed onto the plastic posts. Luckily the posts are all hollow, and take a #6 screw perfectly.
Supplies needed –
• Euro signal kit
• (16) #6x3/8 stainless sheet metal screws
• (16) #6 washers
Directions
Remove the clear wing deflectors. Two screws.
Remove the side fairings. There are three attachment points, Shown above as Items 10, 15 & the screw not shown that connects to clip 12. They are shown here:
Item 15
Item 10
The screw into Item 12
Reach in and unplug the mirror cable if you haven’t done it already – the cover comes off and looks like this. All the little toothy washers need to come off in order to change the lens. I pointed to a couple of them.
I used a little diagonal cutter to snip the washers. They come off without destroying the posts that way. There is a rubber washer between the toothy washer and the plastic. Save this; it is perfect for re-assembly.
Once all the horrid little washers are removed take off the screen and separate the two halves of the fairing. Finally now you can get the little holding screw (Item 18) for the lens and swap it out.
The toothy washers leave a nice ring on the plastic posts showing where they were clamped down to. A quick pass with a small sander will bring the posts down to this level. It is helpful to go slightly below this so you can use the screw to compress the rubber washer, but go easy. If you dust them off slowly you will have less flash to clean up off the top of the posts.
Clean the flash out of the center of the posts with a small drill or an X-acto knife.
Re-assemble the two halves with the new signal lens in place. Add the rubber washers you saved, then a little stainless washer and secure GENTLY with the #6 screws. You just want enough compression to slightly squeeze the rubber washer. Here’s what it looks like back together again:
Put the bike back together and ride!