• Ciao Guest - You’ve landed at the ultimate Guzzi site. NEW FORUM REGISTRATIONS REQUIRE EMAIL ACTIVATION - CHECK YOUR SPAM FOLDER - Use the CONTACT above if you need help. New to the forum? For all new members, we require ONE post in the Introductions section at the bottom, in order to post in most of the other sections. ALWAYS TRY A SEARCH BEFORE STARTING A NEW TOPIC - Most questions you may have, have likely been already answered. DON'T BE A DRIVE-BY POSTER: As a common courtesy, check back in and reply within 24 hours, or your post will be deleted. Note there's decades of heavily experienced Guzzi professionals on this site, all whom happily give endless amounts of their VALUABLE time for free; BE COURTEOUS AND RESPECTFUL!
  • There is ZERO tolerance on personal attacks and ANY HYPERLINKS to PRODUCT(S) or other competing website(s), including personal pages, social media or other Forums. This ALSO INCLUDES ECU DIAGnostic software, questions and mapping. We work very hard to offer commercially supported products and to keep info relevant here. First offense is a note, second is a warning, third time will get you banned from the site. We don't have the time to chase repeat (and ignorant) offenders. This is NOT a social media platform; It's an ad-free, privately funded website, in small help with user donations. Be sure to see the GTM STORE link above; ALL product purchases help support the site, or you can upgrade your Forum profile or DONATE via the link above.
  • Be sure to see the GTM STORE link also above for our 700+ product inventory, including OEM parts and many of our 100% Made-in-SoCal-USA GTM products and engine kits. In SoCal? Click the SERVICE tab above for the best in service, tires, tuning and installation of our products or custom work, and don't miss our GT MotoCycles® (not) art on the BUILDS tab above. WE'RE HERE ONLINE ONLY - NO PHONE CALLS MADE OR RECEIVED - DO NOT EMAIL AND ASK QUESTIONS OR ASK TO CALL YOU.
  • Like the new V100, GuzziTech is full throttle into the future! We're now running on an all-new server and we've updated our Forum software. The visual differences are obvious, but hopefully you'll notice the super-fast speed. If you notice any glitches or have any issues, please post on the Site Support section at the bottom. If you haven't yet, please upgrade your account which is covered in the Site Support section or via the DONATE tab above, which gives you full site access including the DOWNLOADS section. We really appreciate every $ and your support to keep this site ad-free. Create an account, sign in, upgrade your account, and enjoy. See you on the road in 2024.

G5 Stock Air Cleaner #$%^&*

Tonerjockey

High Miler
GT Contributor
Joined
Oct 28, 2008
Messages
788
Location
San Jose
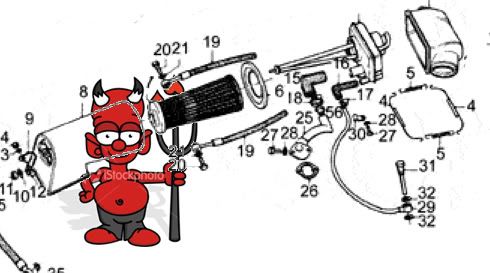
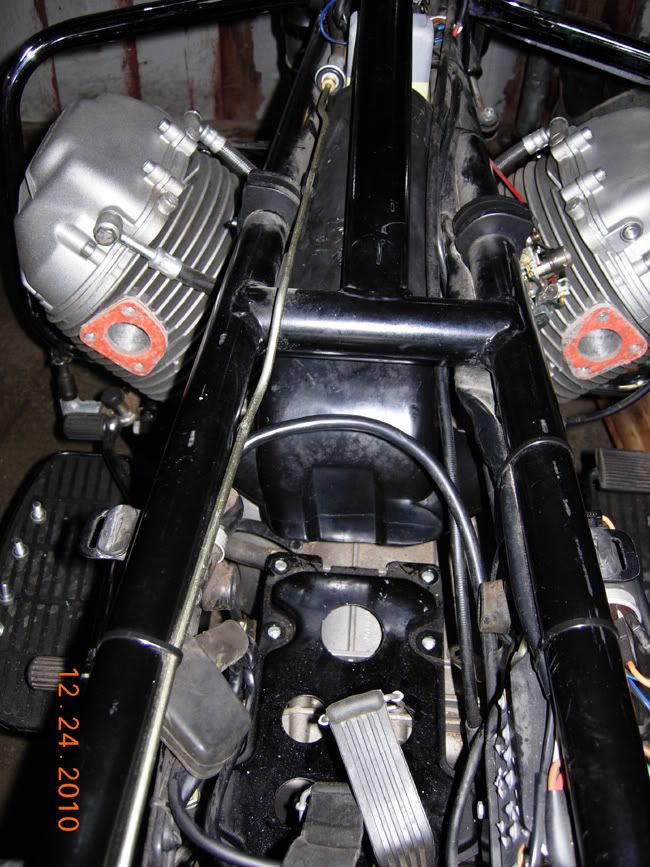
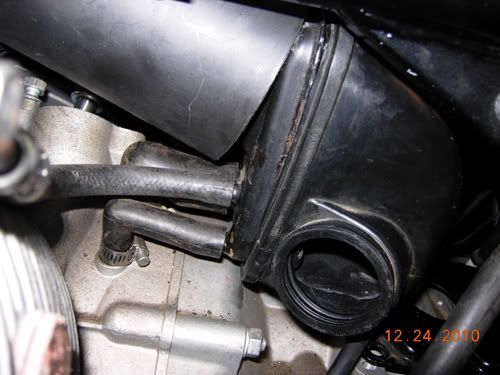
What a POS!!!! Getting this fakockta air cleaner back together and in the bike is a real pain. I MUST be missing a step somewhere.

Whew. I feel better now. I'll give it another try now. Maybe if I take out the distributor... I already have the tank, seat, battery and both carbs and manifolds removed.

Alex
 
Alex,

I have no direct experience with the G5 but I have an LM III with standard filter box. I've read a number of times how hard it is but I don't find mine difficult at all. B)

If it is similar:

I undo the 2 long bolts on the side of the box.

There is a 10mm AF bolt at the top front of the trumpet. I undo this to allow the front piece of the box to move forward.

The LH carby needs to be off or hanging. I then slide the centre section out to the left that holds the filter.

I glue the filter into place and let it dry before reinserting the centre section.

If any of the plastic elbows don't quite fit then I use a hair dryer to heat the plastic and stretch it into shape, allowing it to cool to the size and shape I want. I use the carb inlets or a jar to help stretch if needed.

Its a 30+ year old bike with the standard filter box still fitted. It must of had the filter changed a lot of times. It can't be that bad. :lol:
 
Morizzi said:
Its a 30+ year old bike with the standard filter box still fitted. It must of had the filter changed a lot of times. It can't be that bad. :lol:

But it is that bad. Most were tossed at the first air filter change and K&N or similar filter pods were installed along with an early LeMans crankcase breather. I believer the G5 is more like the T and T-3 filter assembly that uses the long round filter. A real PITA.
 
Hey Morizzi,

It is a little different than the LMIII.

AirFilter.jpg


Today I shall attempt again. I really wanna use the orig system but I can't imagine a complete teardown just to R&R the air filter.

Uses the long round tapered filter. I can get the filter cover in (#8), and I can get the filter assy (#16 et al) into the cover when out side the bike. I can't seem to get the filter into the cover when the cover is mounted. Can't get the threaded end through the hole. Nor can I seem to get the filter and cover when assembled into position.

Ho Ho #$%^&*(!!!
 
Oh, I see.

The round barrel motors had the extra breathers that the LM III didn't have. I can see the purpose of connecting the breather hoses there for clean, negative pressure air.

Be patient. There must be a way that it is do-able. Well, less PITA than other methods anyway.

Sorry I couldn't be of any real help.

Merry Christmas.

Rod
 
The original system is very effective but it is, as you've found out, absolutely weep-inducingly awful to replace the filter on. As John sez, most people went to pods because the filter is such a pain to access.

All the best to all for x-mass and the nude year!

Pete
 
Seems to me it's hard to find a round head Tonti still with a stock filter arrangement. Unless the owner just has to have "original" no matter what. Changed to the large oval K&N's on my 78 T3 approx 32 years ago. Think I replaced the K&N's once when they were damaged. Otherwise, clean & re-oil, endlessly. Despite what some (Greg Field) think, never caused any damage I could detect. Greg thinks they do not filter small enough. My experience says otherwise.
 
Al, this is the worst job to do on these bikes. The easiest (everything's relative) way is to clamshell the frame but you probably don't want to do that. From memory the last time I did it the distributor had to come out but the carbs stayed on. You should be able to assemble the filter and housing, feed it up through the frame and connect the breathers. The trick is to leave the rubber boot/manifold off until last and then work it into and around the gaps and over the ram tubes. Then fit the clips and springs. BUT, the manifold/boots are almost always hard and brittle and I've found it can save a lot of grief if you buy a new one which will be nice and flexible and can actually be worked into place. Same with the breather hoses. Another tip is to ensure the hole at the top of the air filter is correctly aligned with the disc at the top of the triangle otherwise you partially crush the element.

Good luck
 
Ahhhh great suggestion Peter!

I got that filter, cover and end piece together and installed. Hadda remove the 4 bolts from the trans top plate mount to get the front battery band out as well.

AirBoxInstalledsm.jpg


The rubber piece is going on OK so far. I think I'll quit for tonight as I haven't broken anything yet. The rubber air box was glued onto the metal piece.... that was a nice touch.

Sideviewsm.jpg


I'll try to get the rubber air box and spring clamps etc tomorrow. The bendy tubes are slightly crack-a-fied but not bad... I'll change them someday.

I should be able to complete this little quickie job tomorrow. It will be Christmas after all.

Ho, repeat as needed.

Al
 
Ah, yes the battery strap, I forgot that one. The mediæval Cathars believed that to achieve spiritual purity you had to undergo an ordeal (hence cathartic). You will come out of this a far better person.
 
Back
Top