Being of a compact design and construction, ok I’m a short arse, the stretch to my Griso 8v bars has not been ideal.
Having looked at the various options I decided to stick with the stock bar and tailor it to better suit my needs. I do like the leverage provided by the wide bar.
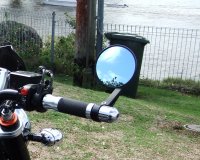
My first adjustment was to slightly reduce the width by moving the grips inboard about 12 mm (1/2 inch) so that the effective overall width is narrower. This is probably the maximum you can manage and still be able to effectively mount the controls. This also allowed me to fit a pair of bar end mirrors and retain the standard bar end weights.
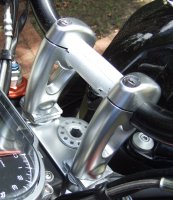
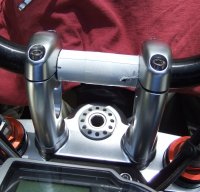
I also felt that a little bit of extra height would be preferable, so after looking at the options I decided to raise the bar risers. You are probably limited to about a max of 25 mm (1 inch) with the stock bar before you start to have issues with wiring, hoses and cables.
With this in mid I decided to experiment with the some spacers fitted between the bar riser and the top fork plate.
After trying a couple of variations on rides I decided that 10 mm was sufficient to suit my preference so I settled on this increase. This obviously raises the overall height and because of the angle of the bar riser also brings the bar back a miniscule amount. This would increase depending on how high you go and if you turn the bar back, which can be done more readily with the extra height.
This small change feels much more significant than you might expect, although the feel would vary depending on the individual.
The most critical thing to remember when experimenting is to ensure you fit the correct length mounting bolt to accommodate the extra length for the spacer. Standard bolts are 45 mm long (I used a 65 mm long bolt and added spacer washers under the head to make up the difference for the extra bolt length.) Now that I have decided on the 10 mm increase in height I will fit 55 mm long bolts to include the additional length needed with the spacer.
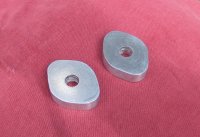
So that the end result would fit in with the standard components I sourced a bit of 10 mm Aluminium plate to make the spacers.
As I didn’t have ready access to someone who could cut the item to shape I made the spacers myself. I cut pieces from the plate to the approximate shape and then ground filed and polished them to a finished item. Then end result is not perfect but is good enough to blend in with the adjacent standard parts.
If you know someone in a machine shop or have access to metal cutting machinery, you could probably do in a couple of minutes what took me several hours.
This solution won’t suit everyone but it has proven to be a good result for me and the financial outlay was about $10.
I put some tape on the centre of the bar and marked the position prior to starting, it is a easy reference point when reassembling things.
Mark
Having looked at the various options I decided to stick with the stock bar and tailor it to better suit my needs. I do like the leverage provided by the wide bar.
My first adjustment was to slightly reduce the width by moving the grips inboard about 12 mm (1/2 inch) so that the effective overall width is narrower. This is probably the maximum you can manage and still be able to effectively mount the controls. This also allowed me to fit a pair of bar end mirrors and retain the standard bar end weights.
I also felt that a little bit of extra height would be preferable, so after looking at the options I decided to raise the bar risers. You are probably limited to about a max of 25 mm (1 inch) with the stock bar before you start to have issues with wiring, hoses and cables.
With this in mid I decided to experiment with the some spacers fitted between the bar riser and the top fork plate.
After trying a couple of variations on rides I decided that 10 mm was sufficient to suit my preference so I settled on this increase. This obviously raises the overall height and because of the angle of the bar riser also brings the bar back a miniscule amount. This would increase depending on how high you go and if you turn the bar back, which can be done more readily with the extra height.
This small change feels much more significant than you might expect, although the feel would vary depending on the individual.
The most critical thing to remember when experimenting is to ensure you fit the correct length mounting bolt to accommodate the extra length for the spacer. Standard bolts are 45 mm long (I used a 65 mm long bolt and added spacer washers under the head to make up the difference for the extra bolt length.) Now that I have decided on the 10 mm increase in height I will fit 55 mm long bolts to include the additional length needed with the spacer.
So that the end result would fit in with the standard components I sourced a bit of 10 mm Aluminium plate to make the spacers.
As I didn’t have ready access to someone who could cut the item to shape I made the spacers myself. I cut pieces from the plate to the approximate shape and then ground filed and polished them to a finished item. Then end result is not perfect but is good enough to blend in with the adjacent standard parts.
If you know someone in a machine shop or have access to metal cutting machinery, you could probably do in a couple of minutes what took me several hours.
This solution won’t suit everyone but it has proven to be a good result for me and the financial outlay was about $10.
I put some tape on the centre of the bar and marked the position prior to starting, it is a easy reference point when reassembling things.
Mark

")