• Ciao Guest - You’ve landed at the ultimate Guzzi site. NEW FORUM REGISTRATIONS REQUIRE EMAIL ACTIVATION - CHECK YOUR SPAM FOLDER - Use the CONTACT above if you need help. New to the forum? For all new members, we require ONE post in the Introductions section at the bottom, in order to post in most of the other sections. ALWAYS TRY A SEARCH BEFORE STARTING A NEW TOPIC - Most questions you may have, have likely been already answered. DON'T BE A DRIVE-BY POSTER: As a common courtesy, check back in and reply within 24 hours, or your post will be deleted. Note there's decades of heavily experienced Guzzi professionals on this site, all whom happily give endless amounts of their VALUABLE time for free; BE COURTEOUS AND RESPECTFUL!
  • There is ZERO tolerance on personal attacks and ANY HYPERLINKS to PRODUCT(S) or other competing website(s), including personal pages, social media or other Forums. This ALSO INCLUDES ECU DIAGnostic software, questions and mapping. We work very hard to offer commercially supported products and to keep info relevant here. First offense is a note, second is a warning, third time will get you banned from the site. We don't have the time to chase repeat (and ignorant) offenders. This is NOT a social media platform; It's an ad-free, privately funded website, in small help with user donations. Be sure to see the GTM STORE link above; ALL product purchases help support the site, or you can upgrade your Forum profile or DONATE via the link above.
  • Be sure to see the GTM STORE link also above for our 700+ product inventory, including OEM parts and many of our 100% Made-in-SoCal-USA GTM products and engine kits. In SoCal? Click the SERVICE tab above for the best in service, tires, tuning and installation of our products or custom work, and don't miss our GT MotoCycles® (not) art on the BUILDS tab above. WE'RE HERE ONLINE ONLY - NO PHONE CALLS MADE OR RECEIVED - DO NOT EMAIL AND ASK QUESTIONS OR ASK TO CALL YOU.
  • Like the new V100, GuzziTech is full throttle into the future! We're now running on an all-new server and we've updated our Forum software. The visual differences are obvious, but hopefully you'll notice the super-fast speed. If you notice any glitches or have any issues, please post on the Site Support section at the bottom. If you haven't yet, please upgrade your account which is covered in the Site Support section or via the DONATE tab above, which gives you full site access including the DOWNLOADS section. We really appreciate every $ and your support to keep this site ad-free. Create an account, sign in, upgrade your account, and enjoy. See you on the road in 2024.

GTM C14 H-pipe & Header Info/Instructions

GTM®

Administrator
Staff member
GT di Razza Pura
Joined
Jul 1, 2009
Messages
15,055
Location
Malibu
I pulled this from the cracking exhaust parts here in this section to highlight info on my crack-proof GTM C14 H-pipe as sold HERE. It also serves as an outline/instructions on how and where to cut.

I am now also offering all-new GTM headers and mid-pipe connectors HERE to mate to the GTM H-pipe then onto your (our our) mufflers, for those who don't want to cut their stock headers. The new mid-pipe will use your front heat shield, and can be used with your stock or aftermarket mufflers and rear heat shield.

GTM H-pipe:


GTM Headers and mid-pipe connectors;


Connector pipe is squarely cut just forward of the connecter brace:
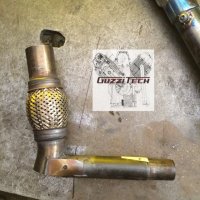
GTRx Cal14 Disc

This is what you have left, to be re-installed:
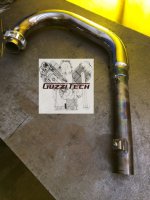
GTRx Cal14 Hdr

Install new H-pipe shown, slide onto cut headers with the angle beehive flex joints facing up and outwards:
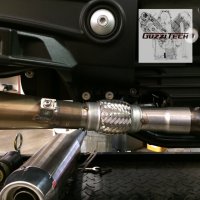
GTRx Cal14 Hpipe

Questions? Post below.
 
Todd, since I own a limited number of tools for metal I want to ask; On the GTM C14 H, After cutting the pipe, do I need to weld any section or modify pipe diameters in any way?

Thanks,
Mario.
 
Todd, since I own a limited number of tools for metal I want to ask; On the GTM C14 H, After cutting the pipe, do I need to weld any section or modify pipe diameters in any way?

Thanks,
Mario.
Hi Mario, no, plug and play from the post above.
 
I pulled this from the cracking exhaust parts here in this section to highlight info on my crack-proof GTM C14 H-pipe as sold HERE or click on top pic below. It also serves as an outline/instructions on how and where to cut.

I am now also offering all-new GTM headers and mid-pipe connectors HERE (or second pic below)to mate to the GTM H-pipe then onto your (our our) mufflers, for those who don't want to cut their stock headers. The new mid-pipe will use your front heat shield, and can be used with your stock or aftermarket mufflers and rear heat shield.

GTM H-pipe:


GTM Headers and mid-pipe connectors;


Connector pipe is squarely cut just forward of the connecter brace:
View attachment 12970

This is what you have left, to be re-installed:
View attachment 12971

Install new H-pipe shown, slide onto cut headers with the angle beehive flex joints facing up and outwards:
View attachment 12972

Questions? Post below.
I just purchased a 2014 CA 1400 w/2086 miles. Owned a 2003 CA EV1100 for 20 years and have some familiarity with MG. Searching the forums to get up to speed on the 1400 and came across this H pipe concern. Is there something I should look at on my exhaust to see if I have a failing part? Should I tap on it or remove now and do a visual or ??? Is there something about the pipe material that will show metal fatigue to look for?

thx….
 
Is there something I should look at on my exhaust to see if I have a failing part? Should I tap on it or remove now and do a visual or ??? Is there something about the pipe material that will show metal fatigue to look for?
A visual check and inspection is all you can do. You may see cracks, or not. Also pull the front heat shields to inspect the front bungs that are welded on.
 
I haven’t received these yet but I have a question.

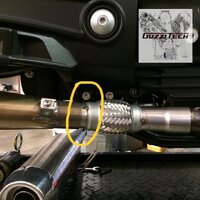
What creates the seal here? With no slits cut, a clamp really won’t cause constriction of any leaks. I just cannot see how this makes a tight seal other than you have compensated for a tight diameter fit?

Thank you.

IMG 0557
 
I haven’t received these yet but I have a question.
What creates the seal here? With no slits cut, a clamp really won’t cause constriction of any leaks. I just cannot see how this makes a tight seal other than you have compensated for a tight diameter fit?
It will make sense once you have it. That photo is from 10 years ago now. I can’t recall the mufflers used. I don’t think they were mine (like shown on the bench in the pic). The inlet side has slits and clamps, and the outlet (you circled) is same as stock. So if your mufflers have gaskets and clamps, they are reused. We’ve sold a dozen or so of these over the years with zero fitment issues. ;)
 
Instead of asking here, you should send the question via the email you received with order confirmation, or shipping confirmation if you want Todd directly. He may not see it here. However, yes friction fit works. Mine makes a pop or two while the pipes initially warm (and swell) I suppose. Ran mine for a year this way/ no clamps, and so fast no issues. There is a clamp each side at the end of the flex pipe piece toward the rear of the bike. I also installed the fuel manager system Todd sells, and it fixed so many related issues I was having. Wasn’tcheap, but now this is the most enjoyed ride I’ve had. No regrets.
 
Well, I’m jumping in the pool - mostly 😆!

I have the new PC/AT fueling on the way, a new airbox lid to modify, Mistral cans (I just love the sound of my Mistral pipes), and this morning I ordered GTM’s polished headers. I just cannot bring myself to cut up stock pipes with only 2,600 miles on them. That’s just sacrilege to me.

I intend to keep and ride my Eldorado until I am dead (many years from now I hope 🤞) and I don’t want broken exhaust issues, so, thank you GTM 😄.

I’ll report back on my experience when I get her setup and get to ride her in the spring.
 
Last edited:
Back
Top