Posting this as it might be useful for others. Used on my Griso but should be ok in other applications.
Needed a bit more legroom when carrying my wife as pillion with H&B C-bow bags fitted.
Neither of us are big and my wife can fit ok with the standard mounts for the H&B soft bags but her ability to reposition her legs was limited.
It occurred to me that if I could move the bags out and back a little then this should provide enough additional room for her to be more comfortable and give her the chance to reposition when she felt the need.
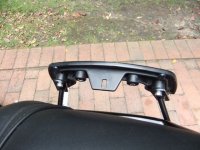
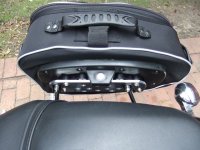
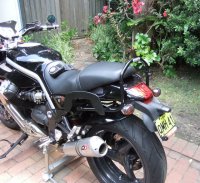
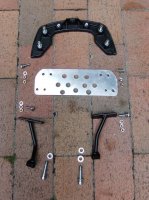
My solution was to add an additional bracket between the standard H&B frame mounts and the C-bow bracket.
Photos below show the first trial bracket which has proven successful for our situation.
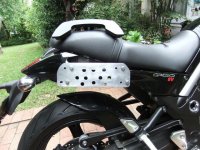
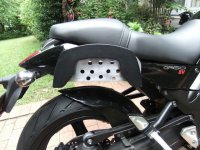
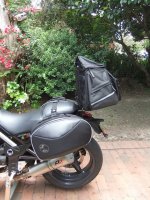
I used 6mm (1/4 inch) aluminium plate which I bolted to the standard frame mounts supplied for the C-bow bracket and then mounted the C-bow 25mm (1 inch) further back than the standard position.
This small change to the bag position has provided a surprising amount of additional room for her legs, which has made her more comfortable on the bike.
She is fairly slim and her legs are not like tree trunks so this relatively small change was sufficient. If you need even more room I can’t see why you couldn’t go out more and even move the bags further back. This should be limited however so you don’t adversely affect the balance of the bike and more importantly so you don’t place to much load on the standard mounts which could compromise their ability to support the bags.
In our situation it has made no real difference to the feel of the bike when loaded and my intention is to only use these additional brackets when we are two up, if I travel on my own I will use the standard bag position as I won’t need the additional room.
The real beauty of this mod is that it takes 5 minutes to add or remove the extra bracket.
I will monitor the aluminium adaptor to make sure it doesn’t fatigue or crack.
There is no reason why you couldn’t do the same thing with steel plate but aluminium is obviously lighter and easier to work with.
If these prototype brackets prove to be successful in the long term I will make some new tidier brackets and probably paint them to match the other parts.
Obviously you should make sure you use good quality bolts and secure then correctly.
I used longer high tensile bolts to replace the supplied H&B bolts for the main under seat mounts when I added my Ventura rack brackets. This combination is really practical as it takes about 15 minutes to instal and 10 minutes to remove from the bike, so I don't need to leave them on when not required.
Needed a bit more legroom when carrying my wife as pillion with H&B C-bow bags fitted.
Neither of us are big and my wife can fit ok with the standard mounts for the H&B soft bags but her ability to reposition her legs was limited.
It occurred to me that if I could move the bags out and back a little then this should provide enough additional room for her to be more comfortable and give her the chance to reposition when she felt the need.
My solution was to add an additional bracket between the standard H&B frame mounts and the C-bow bracket.
Photos below show the first trial bracket which has proven successful for our situation.
I used 6mm (1/4 inch) aluminium plate which I bolted to the standard frame mounts supplied for the C-bow bracket and then mounted the C-bow 25mm (1 inch) further back than the standard position.
This small change to the bag position has provided a surprising amount of additional room for her legs, which has made her more comfortable on the bike.
She is fairly slim and her legs are not like tree trunks so this relatively small change was sufficient. If you need even more room I can’t see why you couldn’t go out more and even move the bags further back. This should be limited however so you don’t adversely affect the balance of the bike and more importantly so you don’t place to much load on the standard mounts which could compromise their ability to support the bags.
In our situation it has made no real difference to the feel of the bike when loaded and my intention is to only use these additional brackets when we are two up, if I travel on my own I will use the standard bag position as I won’t need the additional room.
The real beauty of this mod is that it takes 5 minutes to add or remove the extra bracket.
I will monitor the aluminium adaptor to make sure it doesn’t fatigue or crack.
There is no reason why you couldn’t do the same thing with steel plate but aluminium is obviously lighter and easier to work with.
If these prototype brackets prove to be successful in the long term I will make some new tidier brackets and probably paint them to match the other parts.
Obviously you should make sure you use good quality bolts and secure then correctly.
I used longer high tensile bolts to replace the supplied H&B bolts for the main under seat mounts when I added my Ventura rack brackets. This combination is really practical as it takes about 15 minutes to instal and 10 minutes to remove from the bike, so I don't need to leave them on when not required.
Attachments
-
 Standard mouting.jpg57 KB · Views: 688
 -
 Adaptor.jpg73.8 KB · Views: 688
 -
 Installed adaptor.jpg66.2 KB · Views: 688
 -
 Installed adaptor 2.jpg66.1 KB · Views: 688
 -
 C-bow fitted.jpg69.3 KB · Views: 688
 -
 Ventura mount brackets.jpg101.5 KB · Views: 688
 -
 Bags + Ventura rack and bag.jpg89 KB · Views: 688
 -
 Adaptor and parts.jpg75.7 KB · Views: 688