• Ciao Guest - You’ve landed at the ultimate Guzzi site. NEW FORUM REGISTRATIONS REQUIRE EMAIL ACTIVATION - CHECK YOUR SPAM FOLDER - Use the CONTACT above if you need help. New to the forum? For all new members, we require ONE post in the Introductions section at the bottom, in order to post in most of the other sections. ALWAYS TRY A SEARCH BEFORE STARTING A NEW TOPIC - Most questions you may have, have likely been already answered. DON'T BE A DRIVE-BY POSTER: As a common courtesy, check back in and reply within 24 hours, or your post will be deleted. Note there's decades of heavily experienced Guzzi professionals on this site, all whom happily give endless amounts of their VALUABLE time for free; BE COURTEOUS AND RESPECTFUL!
  • There is ZERO tolerance on personal attacks and ANY HYPERLINKS to PRODUCT(S) or other competing website(s), including personal pages, social media or other Forums. This ALSO INCLUDES ECU DIAGnostic software, questions and mapping. We work very hard to offer commercially supported products and to keep info relevant here. First offense is a note, second is a warning, third time will get you banned from the site. We don't have the time to chase repeat (and ignorant) offenders. This is NOT a social media platform; It's an ad-free, privately funded website, in small help with user donations. Be sure to see the GTM STORE link above; ALL product purchases help support the site, or you can upgrade your Forum profile or DONATE via the link above.
  • Be sure to see the GTM STORE link also above for our 700+ product inventory, including OEM parts and many of our 100% Made-in-SoCal-USA GTM products and engine kits. In SoCal? Click the SERVICE tab above for the best in service, tires, tuning and installation of our products or custom work, and don't miss our GT MotoCycles® (not) art on the BUILDS tab above. WE'RE HERE ONLINE ONLY - NO PHONE CALLS MADE OR RECEIVED - DO NOT EMAIL AND ASK QUESTIONS OR ASK TO CALL YOU.
  • Like the new V100, GuzziTech is full throttle into the future! We're now running on an all-new server and we've updated our Forum software. The visual differences are obvious, but hopefully you'll notice the super-fast speed. If you notice any glitches or have any issues, please post on the Site Support section at the bottom. If you haven't yet, please upgrade your account which is covered in the Site Support section or via the DONATE tab above, which gives you full site access including the DOWNLOADS section. We really appreciate every $ and your support to keep this site ad-free. Create an account, sign in, upgrade your account, and enjoy. See you on the road in 2024.

How-To, check swingarm and linkage bearings on NTX

GTM®

Administrator
Staff member
GT di Razza Pura
Joined
Jul 1, 2009
Messages
15,059
Location
Malibu
This is a combination of several recent threads all heading in the same direction: swingarm bearings for CARC bikes.

This 2012 Stelvio NTX showed no signs of any bearing or linkage problems but as a preventative measure I decided to check anyway. The bike has about 6500 miles. Since the seat was off for a re-cover this was the perfect time.

The service manual spells out the procedure: put bike on center stand, remove rear wheel (caliper first), remove speed sensor, remove left side rack, remove left foot peg assembly, remove muffler. Now we are down to the real operation.

Disconnect the reaction arm from the CARC assembly, support the CARC so it does not drop down too far. I used rope.

NTX SwngArm1

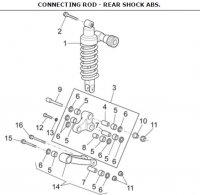
Remove the aluminum link that goes between the shock, swingarm, and frame.

NTX SwngArm2

There are three bolts. Pay attention to which way they are inserted because you want to put all this back the same way. Each bolt goes through a bushing. Push that bushing out with your finger, watch out for the needle bearings that will want to fall out. I recommend doing this over a towel to catch the bearings. The bearings fell out because there was not much grease there to hold them in place. Put the bearings back and slather in lots of high quality bearing grease, I recommend synthetic but use what you like.

NTX SwngArm3

Re-insert the bushings and reassemble two of the three bolts. The third bolt will link up with the swingarm when you are finished with the swingarm bearings.

Loosen two pinch bolts on the left side of the swingarm. There is a special nut on the swingarm axle, I got the appropriate socket from the UK but now they are available from GuzziTech. This nut is not very tight, it's actually just a sleeve that goes over the axle. Next, you will need a 14mm allen wrench to unscrew the axle itself. Before you take the axle out it's a good idea to snip off the straps holding the rubber bellows that go between the transmission and the swingarm...on the right side of the bike. OK, now remove the swingarm axle. It helps if you have a second person working with you. I used some 1/4" nylon line to support the CARC/swingarm assembly.

I pulled the swingarm free but that left the driveshaft attached to the output shaft.

NTX SwngArm4

The shaft is held in place on a splined shaft by a circlip.

NTX SwngArm5

It took some taps with a ball peen hammer but all of a sudden everything was in my hands.

Now you can clearly see the swingarm bearings.

NTX SwngArm6

and driveshaft splines.

NTX SwngArm7

I'll bet there is very little grease on the bearings. Inspect the bearings and the cones they run in.

NTX SwngArm8

If you see any imperfections or can feel any it's time to replace the bearings. The bearings are getting pricey at the dealer, but I can't find anyone else who carries the correct bearing with attached seal.

Once again, slather lots of high quality grease on the bearings. For the splines I recommend a moly paste.

Now comes reassembly. Obviously this is the same process but in reverse, however I found it impossible to get the drive shaft to mate up with the CARC splines so I had to split the CARC from the swingarm.

NTX SwngArm9

It's really no big deal, just 4 bolts. Now you can re-attach the drive shaft to the output shaft and thread the driveshaft through the swingarm as you line it up to insert the swingarm axle. This is really easy as the CARC is still unattached. Here I'm using the 14mm allen socket to screw the axle into place.

NTX SwngArm10

This is the business end of the CARC.

NTX SwngArm11

After the swingarm is secure you can re-attach the CARC and proceed with reassembly.
 
And all of this, just because some manufacturing engineers in Italy that are supposedly in the motorcycle business don't understand that bearings need to be lubricated?

Blaming it on Luigi on the assembly line doesn't help - he does what he's told to do and what he is measured to ....

I just put a new rear shock on my 2009 and the swingarm moved smoothly and quietly, so I'm going to run it as is; they can't ALL be defective ... can they?

Lannis
 
Lannis, I'd love to say that the guy building my bike did a crappy job that day but I suspect he was following the company build instructions. It looks like they are using moly grease/paste on the bearings, just not much of it. It will take years of use before the bearings are toast. I'd rather have that to be many, many years and then catch the problem before it actually fails. In addition, I enjoy doing this stuff!

It would be interesting to learn the background on this assembly decision. Evidently it's a pretty common one since I have seen the same thing with BMW, Triumph, and Ducati.

Peter Y.
 
I'm sure you saw my query on the goop splooging out between my CARC and drive shaft housing and how aparrently there have been leakage problems in the past and this is an attempt to cure that (even tho you'd think they could have cleaned off the excess.(or maybe it was left there to prove a point)). Just wondering if you made a point of using a silicone gasket goo for extra backup yourself? :?:
 
Toadride said:
I'm sure you saw my query on the goop splooging out between my CARC and drive shaft housing and how aparrently there have been leakage problems in the past and this is an attempt to cure that (even tho you'd think they could have cleaned off the excess.(or maybe it was left there to prove a point)). Just wondering if you made a point of using a silicone gasket goo for extra backup yourself? :?:

Doug, the goop you mentioned is no big deal. My swingarm had some of the same, it's just a sealer that does not harden so you can split the two parts when needed. I had to split mine for re-assembly so I put some sealer between the two parts. The goop ozzed out when I tightened the four bolts. I simply scraped off the excess for a slightly cleaner look. The sealer is not keeping any fluid inside the housing but does keep water from pooling inside. The swingarm to CARC junction is machined for a good fit and there is no other gasket other than the goop.

Peter Y.
 
I had the devil of a time getting the CARC off the end of the swingarm on one I had in recently hat had been 'Glued' on with sealant. Personally I think its a stupid decision as a seepage from that joint is an indicator that either the pinion seal on the CARC box has died or the gearbox output shaft seal. It'll still leak out of the hose clip holes eventually but a seep at the joint is a good early warning.

Pete
 
Pete, good point about the sealant making the parts hard to split apart. I could not see any good reason to have the joint sealed other than to keep water out. If I do this again I think I'll not put any sealant there.

Peter Y.
 
Excess grease when used in a HIGH SPEED bearing is a bad idea for many reasons. I suspect they just carry that thinking to the low speed bearings like in the swingarm and steering. Part of it may also simply be that excess grease may ooze out and cause some people to panic.
Whatever the reason, I packed mine with as much grease as I could fit in.
 
Wayne Orwig said:
Excess grease when used in a HIGH SPEED bearing is a bad idea for many reasons. I suspect they just carry that thinking to the low speed bearings like in the swingarm and steering. Part of it may also simply be that excess grease may ooze out and cause some people to panic.
Whatever the reason, I packed mine with as much grease as I could fit in.

:mrgreen: Likewise! Stuff the whole bearing cavity and pack the bugger to the max! It'll stop oozing out when its reached its natural level and the seal will do an adequate job of keeping water out even if its total sealing integrity has been compromised.

Pete
 
I have been reading, with great interest, about the procedure to lube the swingarm bearings. I can tell you that my BMW K1200 had similar lube deficiency. The bearings were replaced by bushings, works well.

Question: Is there a way, and/or has anyone tried to install Zerk fittings on the shock lever and the swingarm, so that complete disassembly woul no longer be needed?

BTW the write ups and pics have been a great help, Thanks.
 
Finally got do do mine (2008), all came apart quite easily.
Swing arm bearings were Okish, some grease,so cleaned them and repacked

The worst were the 3 needle bearing set in the lower shocker link (item 3), esp the one onto the swing arm the one with rod 4 in it, it was seized and took a some WD40 and a few taps with a large hammer to free it, the needles were all seized up, had to be picked out a scriber. The bearing 'housing' was also correded and as was the sleeve. Anyway, wanting it back together, I cleaned the up and reassembled. Again went OK, even fitted the CARC breather (banjo bolt and spare ss braide hose).

The rear feels must freer now BUT there is a little play vertically in the lower links when on the centre stand, feels Ok when on the tyres, but not ridden it yet.

Anyone know if the needle bearings/sleeves are available as spares or do I look a new new double conrod assembly
 

Attachments

  • Stelvio rear shocker links.JPG
    Stelvio rear shocker links.JPG
    38.6 KB · Views: 465
It appears that the same needle bearing is used multiple times in that dog-bone assembly. Part # AP 8110066 (Aprilia part?) and the parts list says you need seven of them. They must be available as individual parts but I think I'd only get as many as actually needed, not replace all seven. The parts list calls these 'Cage a Rouleaux'.

Peter Y.
 
Took another look at the bottom link yesterday. With a bar under the back wheel (bike on centre stand) I could get maybe 3 mm movement at the wheel that was due mostly to the link onto the swing arm bushing - item 4 - this was the worst one the other day, with the whole bushing seized into the needle and the needles into the housing.

So I dropped the linkages out again, only 4 bolts so a quick job. Then while holding the sleeve, item 4 between my fingers I could get definite lateral movement in the sleeve. Also checked the others and some lateral movement but nowhere near as much.

Put it all back togther, whilst awaitng delivery of replacement assembly. Choose to go with the whole assembly (part 3, £85 - but includes all the sleeves, needle brgs and seals), then added the brgs for item 14 and some new bolts and nuts.

Should be any easy fix when they arrive.

However, looking at the design, surely there must be better design than tiny needle roller bearings for all these links given their proximity to the ground and all that road dirt, spray etc. Certainly an improved level of protection may help (I may start a new thread on this).
 
good job on the post - would there be a proper torgue pattern on the bolting up the swingarm to the CARC. I did a search in the torgue settings in the PDF service manual and couldn't put my finger on the required amount for those bolts. Anyone know off hand?
 
Thank you, Peter and the others.
Just finished all the needle bearings on my '06/'07 G-11. 85K km, looks like it has spent much time in the elements and on dirt roads, so I was concerned. All needle bearings were well packed, no loose needles, no corrosion. Pleasant work on a rainy Nov. day. Will do the B-11 next as preventive maintenance.
Don't have the Cark castle nut tool yet, so that will be a job for next winter (or this spring).
 
Hey all. Buy one of Todd's CARC tools. Even if you don't need one it's a piece of high tool box art. There are times I just pull open the drawer and stare at mine! It's a beauty!
Garwood.
 
Back
Top