• Ciao Guest - You’ve landed at the ultimate Guzzi site. NEW FORUM REGISTRATIONS REQUIRE EMAIL ACTIVATION - CHECK YOUR SPAM FOLDER - Use the CONTACT above if you need help. New to the forum? For all new members, we require ONE post in the Introductions section at the bottom, in order to post in most of the other sections. ALWAYS TRY A SEARCH BEFORE STARTING A NEW TOPIC - Most questions you may have, have likely been already answered. DON'T BE A DRIVE-BY POSTER: As a common courtesy, check back in and reply within 24 hours, or your post will be deleted. Note there's decades of heavily experienced Guzzi professionals on this site, all whom happily give endless amounts of their VALUABLE time for free; BE COURTEOUS AND RESPECTFUL!
  • There is ZERO tolerance on personal attacks and ANY HYPERLINKS to PRODUCT(S) or other competing website(s), including personal pages, social media or other Forums. This ALSO INCLUDES ECU DIAGnostic software, questions and mapping. We work very hard to offer commercially supported products and to keep info relevant here. First offense is a note, second is a warning, third time will get you banned from the site. We don't have the time to chase repeat (and ignorant) offenders. This is NOT a social media platform; It's an ad-free, privately funded website, in small help with user donations. Be sure to see the GTM STORE link above; ALL product purchases help support the site, or you can upgrade your Forum profile or DONATE via the link above.
  • Be sure to see the GTM STORE link also above for our 700+ product inventory, including OEM parts and many of our 100% Made-in-SoCal-USA GTM products and engine kits. In SoCal? Click the SERVICE tab above for the best in service, tires, tuning and installation of our products or custom work, and don't miss our GT MotoCycles® (not) art on the BUILDS tab above. WE'RE HERE ONLINE ONLY - NO PHONE CALLS MADE OR RECEIVED - DO NOT EMAIL AND ASK QUESTIONS OR ASK TO CALL YOU.
  • Like the new V100, GuzziTech is full throttle into the future! We're now running on an all-new server and we've updated our Forum software. The visual differences are obvious, but hopefully you'll notice the super-fast speed. If you notice any glitches or have any issues, please post on the Site Support section at the bottom. If you haven't yet, please upgrade your account which is covered in the Site Support section or via the DONATE tab above, which gives you full site access including the DOWNLOADS section. We really appreciate every $ and your support to keep this site ad-free. Create an account, sign in, upgrade your account, and enjoy. See you on the road in 2024.

How to Remove / Refit Rear Wheel / Transmission

Hippo-Drones

Cruisin' Guzzisti
Joined
Apr 16, 2019
Messages
223
Location
UK
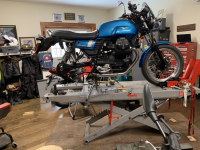
Other than another video I made a couple of years ago I have not found many how to remove or replace the rear wheel on a Moto Guzzi V7. On my previous video I showed how to do so without removing the transmission box assembly, which is just about manageable with a standard 130 tyre. If however like me, you have a wider rear tyre, that way is not possible and is also a bit fiddly, even with the standard sized tyre.
In this video I show how easy/hard it is to remove the transmission box assembly and refit the rear wheel. This also allows access to grease up the shaft bevel gear too.
I do suggest a soft mallet, and you will definitely want some Loctite as well.

 
Thanks for that.

Enjoyed the improv approach and your humor. Especially like your "sleeve of wizardness." :clap:

I'll likely refine my comments here later on your y/t channel and mod this one, as I am -- as I peck out this quick thanks -- 300 miles away from my V7. Doing our monthly eldercare visit in Erie, Pa., to Kathi's 98-YO dad (and his 86-YO girlfriend! :giggle:).

Anyway, your vid was very helpful as my V7 sits forlornly with its rear wheel and bevel box off awaiting my return to the top of Virginia ... and screwing up my courage to give reassembling it all another try.

TempImageaNAS8u


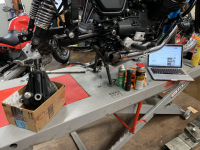
As you can see, below, my bevel box, unlike yours, came off the swingarm forward of the coupler.


TempImage4tuq6h

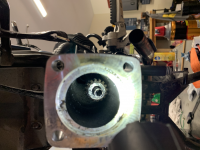
That has left an "interesting" problem in reassembly as the driveshaft now drops down in such a way that I have thus far been unable to reattach it despite my inspired cursing.

FWIW, my bevel box slipped right off without the effort yours required. It is a 2017 V7 III, so it had less time to fuse itself into place.

TempImagemwvaGo

I have no clue why that image loaded upside down, but you can get the picture (so to speak ;)).

I have yet to try the promising(-sounding) suggestion I have received from kibitzing Guzzisti to put a large "glob" of grease just forward of or directly under the splines of the driveshaft so that I can marry up the coupler to those.

Would appreciate your thoughts and those of others here at convenience.

In an unrelated "P.S.," curious about your logo. Did you spend some time with British airborne forces? The sweatshirt in the center background of my first pic, above, shows why I ask. :)

Now time to go check on Kathi's dad and companion. :tmi:

Best wishes,

Bill
 
Ahh cheers Bill :) Haha, with my spannery ability I can't take myself too seriously :D
Cor, your misses' old man is a bit of a stud! :D
Am glad you found it helpful, hopefully others will too, even if it to see how not to do things possibly!: D
I was informed by another that mine had come apart differently, I wonder if the trackdays have fused mine together! hahaha :D
That does look to be awkward it having dropped a bit, hopefully when you reinsert it all it will squidge back together ok, but yes, maybe pack it with a bit of grease to help it all align, and it is a good idea to grease it anyway.

Regarding my logo, although I was in the armed forces (RN submariner) it is unrelated. The Hippo is because when I am naked my belly looks like a hippo head :D, the gun was part to do with being in the forces, but also my previous channel I made airsoft vids (more ouchy than paintball and a bit more fun), and the parachuting was from me learning to skydive a few years back :)

Thanks, tho, IMO, all submariners are at least half crazy, so I must now discount appropriately all of your moto-counsel. ;)

Kidding aside, I would last about 30 seconds on a submarine -- even moored safely at dock. I’ve often thought that Psalms 107:23 — "They that go down to the sea in ships, that do business in great waters” — should be amended to address going under the sea! What dangerous business that is. Few folks really appreciate what an incredibly significant role that submarines had in ending the Cold War. I know that Soviet leaders did! Sincere salutes to a R.N. submariner sailer from a former U.S. soldier!

Now, back to topic. FWIW, I have tried the slather-with-grease approach, but, so far, no joy. Will try the "glob-under" approach next.

Bill

All you do is rotate the box from the cush drive side and eventually it'll slip right on in.

"Eventually" is a very long time, and "all you do" shows appreciated but unwarranted confidence in my abilities. :giggle:

Seriously, have you done that or are you speculating ? Nothing wrong with the latter, BTW, and especially not as I solicited suggestions. But I am curious.

Moreover, I have to admit that I have not tried that particular exercise, so if the glob-under mentioned next above fails, what's to lose ...erm ... except dropping the bevel box, I suppose? :cry:

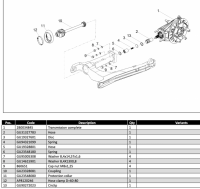
That said, after watching the wizard "Hippo-Drones" vid, I am thinking it might be simpler to remove part #2 GU31327783 in this parts list -- which Mandellans oddly call a "hose" :wasntme: -- and, with the coupler -- #5, also a "hose!" -- and connect to the driveshaft splines that way.


Screen Shot 2021 02 25 at 210808

In the meantime, I'll continue to listen to my f-i-l's grand tales of playing baseball in Hawaii during WWII. Beats being a submariner or paratrooper back then! :clap:

Wait a minute! I was about to hit "post reply" when I noticed that Scott has not weighed in with the answer. And this after I searched for previous problems of this sort. I am a horse ready to be led to water, too. :giggle:

Bill
 
Thanks, tho, IMO, all submariners are at least half crazy, so I must now discount appropriately all of your moto-counsel. ;)

Kidding aside, I would last about 30 seconds on a submarine -- even moored safely at dock. I’ve often thought that Psalms 107:23 — "They that go down to the sea in ships, that do business in great waters” — should be amended to address going under the sea! What dangerous business that is. Few folks really appreciate what an incredibly significant role that submarines had in ending the Cold War. I know that Soviet leaders did! Sincere salutes to a R.N. submariner sailer from a former U.S. soldier!

Now, back to topic. FWIW, I have tried the slather-with-grease approach, but, so far, no joy. Will try the "glob-under" approach next.

Bill


"Eventually" is a very long time, and "all you do" shows appreciated but unwarranted confidence in my abilities. :giggle:

Seriously, have you done that or are you speculating ? Nothing wrong with the latter, BTW, and especially not as I solicited suggestions. But I am curious.

Moreover, I have to admit that I have not tried that particular exercise, so if the glob-under mentioned next above fails, what's to lose ...erm ... except dropping the bevel box, I suppose? :cry:

That said, after watching the wizard "Hippo-Drones" vid, I am thinking it might be simpler to remove part #2 GU31327783 in this parts list -- which Mandellans oddly call a "hose" :wasntme: -- and, with the coupler -- #5, also a "hose!" -- and connect to the driveshaft splines that way.


View attachment 21576

In the meantime, I'll continue to listen to my f-i-l's grand tales of playing baseball in Hawaii during WWII. Beats being a submariner or paratrooper back then! :clap:

Wait a minute! I was about to hit "post reply" when I noticed that Scott has not weighed in with the answer. And this after I searched for previous problems of this sort. I am a horse ready to be led to water, too. :giggle:

Bill
I have done it before. I casually removed the fibal drive and when it was up until that point when it was time to install it was an "oh shit" moment.
All I did was fiddle the shaft(no homo) and centered it where I hoped it would bite, installed the final drive and did half a turn and on it went. No issues since
Ok I just saw your picture of the splines on the drive shaft. If you move it down more and center it. It should work.
Not very official, but it beats removing the whole swingarm

Thanks.

Actually, moving it down is not the issue. "Up" is. I think you missed my "I have no clue why that image loaded upside down."

It is getting it up -- so to speak! :giggle: -- is the issue, thus my discussion earlier about using the "grease glob" to hold the shaft in position to receive the coupler.

I'm still in Erie, but hope to give this all a try over the weekend.

Grazie,

Bill
 
Am just wondering if it may have slid in the shaft housing, are you able to poke something in there and push it back towards the gearbox, which may help centre it a bit???
 
Vittorio in Virginia!

As I mentioned, I have been traveling and otherwise unable to spend time on Guzzi tasks (or just have fun doing nothing at all in the Moto Grappa), so, back from Erie last night, I got right to it.

Before I forget, sincere thanks to the many here and elsewhere who chimed with suggestions on how to get this done. It may look and sound simple, but it sure wasn’t … at least not for me.

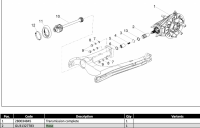
The real key to success was getting the little bit of extra length from what, as I previously mentioned, Guzzi (oddly) calls “hose.” See # 2, here:


Screen Shot 2021 02 27 at 204725


With that and the coupler, I was able to insert it and mesh with the driveshaft’s splines, then more easily bring the bevel box into place and engage all.

Pix of today’s win are here: https://bill-and-kathi.smugmug.com/Beating-the-Bevel-Box-/n-pmd9Sd/

Naturally, there was drama today, but nothing catastrophic. Aside from my usual lethargy and sloth, I am painfully slow when working alone. I just do not want to miss through inattention something fundamental and likely obvious to all except me.

Now, it's time for some celebratory sipping. :clap:


i-5M6Qnwt-M.jpg


Bill
 
Back
Top