• Ciao Guest - You’ve landed at the ultimate Guzzi site. NEW FORUM REGISTRATIONS REQUIRE EMAIL ACTIVATION - CHECK YOUR SPAM FOLDER - Use the CONTACT above if you need help. New to the forum? For all new members, we require ONE post in the Introductions section at the bottom, in order to post in most of the other sections. ALWAYS TRY A SEARCH BEFORE STARTING A NEW TOPIC - Most questions you may have, have likely been already answered. DON'T BE A DRIVE-BY POSTER: As a common courtesy, check back in and reply within 24 hours, or your post will be deleted. Note there's decades of heavily experienced Guzzi professionals on this site, all whom happily give endless amounts of their VALUABLE time for free; BE COURTEOUS AND RESPECTFUL!
  • There is ZERO tolerance on personal attacks and ANY HYPERLINKS to PRODUCT(S) or other competing website(s), including personal pages, social media or other Forums. This ALSO INCLUDES ECU DIAGnostic software, questions and mapping. We work very hard to offer commercially supported products and to keep info relevant here. First offense is a note, second is a warning, third time will get you banned from the site. We don't have the time to chase repeat (and ignorant) offenders. This is NOT a social media platform; It's an ad-free, privately funded website, in small help with user donations. Be sure to see the GTM STORE link above; ALL product purchases help support the site, or you can upgrade your Forum profile or DONATE via the link above.
  • Be sure to see the GTM STORE link also above for our 700+ product inventory, including OEM parts and many of our 100% Made-in-SoCal-USA GTM products and engine kits. In SoCal? Click the SERVICE tab above for the best in service, tires, tuning and installation of our products or custom work, and don't miss our GT MotoCycles® (not) art on the BUILDS tab above. WE'RE HERE ONLINE ONLY - NO PHONE CALLS MADE OR RECEIVED - DO NOT EMAIL AND ASK QUESTIONS OR ASK TO CALL YOU.
  • Like the new V100, GuzziTech is full throttle into the future! We're now running on an all-new server and we've updated our Forum software. The visual differences are obvious, but hopefully you'll notice the super-fast speed. If you notice any glitches or have any issues, please post on the Site Support section at the bottom. If you haven't yet, please upgrade your account which is covered in the Site Support section or via the DONATE tab above, which gives you full site access including the DOWNLOADS section. We really appreciate every $ and your support to keep this site ad-free. Create an account, sign in, upgrade your account, and enjoy. See you on the road in 2024.

LED plate

francod123

Cruisin' Guzzisti
Joined
Aug 2, 2013
Messages
432
Location
Maryland
I had a dealer install my LED plate and they botched it up...they wired it wrong because there are no running lights while you're riding...the brake lights only come on when I hit the brake, otherwise there is no red light at all while riding. This is the Radiantz LED plate that Todd sells.

So, I think they soldered it in...is it difficult to rewire this thing so it's working correctly, with three brake lights and the two turn signals, all integrated into the LED plate as I instructed to them but they obviously screwed up. Just trying to get an idea of what I would have to do to get it right. Thanks.
 
I did a quick search online to find a wiring diagram, and found this wire mapping table:
Wire: Purpose
Black wires: Ground
License plate light LEDs: White wire
Red LEDs: Red Wire
Amber LEDs: Amber Wire

These dedicated wires in the Radiantz harness perform specific functions -- Amber R-turn, Amber L-turn, Red Brake, Red Running and White License lights. What this information doesn't tell me is how many wires are there per function (I'm totally taking a guess here). It's quite possible that the mechanic who screwed up your install just neglected to connect the dedicated Running light circuit or possibly he connected the Running light circuit to the Brake light circuit.

First, check to make sure you can identify the Running light wire. This may mean using a 12V battery with a test lead to check out which wire in the harness illuminates which set of LEDs in the plate. Check the installation to see if the Running light wire is connected to the brake light wire in the tail assembly. If so, merely clip it off and connect it to the proper running light wire; I'll guess it's the wire to which the White Licenses LEDs is connected. If I were you, I'd also solder the connection and use heatshrink on the finished connection. This may be difficult, so electrical tape would be a good second choice for insulating the connection.

Hope that helps.
 
Last edited:
Franco, the full wiring diagrams and extra required diodes to make everything work were in the box. It sounds like they didn't use them, which, you'll need them back if they didn't.
 
I did a quick search online to find a wiring diagram, and found this wire mapping table:
Wire: Purpose
Black wires: Ground
License plate light LEDs: White wire
Red LEDs: Red Wire
Amber LEDs: Amber Wire

These dedicated wires in the Radiantz harness perform specific functions -- Amber R-turn, Amber L-turn, Red Brake, Red Running and White License lights. What this information doesn't tell me is how many wires are there per function (I'm totally taking a guess here). It's quite possible that the mechanic who screwed up your install just neglected to connect the dedicated Running light circuit or possibly he connected the Running light circuit to the Brake light circuit.

First, check to make sure you can identify the Running light wire. This may mean using a 12V battery with a test lead to check out which wire in the harness illuminates which set of LEDs in the plate. Check the installation to see if the Running light wire is connected to the brake light wire in the tail assembly. If so, merely clip it off and connect it to the proper running light wire; I'll guess it's the wire to which the White Licenses LEDs is connected. If I were you, I'd also solder the connection and use heatshrink on the finished connection. This may be difficult, so electrical tape would be a good second choice for insulating the connection.

Hope that helps.


Thanks man, I DO appreciate your efforts to provide some assistance!
 
Franco, the full wiring diagrams and extra required diodes to make everything work were in the box. It sounds like they didn't use them, which, you'll need them back if they didn't.

Fuuuuuuuuuuck. Thanks Todd! I'm trying to mentally block out that entire experience with them as I pack for my trip to Cali. Breathing in, breathing out ...
 
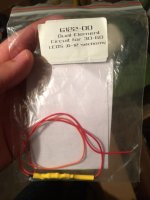
Todd, if I remember correctly from when I first purchased the LED plate, you mentioned that I wouldn't need the dual circuit add on, seen below, because I was NOT using the OEM turn signals or brake light, and I was only using the LED plate as my turn signals, running lights, and brake lights. That's correct right? Because I did not provide the dual circuit to them, since I thought it wasn't needed.

Photo 17
 
One of the resistors is for running and brake lights, and the other was for turn signal integration. If you are hoping to use both for the plate surround, then you'll need both. We can chat in person about it when I see you.
 
One of the resistors is for running and brake lights, and the other was for turn signal integration. If you are hoping to use both for the plate surround, then you'll need both. We can chat in person about it when I see you.


Ok sounds good. I think there might have only been one resistor in the box now that I think about it, and that dual circuit above. But yea, talk to you soon.
 
Todd, was my plate surround supposed to have all three strips act as brake lights, or just the bottom one...can't remember. Is it just a matter of installing the correct resistors?
 
It's all on how you wire it with the resistors. With what I sent, you can run the sides as turn and stop, and the bottom just stop. You can additionally run the sides and bottom straight in as the stock feed is LED ready.
 
Back
Top