• Ciao Guest - You’ve landed at the ultimate Guzzi site. NEW FORUM REGISTRATIONS REQUIRE EMAIL ACTIVATION - CHECK YOUR SPAM FOLDER - Use the CONTACT above if you need help. New to the forum? For all new members, we require ONE post in the Introductions section at the bottom, in order to post in most of the other sections. ALWAYS TRY A SEARCH BEFORE STARTING A NEW TOPIC - Most questions you may have, have likely been already answered. DON'T BE A DRIVE-BY POSTER: As a common courtesy, check back in and reply within 24 hours, or your post will be deleted. Note there's decades of heavily experienced Guzzi professionals on this site, all whom happily give endless amounts of their VALUABLE time for free; BE COURTEOUS AND RESPECTFUL!
  • There is ZERO tolerance on personal attacks and ANY HYPERLINKS to PRODUCT(S) or other competing website(s), including personal pages, social media or other Forums. This ALSO INCLUDES ECU DIAGnostic software, questions and mapping. We work very hard to offer commercially supported products and to keep info relevant here. First offense is a note, second is a warning, third time will get you banned from the site. We don't have the time to chase repeat (and ignorant) offenders. This is NOT a social media platform; It's an ad-free, privately funded website, in small help with user donations. Be sure to see the GTM STORE link above; ALL product purchases help support the site, or you can upgrade your Forum profile or DONATE via the link above.
  • Be sure to see the GTM STORE link also above for our 700+ product inventory, including OEM parts and many of our 100% Made-in-SoCal-USA GTM products and engine kits. In SoCal? Click the SERVICE tab above for the best in service, tires, tuning and installation of our products or custom work, and don't miss our GT MotoCycles® (not) art on the BUILDS tab above. WE'RE HERE ONLINE ONLY - NO PHONE CALLS MADE OR RECEIVED - DO NOT EMAIL AND ASK QUESTIONS OR ASK TO CALL YOU.
  • Like the new V100, GuzziTech is full throttle into the future! We're now running on an all-new server and we've updated our Forum software. The visual differences are obvious, but hopefully you'll notice the super-fast speed. If you notice any glitches or have any issues, please post on the Site Support section at the bottom. If you haven't yet, please upgrade your account which is covered in the Site Support section or via the DONATE tab above, which gives you full site access including the DOWNLOADS section. We really appreciate every $ and your support to keep this site ad-free. Create an account, sign in, upgrade your account, and enjoy. See you on the road in 2024.

Longrider's C14 Mods & Questions

Fast1400

Tuned and Synch'ed
Joined
Jul 19, 2014
Messages
71
Location
Maine
My 2014 California 1400 Custom/Touring - original post HERE

Longrider,

Looks nice, I prefer the Merc color also ;)
If you don't mind my asking, what did you use to dye the saddle?
I've been wanting to get rid of my 'skunk stripe' also.
Thanks,

F14
 
Last edited by a moderator:
I think Longriders bike looks great. A couple questions. The National Cycle hand guards are model specific or generic? I've never seen these and I think they would help.
Are the saddlebags identical to the tour model? If so how can the remote reservoir shocks clear them. I want to upgrade my rear shocks and I thought there was not enough clearance.
I thought the Guzzi GPS mount went up high near the master cylinders. I see it mounts down low where I prefer.

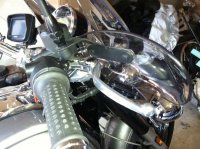
“The National Cycle hand guards are model specific or generic?”

National Cycle makes lots of model-specific hand guards, but none for Moto Guzzi. The ones I used mount under the mirror stalks. In the case of the Cal 1400 (and my Griso), the right and left need to be the same size and shape. In other words, the brackets need to be mirror images of one another. With help from Peter at National Cycle Customer Service, I settled on kit N5502 (for certain Hondas, $89.95). The same parts fit perfectly on both my Griso and 1400 Custom. While I have not tried them on other Guzzis, I think this combination will fit most other MG models as well.

The clear lexan portion of each guard is approximately 10” wide by 5” high. The bracket positions it approximately 3” in front of the hand grip. On my Custom, the clear portion tucks approximately 1.5” behind the windshield. I’m not sure how this will work out with Touring bars; it depends where your turn signal stalks are relative to the windshield.
Image

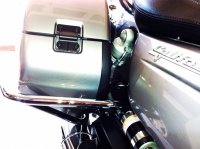
“Are the saddlebags identical to the tour model? If so how can the remote reservoir shocks clear them? I want to upgrade my rear shocks and I thought there was not enough clearance.”

The saddlebags are identical to the Touring model. Currently, they have three color codes indicated by the last digit of the part number: 1 for black; 2 for white; and, 3 for Mercury Grey. Perhaps they will add the new 2015 colors in future.

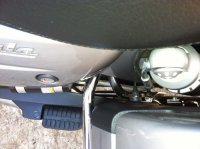
I heard about the alleged problem clearing the reservoir, but in fact there is sufficient clearance. On a Custom, the remote reservoir mounts to a stud on the inside of the passenger foot peg bracket. The saddlebag bracket mounts at the same spot. Do not disconnect the reservoir as it is under pressure. Remove the nut and swing the reservoir out of the way. Slide the saddlebag bracket hole over the stud first, then reinstall the reservoir on the same stud and tighten the nut.

I did this on my bike, and also helped a guy install the leather covered bags that are also in the factory accessory catalog. No clearance conflict on either bike.

Here are a couple of tips for anyone installing factory bags on a Custom. The bracket kit that comes with the bags has everything needed for the installation. However, if you also install the chrome saddlebag guards, you will have to remove some bolts and brackets that you just installed and replace them with parts that come with the saddlebag guards. Therefore, unpack both sets of brackets, read both sets of instructions and install them together. I learned this the hard way.

In my case, I had also installed the luggage rack before attempting the saddlebag installation. I had to uninstall two of the luggage rack studs (hidden under the fender) and replace them with saddlebag bolts. Easier if you know this and can install everything at the same time.

Attach everything loosely until you have all the nuts and bolts in place. That allows you to manipulate things a bit to get each fitting started on its threads. There were a couple of times I needed three hands (thank you Sharon!). I did the job lying on the floor, but it would have been much easier if I had a lift.

Finally, the instruction sheet says to install a bolt (that comes with the brackets) on the back side of the passenger foot peg bracket. That is where the Custom has the aforementioned stud. So you do not need that bolt. They also furnish a replacement for the brace that goes from the inside of the rear fender to the back of the license frame. It is identical to the one already there, so perhaps this is just for European plates.
Image
Image

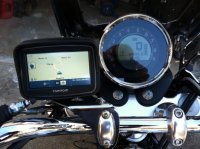
“I thought the Guzzi GPS mount went up high near the master cylinders. I see it mounts down low where I prefer.”

It mounts right next to the instrument cluster. Perfect view in my opinion. Please note that factory mount is specific to the latest-generation TomTom Rider. Likewise, the factory wiring harness has a prewired connector that is specific to that model Rider. You may be able to adapt either or both to a Garmin or whatever, but I personally would be reluctant to try. I like the fact that these factory accessories are properly engineered for the 1400.

I like this TomTom Rider. I previously owned the first-generation Rider as well as a couple of Garmin units. This new Rider has a 4.3 inch screen that is readable in the brightest sunlight, is easy to use wearing gloves and comes with lifetime map updates. Garmin people will have to adapt to the TomTom user interface, but personally I like it.

Purchasing this latest Rider can be confusing, as it is sometimes called Rider 5, Rider 2013 or just Rider. You will know you are buying the right one if it has the “Winding Roads” feature, lifetime maps and Tyre route planning feature.

I also installed TomTom’s optional “Anti-Theft Solution” which is basically a locking clamp that mounts unobtrusively behind the Rider. A thief could still unbolt the whole thing, but this gizmo should deter someone from easily releasing the GPS from the mount and walking away.
Image
 
Longrider,

Looks nice, I prefer the Merc color also ;)
If you don't mind my asking, what did you use to dye the saddle?
I've been wanting to get rid of my 'skunk stripe' also.
Thanks,

F14
The dye is SEM Color Coat #15243 Satin Black. It comes in a spray can. You have to super-clean the material, then spray it like paint. Rub it in and re-coat a couple of times. I did not feel I had the painting skills to do it properly, so I had a local custom car shop do it for me. $125 for a perfect job. My suggestion is to contact Mike Bowen at Spotlight Custom Cars in Dahlonega, Georgia. Email spotlightcustomcars@hotmail.com
 
Or I can get you the two-person gel saddle from Europe for ~$350 per below (also shown with my new full 2-2 exhaust system!).

 
Back
Top