• Ciao Guest - You’ve landed at the ultimate Guzzi site. NEW FORUM REGISTRATIONS REQUIRE EMAIL ACTIVATION - CHECK YOUR SPAM FOLDER - Use the CONTACT above if you need help. New to the forum? For all new members, we require ONE post in the Introductions section at the bottom, in order to post in most of the other sections. ALWAYS TRY A SEARCH BEFORE STARTING A NEW TOPIC - Most questions you may have, have likely been already answered. DON'T BE A DRIVE-BY POSTER: As a common courtesy, check back in and reply within 24 hours, or your post will be deleted. Note there's decades of heavily experienced Guzzi professionals on this site, all whom happily give endless amounts of their VALUABLE time for free; BE COURTEOUS AND RESPECTFUL!
  • There is ZERO tolerance on personal attacks and ANY HYPERLINKS to PRODUCT(S) or other competing website(s), including personal pages, social media or other Forums. This ALSO INCLUDES ECU DIAGnostic software, questions and mapping. We work very hard to offer commercially supported products and to keep info relevant here. First offense is a note, second is a warning, third time will get you banned from the site. We don't have the time to chase repeat (and ignorant) offenders. This is NOT a social media platform; It's an ad-free, privately funded website, in small help with user donations. Be sure to see the GTM STORE link above; ALL product purchases help support the site, or you can upgrade your Forum profile or DONATE via the link above.
  • Be sure to see the GTM STORE link also above for our 700+ product inventory, including OEM parts and many of our 100% Made-in-SoCal-USA GTM products and engine kits. In SoCal? Click the SERVICE tab above for the best in service, tires, tuning and installation of our products or custom work, and don't miss our GT MotoCycles® (not) art on the BUILDS tab above. WE'RE HERE ONLINE ONLY - NO PHONE CALLS MADE OR RECEIVED - DO NOT EMAIL AND ASK QUESTIONS OR ASK TO CALL YOU.
  • Like the new V100, GuzziTech is full throttle into the future! We're now running on an all-new server and we've updated our Forum software. The visual differences are obvious, but hopefully you'll notice the super-fast speed. If you notice any glitches or have any issues, please post on the Site Support section at the bottom. If you haven't yet, please upgrade your account which is covered in the Site Support section or via the DONATE tab above, which gives you full site access including the DOWNLOADS section. We really appreciate every $ and your support to keep this site ad-free. Create an account, sign in, upgrade your account, and enjoy. See you on the road in 2024.

Luggage and Tail Rack Picture request

TheMuffinMan

Tuned and Synch'ed
Joined
Jan 18, 2010
Messages
72
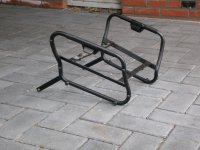
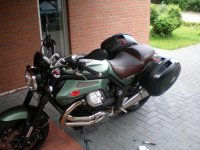
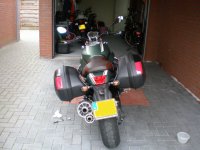
Specifically I'm looking for good pictures of the mounting points for the MG oem side bag racks and the tail rack for the Griso. I want to get some racks (side and tail) for a long 3 week trip I'm taking August 14th through Labor Day, but due to RL being a bastard I'm running lower on funds for the big trip then I'd like :( and so I want to take a crack at designing some racks for a welder friend of mine to knock together to save me the $500-600+ for the oem getup.

Once I have the racks finding some sort of bags or pelicans for the sides will be easier.

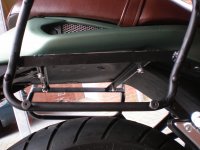
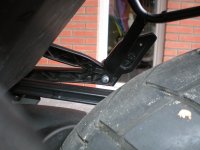
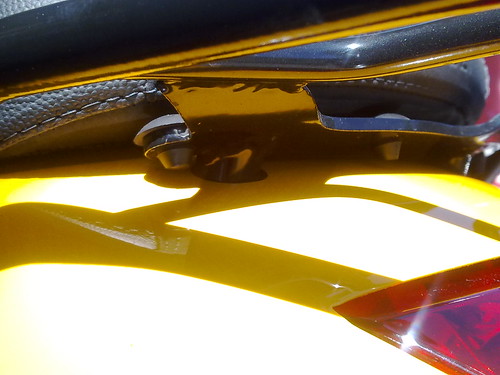
The side cases seem pretty clear that they attach under the passenger seat to the 4 tiedown pegs but from pictures I find online I have no idea how the tail rack attaches.

I appreciate any help, thoughts, or ideas on the matter as well.
 
Yes, side racks hang off the threaded holes for the tie down bobbins under the seat, but they also have stays bolted to the threaded holes on the inside of the pillion footrest hangers.

Tail rack is held by 4 bolts. It needs 2 holes drilled thru' tailpiece just behind the seat & bolted to the frame. I think the location for them is moulded into the underside of the tailpiece. The second pair of fixing bolts are in the side grills where there is a snap out plastic cap.
 
I have modified a givi rack to connect to the bobbins under the seat and to the hole in the peg on the right and the exhoust mount to the left. It holds 2 givi v35 cases. I have no pictures (yet) but if you want i could make some detailed photo's and tell you how i've made the rack.
 
kampe said:
I have modified a givi rack to connect to the bobbins under the seat and to the hole in the peg on the right and the exhoust mount to the left. It holds 2 givi v35 cases. I have no pictures (yet) but if you want i could make some detailed photo's and tell you how i've made the rack.


I would appreciate that!
 
I took some snapshots of the rack, the rack on the bike and with the cases mounted.

I made the rack from the original givi but i cut of all the struds and mounted the ones i had already made to suit the griso.

As you can see, I used the 4 holes used to mount the studs but i did not use the exta attachment holes on the side.
I also used the exhoust mount and on the other side the threaded hole behind the passenger footpeg to accomodate 2 more mountingpoints for stability.


The cases snap on to the rack. I had to make this rack in a hurry as we were leaving for a short vacation in germany. It took me day of grinding and welding but i'm not pro, so you might do it quicker.


this givi system uses the plx rack to accomodate the v35 system. its 35 liters each more than enough space for me. You will notice the cases in how the bike handles and behaves when your traveling more than 120 kmh but i go used to that quickly.

If you want some more pictures, I can mail some if you want and give you some dimensions of the rack.
 

Attachments

  • P5310017.JPG
    P5310017.JPG
    632 KB · Views: 913
  • P5310023.JPG
    P5310023.JPG
    651.6 KB · Views: 913
  • P5310025.JPG
    P5310025.JPG
    560.3 KB · Views: 913
  • P5310027.JPG
    P5310027.JPG
    639.2 KB · Views: 913
  • P5310028.JPG
    P5310028.JPG
    586.8 KB · Views: 913
  • P5310034.JPG
    P5310034.JPG
    761.1 KB · Views: 913
4000546030_3f38af5c88.jpg

This is the critical issue with the tail rack, it needs holes which I didn't want to make. The sides are attach to the places where are easy-to-remove hole covers just behind the mesh under the saddle. 4-points attachment.
http://www.flickr.com/photos/mattinaskali/4000546030/in/photostream/
 
Back
Top