• Ciao Guest - You’ve landed at the ultimate Guzzi site. NEW FORUM REGISTRATIONS REQUIRE EMAIL ACTIVATION - CHECK YOUR SPAM FOLDER - Use the CONTACT above if you need help. New to the forum? For all new members, we require ONE post in the Introductions section at the bottom, in order to post in most of the other sections. ALWAYS TRY A SEARCH BEFORE STARTING A NEW TOPIC - Most questions you may have, have likely been already answered. DON'T BE A DRIVE-BY POSTER: As a common courtesy, check back in and reply within 24 hours, or your post will be deleted. Note there's decades of heavily experienced Guzzi professionals on this site, all whom happily give endless amounts of their VALUABLE time for free; BE COURTEOUS AND RESPECTFUL!
  • There is ZERO tolerance on personal attacks and ANY HYPERLINKS to PRODUCT(S) or other competing website(s), including personal pages, social media or other Forums. This ALSO INCLUDES ECU DIAGnostic software, questions and mapping. We work very hard to offer commercially supported products and to keep info relevant here. First offense is a note, second is a warning, third time will get you banned from the site. We don't have the time to chase repeat (and ignorant) offenders. This is NOT a social media platform; It's an ad-free, privately funded website, in small help with user donations. Be sure to see the GTM STORE link above; ALL product purchases help support the site, or you can upgrade your Forum profile or DONATE via the link above.
  • Be sure to see the GTM STORE link also above for our 700+ product inventory, including OEM parts and many of our 100% Made-in-SoCal-USA GTM products and engine kits. In SoCal? Click the SERVICE tab above for the best in service, tires, tuning and installation of our products or custom work, and don't miss our GT MotoCycles® (not) art on the BUILDS tab above. WE'RE HERE ONLINE ONLY - NO PHONE CALLS MADE OR RECEIVED - DO NOT EMAIL AND ASK QUESTIONS OR ASK TO CALL YOU.
  • Like the new V100, GuzziTech is full throttle into the future! We're now running on an all-new server and we've updated our Forum software. The visual differences are obvious, but hopefully you'll notice the super-fast speed. If you notice any glitches or have any issues, please post on the Site Support section at the bottom. If you haven't yet, please upgrade your account which is covered in the Site Support section or via the DONATE tab above, which gives you full site access including the DOWNLOADS section. We really appreciate every $ and your support to keep this site ad-free. Create an account, sign in, upgrade your account, and enjoy. See you on the road in 2024.

O2 sensor removal problem

husker_in_kc

Just got it firing!
Joined
Oct 20, 2011
Messages
13
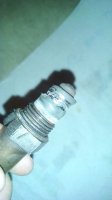
So was working on the Norge installing installing the new O2 sensors with Todds upgrade kit and had one heck of a time getting one of the O2 sensors out. I had to wrench rather hard every bit to get it out. Was thinking it was really bad crossed threaded at the factory or something. When I was finally able to extract it this is what I found.
One


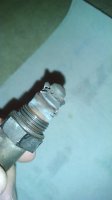
Rolling the sensor over.


Three

Its interesting to see half of it cover in carbon, dented in and dull and to see the other part of it ripped apart by removing it.


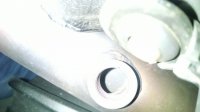
I used my finger to inspect the O2 sensor hole in the header and felt some pieces of something fall back down into the pipe and felt a protrusion in the hole that can be seen in the bottom right side.
Four

It appears the thread-o-let (not sure the term in this case but that's what it is in the I&C world) did not line up with the hole in the pipe very well.

Soo the question is what now? Can I just try and file the lip down? Do I need to pull of the pipe so I don't get stuff down stream to plug up the catalytic converter?

Other question is how the heck did they get it in to start with.
 
You could remove the pipe to be sure, or if there is room have a vacuum cleaner tip near the hole when you file that lip down.
 
Something like a Dremel tool would be best, rather than a file, you could avoid damaging the thread easier that way. It would be safer to remove the pipe and probably easier in the long term.
 
Wow, first I've ever seen like that, thanks for posting the pics.
I second the dremel, and FWIW, I'd recommend removing the exhaust to do this, and blowing it out before firing the bike.
 
I ended up pulling the exhaust off, it was easier then I anticipated. Filed down the protrusion so the new sensor went in easy.

I am curious on the assembly procedure, it looks as if the O2 sensor was already pre-assembeled to the fitting. This assembly is then put into the exhaust and then welded. Seems to be the only way to explain the dent on the first picture that was covered in carbon and how the other 3/4ths of the sensor got tore up on the removal.


Probably not assembled that way. Hole drilled, bung welded on, then sensor installed. The factory uses many air tools so the guy probably didn't even notice (or care).
 
Back
Top