zoom zoom
Tuned and Synch'ed
There are a couple of things I feel I would like, and true electronic cruise control is one of them. Though I was waiting for the Oz guy to have the kabootle kit for the Norge, nobody there ever bit. I simply didn't want to go through the hassel of figuring out all the various bits to complete the basic kit.
Therefore, I decided to go the cheap, (inexpensive), route, and purchase the Audio Vox unit that many have adapted sucessfully to bikes. At this point, my Norge looks like a picked over Thanksgiving turkey, having been disassembled for this and other improvements, (suspension upgrades). Anyway, the initial gut feeling is that this will be easier than I figured. After removing the emissions canister from the rear compartment under the seat, I have found that the servo unit fits perfectly there using the same clamp that held the charcoal canister that I removed. Cable routing looks to be pretty straight forward too. The vacume line from the intake manifold can probably be reused to supply the cruise. There is enough room under that side cover under the seat to allow a good enough sweep for the cable. I think I even have an idea on where to put the bracket that secures the other end of the cable in alignment with the linkage rod between the two throttle bodies.Since this is a work in progress, there will be more to come as things progress. It will also be necessary to fabricate a vacume cannister out of PVC pipe and figure a location for that as well. My initial thoughts are to put that beside the battery since I don't use that space for anything much anyway. If I can figure out a better place that will keep that useable, I'll do that. Stay tuned:
Zoom Zoom,
John Henry
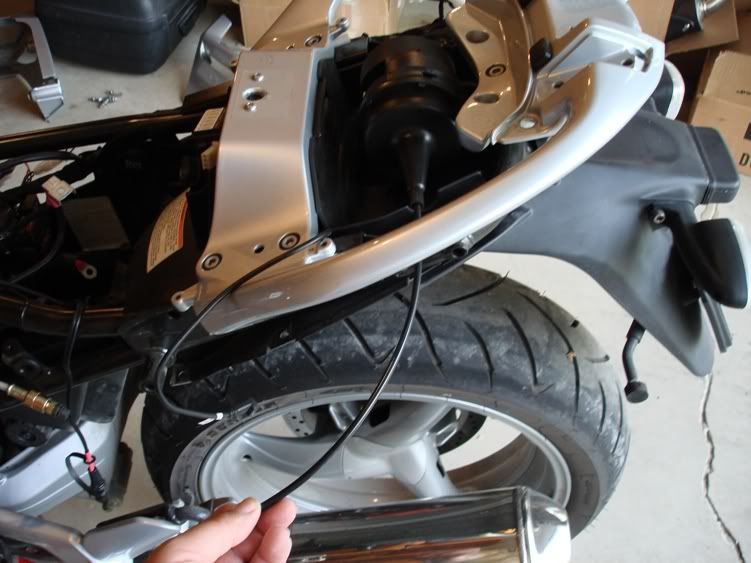
This is the servo unit mounted in the place of the charcoal cannister. If it turns out I need more distance for the cable, I may point it the other direction and sweep across and down. FWIW, the same bracket that held the charcoal cannister holds the servo. (black plastic.)

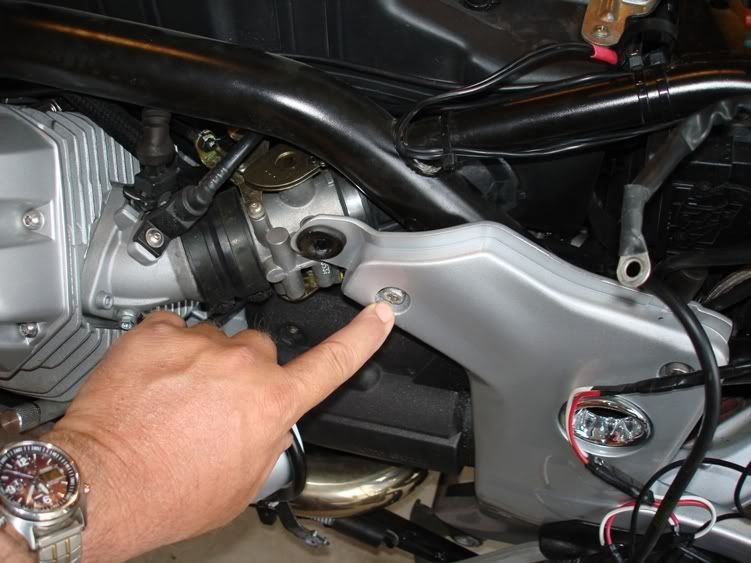
This shows the cable coming out. The side trim will cover this and allow enough room for the cable to sweep without a sharp bend.
There is a bracket that will need to be attached that secures the end of the cable sheath. This bolt goes into a J nut. With a bit longer bolt, and a regular nut, I think that bracket can be attached behind. There is room to get a wrench in there to tighten a nut.
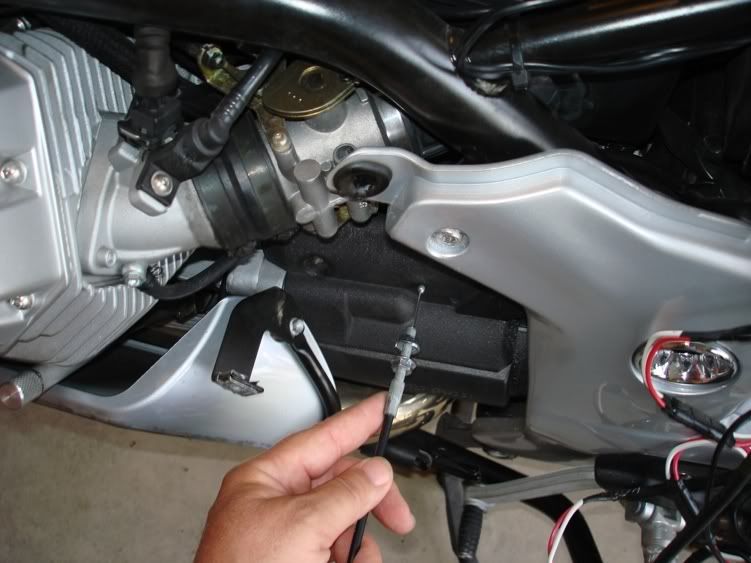
No matter how the cable routes, it needs to end up here. I figure it will pull from the linkage rod between the TB's. This puts it in alignment for that. It will, of course, be hidden underneath. It appears that it should move freely without worrying about something catching or binding.
Zoom Zoom,
John Henry
Therefore, I decided to go the cheap, (inexpensive), route, and purchase the Audio Vox unit that many have adapted sucessfully to bikes. At this point, my Norge looks like a picked over Thanksgiving turkey, having been disassembled for this and other improvements, (suspension upgrades). Anyway, the initial gut feeling is that this will be easier than I figured. After removing the emissions canister from the rear compartment under the seat, I have found that the servo unit fits perfectly there using the same clamp that held the charcoal canister that I removed. Cable routing looks to be pretty straight forward too. The vacume line from the intake manifold can probably be reused to supply the cruise. There is enough room under that side cover under the seat to allow a good enough sweep for the cable. I think I even have an idea on where to put the bracket that secures the other end of the cable in alignment with the linkage rod between the two throttle bodies.Since this is a work in progress, there will be more to come as things progress. It will also be necessary to fabricate a vacume cannister out of PVC pipe and figure a location for that as well. My initial thoughts are to put that beside the battery since I don't use that space for anything much anyway. If I can figure out a better place that will keep that useable, I'll do that. Stay tuned:
Zoom Zoom,
John Henry
This is the servo unit mounted in the place of the charcoal cannister. If it turns out I need more distance for the cable, I may point it the other direction and sweep across and down. FWIW, the same bracket that held the charcoal cannister holds the servo. (black plastic.)
This shows the cable coming out. The side trim will cover this and allow enough room for the cable to sweep without a sharp bend.
There is a bracket that will need to be attached that secures the end of the cable sheath. This bolt goes into a J nut. With a bit longer bolt, and a regular nut, I think that bracket can be attached behind. There is room to get a wrench in there to tighten a nut.
No matter how the cable routes, it needs to end up here. I figure it will pull from the linkage rod between the TB's. This puts it in alignment for that. It will, of course, be hidden underneath. It appears that it should move freely without worrying about something catching or binding.
Zoom Zoom,
John Henry