• Ciao Guest - You’ve landed at the ultimate Guzzi site. NEW FORUM REGISTRATIONS REQUIRE EMAIL ACTIVATION - CHECK YOUR SPAM FOLDER - Use the CONTACT above if you need help. New to the forum? For all new members, we require ONE post in the Introductions section at the bottom, in order to post in most of the other sections. ALWAYS TRY A SEARCH BEFORE STARTING A NEW TOPIC - Most questions you may have, have likely been already answered. DON'T BE A DRIVE-BY POSTER: As a common courtesy, check back in and reply within 24 hours, or your post will be deleted. Note there's decades of heavily experienced Guzzi professionals on this site, all whom happily give endless amounts of their VALUABLE time for free; BE COURTEOUS AND RESPECTFUL!
  • There is ZERO tolerance on personal attacks and ANY HYPERLINKS to PRODUCT(S) or other competing website(s), including personal pages, social media or other Forums. This ALSO INCLUDES ECU DIAGnostic software, questions and mapping. We work very hard to offer commercially supported products and to keep info relevant here. First offense is a note, second is a warning, third time will get you banned from the site. We don't have the time to chase repeat (and ignorant) offenders. This is NOT a social media platform; It's an ad-free, privately funded website, in small help with user donations. Be sure to see the GTM STORE link above; ALL product purchases help support the site, or you can upgrade your Forum profile or DONATE via the link above.
  • Be sure to see the GTM STORE link also above for our 700+ product inventory, including OEM parts and many of our 100% Made-in-SoCal-USA GTM products and engine kits. In SoCal? Click the SERVICE tab above for the best in service, tires, tuning and installation of our products or custom work, and don't miss our GT MotoCycles® (not) art on the BUILDS tab above. WE'RE HERE ONLINE ONLY - NO PHONE CALLS MADE OR RECEIVED - DO NOT EMAIL AND ASK QUESTIONS OR ASK TO CALL YOU.
  • Like the new V100, GuzziTech is full throttle into the future! We're now running on an all-new server and we've updated our Forum software. The visual differences are obvious, but hopefully you'll notice the super-fast speed. If you notice any glitches or have any issues, please post on the Site Support section at the bottom. If you haven't yet, please upgrade your account which is covered in the Site Support section or via the DONATE tab above, which gives you full site access including the DOWNLOADS section. We really appreciate every $ and your support to keep this site ad-free. Create an account, sign in, upgrade your account, and enjoy. See you on the road in 2024.

Rear-sets for Jackal/Stone

Nordicnorm

Cruisin' Guzzisti
GT Famiglia
Joined
May 12, 2011
Messages
397
Location
Vancouver Island BC
I have been approached by a member wanting to see the rear-sets on my Jackal. May as well post here.
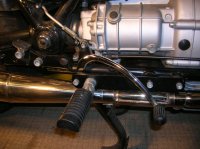
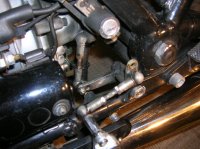
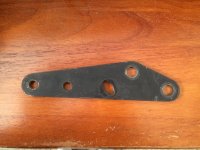
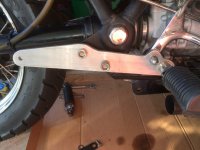
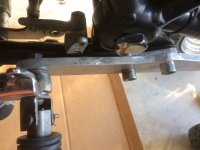
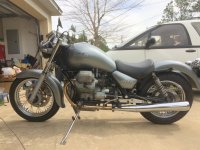
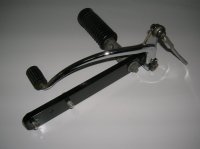
They are based on a hi grade alloy bar from the local Metal Mart, measuring 10x1.5x3/8" ($5 worth+$15 for powder coat). Uses many existing parts. I have used them for almost 10 years with no problem. I weigh 235 lbs. They rear set the pegs 6.5". The first image should give you an idea of the concept. You have to wing it for the linkage (metric sleeve nut with a threaded alloy tent-peg!) The second image needs no comment.
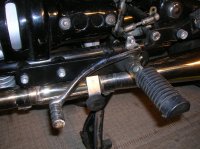
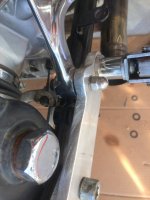
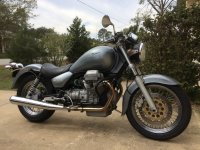
The third image shows the linkage LH/RH threaded adjusters. They are identical so an MG part, but mine cam from a wrecker off a Honda. The position of the balls on the intermediate linkage shortens up the shift lever travel as much as possible. I drilled the lower hole on the outer link for best action. Also added a sleeve nut as a "spacer" between the shift lever and the short outer rod, for a more linear pull.
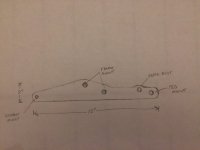
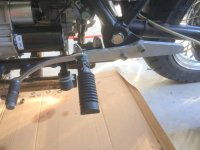
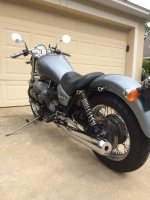
In the last image: a stopper for "The side-stand from hell". The shift lever is straight bolt-on, but for the brake lever you have to make a pivot from 1/2" o.d. pipe or similar. You may also have to relocate the passenger pegs
Works? Check. Cheap? Check. Simple? Check. Ugly? Check!
2017 Guzzi Rear sets 001 2017 Guzzi Rear sets 002 2017 Guzzi Rear sets 004 2017 Guzzi Rear sets 005
 
IMG 0607 I had a similar idea before seeing your design, coming from the other direction with an aluminum bar that also extended back to the muffler mount being retained to the frame with the 2 bolts below the swing arm pivot. I would probably use 3/8 x 2"x12" and cut out a bit of areas where the full 2" width is not needed.
Your design involves cutting off the kick stand stop.
I may just remove the bottom frame rails and cut off all the unused tabs/mounts and grind them smooth and repaint them.
Your brake lever mounting looks good. Gave me some good ideas. Thanks
 
Yes, I forgot, but the big tab for the sidestand bumper had to go. Your idea looks very sanitary, and I would love to see the outcome in the future. In my case the black powdercoat seems to "hide" the crudeness of the set-up from a distance (1/2 mile!). It certainly was a huge improvement in rideability and comfort.
The plates will flex slightly (on my set-up) when you stand up on them over railway tracks etc., but there has been no give.
Good luck with the project.
 
It doesn't look crude to me, it is a good idea. The brake pivot was a sticking point for me in deciding to go a similar route. If you can give me any more pointers on its fabrication that would be great. Did you use a bushing? Did you put zerk grease fittings on the pivots?
 
I drilled and tapped grease fittings in both the shift lever and the intermediate linkage. Didn't bother with the brake lever as it is easy to dismantle and of course does not move a lot.
For the brake lever, I used a 1/2" aluminum pipe and put another bush inside it to space it down to accommodate an 8mm bolt. Made the tube slightly long, then through several re and re I filed the length down to get a snug fit. There is little space between the nut and the frame on the backside, so a really thin fender washer and a "shallow" nut w/Locktite did the trick.
It was actually a bit of a rush-job. What I would call "Proof of concept", thinking it would need some refinement over time.
That was 9 years ago.....
 
I used 2 pieces of 3/8 inch thick aluminum bar that was 2" x 12" (cost $12) and cut and shaped it using the Jackal rear peg and muffler support as a template.
I then had to mount pivots for the shift and brake levers. I used 5/8" OD steel pipe for this. I cut off the rear part of the shift lever for the heel.
I still have a bit to do with the linkage. I ordered some heim joints from ebay for about $6 for the shift linkage and will just cut and re thread the brake rod.

I made a couple of spacers out of 1/4' aluminum to replace the 1/8" factory steel ones between the 2 bolts that hold the rear peg /muffler bracket and the frame together just below the swing arm pivot lock nuts. Just needed a bit more clearance between the new peg brackets and the frame tubes to clear everything.


IMG 0613 IMG 0608 IMG 0609 IMG 0610 IMG 0611
 
You already got the pegs in the right place now and they have been working fine for years, so why bother redoing them. If we were doing 'show bikes' then neither of ours would be acceptable.
I actually think not many are interested in what we have done with our peg setup. Most would spend $4-600 on a factory setup with all the shift controls and brackets that will bolt right up and the whole job would take 45 minutes. I spent 2-3 hours in Lowes and HD looking for the right 5/8" pipe for the brake and shift pivots and I had given up and returned home to find some steel tube in my garage that was perfect.
I took a little extra time to tap m8-1.25 threads in the brake pivot hole and shift/peg hole and then used a nut on the opposite side to tighten (see acorn nut in picture).
I get satisfaction from doing and making stuff my self. Maybe most would rather ride than work on their bikes, but I live in Florida, home of straight flat roads that go on for miles so I need projects to keep me occupied.
 
I, for one, would love to see the end result of your project. I am not a cruiser guy, and without this mod, the Jackal would never have stuck around this long. It is the difference between 300 miles a day and 500 miles (I've done 6). My Breva was born with it (I spent real money looking for the perfect handlebars w/clamps, only to revert to stock!), and approaching 70 it is no longer a deal breaker, but it has made this old lump as lovable as anything I have owned over the years.
Show us....
 
IMG 0623 IMG 0624 IMG 0625 Pegs
I, for one, would love to see the end result of your project. I am not a cruiser guy, and without this mod, the Jackal would never have stuck around this long. It is the difference between 300 miles a day and 500 miles (I've done 6). My Breva was born with it (I spent real money looking for the perfect handlebars w/clamps, only to revert to stock!), and approaching 70 it is no longer a deal breaker, but it has made this old lump as lovable as anything I have owned over the years.
Show us....
I am 63 next month but I find it more difficult to ride in a cruiser position than with a bit of forward lean and my feet below me and I also feel less in control in a cruiser position. I also have a Cal Vin that has the stock handlebars and seat but I don't really care for the riding position and the floorboards are cumbersome and I don't like a heel -toe shifter.
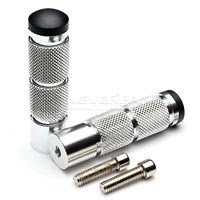
I still have a bit to do on the Jackal. I have ordered some CNC non-folding pegs to replace the folding Guzzi ones on the bike now (shown in the pictures) because my feet are always over the hinge on the pegs and it feels unsecure. I thin solid pegs will be better and they will be about 1-1/2 shorter.
For the bars I am using CNC aluminum clipons that are mounted above the top triple clamp attached to the forks that I dropped about an inch.
I want to switch to a T3/Convert gas tank with a flat bench seat. That way I will be able to slide back and forth on the seat a bit and I will have a couple of extra gallons of gas. The air box is gone so an old style tank will fit.
 
Well done!
Guzzi sure scraped the bottom of the parts bin for those folding pegs! They also stick out enough to foul my legs at a stop.
I think you will also like a higher seat. Mine is a Cal Tourer seat, and it makes the seat to peg to bars identical (within an inch or so) to my B-11, but was not a drop-in fit. The Jackal Touring seat is probably a better fit, and the seats are not overly expensive.
The old flat seats (my G-5) was extremely soft, and hence not too comfortable, but you could move around more.
Hope you enjoy the changes as much as I have.
Enjoy your ride, and thanks again for sharing.
 
Back
Top